Pages

Showing posts with label Japanese. Show all posts

Saturday, September 19, 2020

Tori Baitan Udon

 Very simple, hearty and satisfying dish loved by my family😊


Source: HERE with my modification

What you need:

For the chicken balls:
300g minced chicken
5pcs oyster mushroom, minced
2stalks spring onion, chopped
1tsp salt
1tsp mushroom stock powder
4tbsp tapioca starch
4tbsp light soy sauce

For the soup:
4 cloves of garlic, peeled and bruised
1tbsp cooking oil
1.5L water
2tsp salt
1tsp chicken stock powder
1/2 tsp pepper
4tbsp tapioca starch diluted with a little water
carrot, peel and slice

udon, prepare as per the package instruction
chopped fried garlic
chopped spring onion

Method:
  • For the chicken balls, mix all ingredients and taste test by making one small ball and boil until cooked
  • Shape into balls and dip into a pot of hot boiling water. When all done, put the pot on the stove over low fire and boil until balls are floating. Dish out and transfer to a pot with icy cold water until cool. Balls can be frozen for future use
  • For the soup, heat a pot with cooking oil and sautee garlic until fragrant. Add in water, salt, pepper, chicken stock powder, and carrot. Bring to boil over medium low fire. Check the taste. When boiling, add in tapioca starch slurry until reaching the thickness preferred
  • Just before serving, place udon in a bowl, add chicken balls, pour soup over it. Sprinkle with fried garlic and spring onion. Serve hot


Sunday, June 14, 2020

Strawberries Sando

Japanese fruity sandwich. We're obsessed by it after having them a couple of times from Family Mart


Recipe source: Honeybeesweets

For the whipping cream filling:
200ml whipping cream
30g icing sugar, sifted
125g mascarpone cheese
1tsp vanilla extract (my addition)

some slices of bread
fruits of your choice, I used strawberries
cling wrap

Method:
  1. Whip cream and sugar until soft peak, about 5mins on medium speed
  2. Add in mascarpone cheese and vanilla, and whip on low speed for 30 secs until well mixed
  3. Refrigerate for about 1hour 
  4. On a slice of bread, spread cream. Top with fruits, and cover with more cream
  5. Cover with another slice of bread. Tighten the sides and wrap with cling wrap
  6. Cut diagonally before serving


Wednesday, May 6, 2020

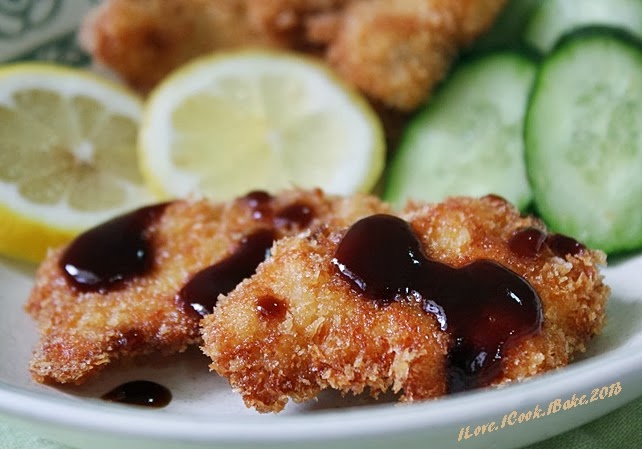
Crispy Chicken Teriyaki

The original chicken teriyaki can be viewed HERE

This is the modified kind, which my kids love too
I found the recipe in Reddit, really simple to make


What you need:
500g chicken breast
chicken teriyaki sauce (I used my homemade sauce)
2 eggs, beaten with 2tbsp milk
1cup plain flour
2 1/2 tbsp corn flour
1/2 tbsp salt
oil to deep fry

Method:
  1. Cut chicken breast as you prefer, I cut mine diagonally, almost parallel to the surface, to give the chicken more surface for easier even cooking
  2. Marinate with teriyaki sauce, enough to coat the chicken. Can keep in the fridge up to a night
  3. Before serving, heat oil in a pan
  4. Place egg mixture in a bowl
  5. Place both flours and salt in a container. Cover and shake until well mixed
  6. Transfer into a plate
  7. Dip each chicken slice into egg, followed by flour mixture, coat evenly and pinch slightly to give the chicken more wrinkly batter all over it
  8. Deep fry until golden brown for both sides
  9. Serve with rice and drizzles of teriyaki sauce. You may slice the crispy chicken into thinner parts
  10. Can add blanched brocolli and carrot to complete the look (I didn't do this) 


Thursday, April 30, 2020

Hamburg Steak


Recipe is from Japanese Cooking 101 with my own modification

What you need:

1/2 cup panko breadcrumbs
40ml milk
300g minced pork
300g minced beef
1 medium yellow onion, minced
1 small egg
a scant 1/2 tsp salt
dash of pepper
over 1/2 tsp worcestershire sauce
oil for pan frying
some teriyaki sauce for brushing (I used my homemade teriyaki sauce) mixed with water (1part sauce:1part water)
rice and teriyaki sauce to serve

Method:
  1. Mix breadcrumbs and milk, stir and set aside for a few minutes 
  2. In a large bowl, mix well minced pork and minced beef, panko breadcrumbs mixture, minced onion, egg, salt, pepper and worcestershire sauce, bang into the bowl few times until it turns smooth
  3. Divide into equal 8pieces and roll into balls
  4. Push down to flatten the steak and make an indentation in the middle
  5. Heat oil in frying pan over medium heat, place patties and fry for a few minutes
  6. Flip over and pour a little of teriyaki sauce mixture on the pan. Cover and fry for another few minutes until sauce stars to caramelize
  7. Brush the top with teriyaki sauce, flip over another time, fry for a while, about 30 seconds
  8. Remove from pan and transfer to serving plate
  9. Serve with rice and teriyaki sauce


Tuesday, April 21, 2020

Chicken Katsudon


Recipe is from Japanese Cooking 101

What you need:

4pcs ready to eat chicken katsu (recipe HERE)
1 large yellow onion, thinly sliced

Sauce:
1cup dashi stock*
4tbsp soy sauce
2tbsp sugar
2tbsp sake
2tbsp mirin

4eggs
vegetables of your choice (I used brocolli)

Sprinkle (optional):
chopped spring onion
shredded seaweed
(I didn't have any, so I skipped)

Method:
  1. In a shallow pot, bring to boil onion and seasoning over medium heat
  2. When it's boiling, reduce heat to low and simmer until onion softened, about 5mins
  3. Off heat and set aside
Before serving:
  1. Using a small pan, pour one serving ladle or two of the sauce, bring to boil over low fire
  2. Add in 1pc chicken katsu, put at the centre
  3. Crack an egg in a small bowl and beat lightly. Pour all around the chicken katsu. You may add any vegetable of your choice too in this step. I added brocolli
  4. Cover the pan and let it cook for 1minute or so
  5. Slide the chicken katsu mixture over a plate of rice. Sprinkle garnish. Serve immediately

*Note:
Dashi stock can be made using instant dashi stock packet or powder
I didn't have one, but I happened to have kelp and bonito flakes, so I made homemade dashi
Source: Just One Cookbook

What you need:
  1. 10g dried kelp, do not wash and wipe away the white powdery substance, that is what creates the umami-ness. Make some slits for more flavour
  2. 4cups water
  3. 10g dried bonito flakes

Method:
  1. In a pot, heat water and kelp. Just before boiling, remove kelp (otherwise it'll be slimy and bitter)
  2. Add in bonito flakes and bring to boil. Off fire and leave it for 10minutes. Strain the liquid
  3. Unused stock can be kept for a few days in the fridge


Monday, April 13, 2020

Easy Chicken Yakiniku


Recipe is from Just Try & Taste with some adjustment


What you need:

600g chicken breast, diced
5 cloves of garlic, minced
1 large yellow onion, thinly sliced
a large thumb sized old ginger, lightly pounded

Sauce, mix together:
3tbsp oyster sauce
3tbsp dark sweet soy sauce
1.5tsp sesame oil
1/2 tsp pepper
1tsp chicken stock powder
3tbsp light soy sauce
3tsp sugar
1tsp salt
1tbsp dark soy sauce
600ml water

Method:
  1. Heat oil in a pan, sautee garlic and ginger until fragrant, followed by onion, let cook until soft and fragrant
  2. Add in chicken and cook until color changed
  3. Add in sauce mixture and let cook until gravy lesser
  4. Adjust the taste and serve


Thursday, May 14, 2015

Bake Along #78 3 Ingredients Souffle Japanese Cheesecake

Oh! Bake Along is 4! How time flies! This year we celebrate with cheesecakes!
This easy 3 ingredients soufflé Japanese cheesecake has been pretty popular and tried by quite a number of bakers
Original recipe is from Ochikeron, one of You Tubers I like and subscribe :)


Somehow my top didn't brown enough. I guess I should have put the pan a little higher in the oven during baking or perhaps need to bake longer in my oven. Should try again :)


But regardless of that, this cake is really yummy. Light, moist, melt in the mouth and a very nice balance between the taste of the cream cheese and white chocolate. FYI, I'm not a fan of white chocolate. I am a dark chocolate eater. But I love this cake :)


What you need:
 
125g cream cheese, softened (I used Philadelphia light cream cheese)
120g white chocolate (I used Cadbury brand)
3 large eggs, cold
 
Method:
  1. Preheat oven to 170degC. Line the sides of 6" round pan with oiled parchment paper
  2. Separate egg yolks from the whites
  3. Put chopped white chocolate in a bowl and melt in double boiler using a very hot water, mix til smooth. Add in cream cheese and mix well. Add in egg yolks and stir well
  4. In another bowl, beat egg whites til firm peak. Mix 1/3 of the whites to the yolks mixture til well incorporated
  5. Add in the remaining whites and fold in gently til mixed
  6. Pour batter into the pan and water bath for 15 mins. After 15mins reduce temperature to 160degC and bake for further 15mins. Turn off the oven and leave the pan in the oven for another 15mins
  7. Remove from oven and let cool in the pan before transferring to cake container
  8. Chill in the fridge for a few hours before serving
  9. Just before serving, sieve icing sugar over the cake. Slice and serve

A bite for you?


This post is for Bake Along, an event organised by Joyce from Kitchen FlavoursLena from Frozen Wings and Zoe from Bake For Happy Kids


I'm also submitting this post to the Best Recipes for Everyone May 2015 Event (Theme: My Favourite Desserts) organized by Fion of XuanHom's Mom and co-hosted by Aunty Young. Link is HERE


Saturday, May 10, 2014

Dorayaki - Finally, The Recipe That Works!

First time I tried making dorayaki was close to 3 years ago and I wasn't too pleased with the result
Finally, after a few times experiments, I discovered the recipe that gives me dorayaki with the texture I want :)


Giant dorayaki LOL - I used chocolate custard as filling as Abby only like red beans in Japanese mochi and Ian dislike red beans totally


Nom nom nom... soft, fluffy and yummy!


Recipe is derived from Dailydelicious and Nami from Just One Cookbook

What you need:

4 eggs
140g sugar
2 tbsp honey
160g cake flour
1.5 tsp baking powder
3 tbsp water
enough oil for greasing

Method:
  1. Sift cake flour and baking powder together, set aside
  2. Mix well eggs, sugar and honey in a bowl and beat til fluffy
  3. Add in flour mixture and mix well. Keep in the fridge for 15mins
  4. Stir in 1/2 tbsp of water one at a time, it should be thicker than pancake batter, otherwise it won't be fluffy
  5. Heat a non stick pan on medium heat, dip paper towel in oil, coat the pan. It should be slightly oiled but not visible to get nice texture
  6. Drop batter about 30cm above the panto create 3 inches round of pancake. When the surface bubbles, flip and cook the other side
  7. Transfer to a plate and cover with damp towel to prevent from drying. Repeat the process til batter finished
  8. Scoop filling and place at the centre part of the dorayaki, cover with another piece of dorayaki on top and slightly press the centre so the filling spread and then continue to press the sides gently
  9. Immediately wrap in clingwrap individually til ready to serve

For the chocolate custard recipe, please view HERE


Oishi!


My wish to all mothers out there (including myself), HAVE A GREAT MOTHER'S DAY! :)

Tuesday, October 29, 2013

AFF Japan - Zaru Soba (Cold Soba Noodles)

Love this! Always do!
Soba noodles is made from buckwheat flour, well known for its healthier option in eating noodles
Ideally served with tempura. However, take out tempura from the picture, with minimum ingredients to go along, it's a surprise that people can enjoy eating this dish on its own


Recipe is from HERE

What you need:

200g dried soba noodles

Dipping sauce:
Soba sauce (Mentsuyu) - store bought or homemade:
  • 1/2 cup sake
  • 1 cup + 2 tbsp mirin
  • 1 cup soya sauce
  • 12 x 2 inches kombu (kelp)
  • 1 cup packed Katsuobushi (bonito flakes)
In a medium saucepan, add sake and bring to boil (high medium heat). Let the alcohol evaporate for a few seconds
Add mirin and soy sauce. Then add kombu and katsuobushi
Cook on low heat for 5 minutes. Turn off the heat and set aside until cool down
Pass the mixture through a fine sieve***
The sauce is ready to use
(You may dilute the dipping sauce with dashi stock or water if you prefer less saltier version. To me, just like what Nami described, the sauce is for alright since it's used to dip the noodles, not to soak)

Topping:
finely chopped spring onion
wasabi paste
finely shredded nori sheets

Method:
  1. To prepare for soba noodles: boil a lot of water in a large pot. There's no need to add salt to the water. Add dried soba noodles in the boiling water in circulate motion, separating the noodles from each other. Boil soba noodles according to the package instructions (each one is slightly different) (mine is 4-5 minutes). Once in a while stir the noodles so they don’t stick to each other. Check the tenderness and do not overcook
  2. Drain the noodles into a colander and wash the noodles in a cold running water (I kept the noodles in the fridge for a few hours as well as the dipping sauce)
  3. Serve the noodles with topping and dipping sauce

***The used kombu (kelp) and katsuobushi (dried bonito flakes) after you make Mentsuyu can be used to make delicious furikake (rice seasoning). HERE is the recipe
Mix everything


Ready to eat! Slurp!


I'm also submitting this post to Little Thumbs up organised by Doreen from my little favourite DIY and Zoe from Bake for Happy Kids, hosted by Mich from Piece of Cake at this post


Monday, October 28, 2013

AFF Japan - Yakisoba

A simple dish and very easy to enjoy. I love it. The whole family does, too. I can't be happier :)


Recipe is from HERE

What you need:
(with some modification to suit my preference)

5 large shitake mushrooms (or 8 medium)
1/2 onion
1 medium carrot
2 spring onions
5 cabbage leaves
200g chicken breast meat
2 tbsp oil
ground black pepper
8 tbsp homemade yakisoba sauce (***see note below for the recipe)
1 package (of 3) yakisoba noodles
Topping: dried green seaweed powder (aonori)

Method:
  1. First, quickly run hot water over the noodles if they are stuck together from the package (mine was not so I skipped this step)
  2. Cut meat into 1 inch cubes. Cut mushrooms as you prefer (I cut into 3 or 4 depending on the size). Julienne onion and carrot. Cut spring onions into 3cm strips. Chop cabbage leaves into pieces
  3. Heat oil in the frying pan (medium high heat). Add in chicken and cook til change color and no longer pink
  4. Add in onion, stir and cook for 30 secs. Add in carrots and continue to cook til soft
  5. Add in mushrooms, stir well and cook for 30 secs. Add in cabbage, stir well and cook til soft
  6. Add black pepper and 3 tbsp of yakisoba sauce, mix well
  7. Lower heat to medium. Add in noodle and separate each other with wooden spoon or chopsticks. Keep stirring and make sure not to burn the bottom of the pan
  8. Add more yakisoba sauce, adjust the amount of sauce according to your preference. Mix all together using a tong (I used 8 tbsp as instructed)
  9. Serve on a plate and garnish with dried seaweed powder. Serve immediately

***Homemade yakisoba sauce:
(makes 9 tbsp) from HERE

9 tbsp oyster sauce
3 tsp soya sauce
3 tsp sugar
3 tsp sesame oil
3 pinches of salt
ground black pepper

Combine all the ingredients in a small bowl and whisk together. Adjust the sauce according to your liking (I didn't do any adjustment as I find the taste is good enough)


I'm also submitting this post to Little Thumbs up organised by Doreen from my little favourite DIY and Zoe from Bake for Happy Kids, hosted by Mich from Piece of Cake at this post


Saturday, October 26, 2013

AFF Japan - Chicken Teriyaki

When I cooked this dish, Ian's complaint was why the chicken wasn't crispy
I discarded the skin, perhaps that's why this chicken teriyaki lost its cispiness
He always prefer those not so authentic kind of chicken teriyaki sold in many places in Singapore where the chicken is deep fried and then drizzled with teriyaki sauce
Despite the comment, he ate a big plate of it twice - lunch and dinner
He said, it's nice. I asked him, I thought you prefer the crispy type? His answer was, I like both LOL
Abby is not a fan of Japanese food. She doesn't even eat sushi at all
She'll eat only those deep fried kinds and also ramen or udon soup. Those don't smell or taste 'too Japanese'
But this time she ate a lot, twice too - lunch and dinner. I asked her, is it nice? She answered, oh yes, it's yummy. I said, that's Japanese chicken teriyaki, you know. She said, I like!
Looks like this dish gonna be served regularly at home from now on :)


Recipe is from Nami from Just One Cookbook

What you need:

2 chicken thigh and 1 chicken breast (skinless and boneless) (original recipe uses the skin to get some crispiness, I usually cook chicken with no skin for healthier option, also DH and I do not really like the texture, but the next time I cook this dish again I'll try to use the skin - crispy chicken skin should be good hehe...)
2 tbsp sake (for steaming)

Marinade sauce:
2 tbsp soya sauce
2 tbsp water
1 tbsp sake
1 tbsp mirin
1 tbsp sugar
1 small onion (or 1/4 from a large onion), grate and include the juice
1 inch ginger, grate and include the juice

Method:
  1. Rinse chicken and cut into small pieces. Prick the chicken with fork (not the skin side)
  2. Cut the chicken thigh into 4 pieces
  3. Combine marinade sauce ingredients into a ziplock bag. Add in the chicken and marinade for 3 hours (store in the fridge)
  4. Heat oil on medium high in a large skillet. Place the chicken (skin side down). The marinade will burn easily. Don't add any liquid. Don't throw the marinade sauce
  5. When the skin side is nicely browned, flip the chicken (skin side up). Add in sake, cover up the skillet and cook for 8-10mins
  6. Remove the chicken to a plate and clean the skillet (mine was too difficult to clean just with a kitchen paper so I used another frying pan)
  7. Heat a little bit of oil and put the chicken to the skillet, skin side down to make it crispy
  8. Then flip again (skin side up) and pour marinade sauce. Cook until the sauce reduced a bit. Use spoon to pour on top of chicken a couple of times while you are cooking
  9. Serve the chicken and pour sauce on top of the chicken (mine only had very little thick sauce leftover) 


Ian loves to have lots of teriyaki sauce whenever he eats this dish, hence I made homemade teriyaki sauce, too

I know that the general rule to make homemade teriyaki sauce is to combine same amount of soya sauce, sake and mirin and add sugar to our preference. Grated ginger and garlic can be added too
But I saw this recipe Nami shared, she mentioned that this one is more similar to American store-bought teriyaki sauce. Curious about how different it is from the original recipe
It's a kind of similar, actually - maybe a little milder. Perhaps only Japanese can tell the difference LOL

Recipe is from HERE

What you need:

4 tbsp soya sauce
4 tbsp mirin
2 tbsp sugar
2 tsp corn starch
2 tbsp water

Method:

In a small saucepan, combine sugar, mirin and soya sauce, bring to boil
In a small bowl, combine corn starch with water till well mixed. Add the mixture into the sauce
Quickly whisk the sauce to evenly distribute the corn starch mixture
Stir the sauce while it's being reduced to the consistency you like


Also, since this dish used up 2 tsp of soya sauce, I'm submitting this post to Little Thumbs up organised by Doreen from my little favourite DIY and Zoe from Bake for Happy Kids, hosted by Mich from Piece of Cake at this post


Friday, October 25, 2013

AFF Japan - Soboro Donburi

This dish is so easy to make and so delicious, too!
When you have no idea what to cook and don't have enough much time for cooking, this dish is must be considered! Both young and old will definitely enjoy :)

Saw Veronica from Peng's Kitchen cooked this inspired by Nami from Just One Cookbook


I love to see the pea on top, I found it cute :P
Oh yes, I'm left handed LOL


What you need:

2 cups japonica (Japanese rice), cook according to the instruction
3 eggs
salt, pepper
200g minced chicken
1 tsp grated ginger with juice
1 tbsp sake
2 tbsp sugar
1 tbsp mirin
2 tbsp soya sauce
cooking oil
some defrosted green peas
shredded dried seaweed for garnish

Method:
  1. Heat 1 tbsp oil on a frying pan over medium heat. Add in minced chicken and cook until almost cooked through. Using wooden spoon, break the chicken into small pieces
  2. Add sake, sugar and mirin, soya sauce and lastly, grated ginger with the juice
  3. Continue to cook until liquid is 98% gone. Transfer to a bowl and set aside, wash the pan
  4. Break the eggs in a bowl, sprinkle salt and pepper and beat with fork
  5. Heat 1 tbsp of oil in a frying pan and pour egg mixture. Using several chopstick held together, break the egg into small pieces. Transfer to a bowl and set aside
  6. Serve rice in a bowl and put the toppings on top of the rice. Garnish with dried seaweed
Note:
  1. Nami used 1 tbsp sugar to mix in 2 beaten egg for the scrambled egg. I omitted the sugar and replaced with salt and pepper
  2. Garnish can be anything that you like.. shredded seaweed, pickled ginger, furikake, or anything you prefer

This post is for Asian Food Fest October 2013: Japan hosted by Alan from Travelling Foodies


Also, since this dish used up 2 tsp of soya sauce, I'm submitting this post to Little Thumbs up organised by Doreen from my little favourite DIY and Zoe from Bake for Happy Kids, hosted by Mich from Piece of Cake at this post

Saturday, October 19, 2013

AFF Japan - Japanese Salt Grilled Eryngii Mushroom (Kinoko no shioyaki)

Do you love mushroom? I do. Very much. All kinds of mushrooms
If you are like me, you will enjoy eating this dish


Recipe is from Sonia from Nasi Lemak Lover
Thank you for sharing. I always see this mushroom in the supermarket but never try it
No clue that it's a popular dish in Japan during autumn

Also well known as king oyster mushroom, I bought two packs, each pack of 2 (200g) is $1.85
It's really yummy and oh so simple to make
Indeed the texture is like eating abalone :)

What you need:

2 pcs of eryngii mushrooms, slice each piece into 3 thick slices
2 small cubes of salted butter
sea salt
crushed black pepper
1/2 tbsp sake

Method:
  1. Heat pan over medium high heat. Place butter and let it melt. Arrange sliced mushrooms - cut side down, and let cook for 2 mins for each side. This is to get a nice golden brown color on the mushrooms
  2. Sprinkle with salt and pepper. Cover pan and let cook further for another 2 mins
  3. Sprinkle with sake, leave it for 30 seconds
  4. Dish out and serve

I cooked this dish twice, once for dinner and another time for breakfast - yes, breakfast :)
And I still crave for more. Yum! :)


This post is for Asian Food Fest October 2013: Japan hosted by Alan from Travelling Foodies

Monday, October 14, 2013

AFF Japan - Chicken Katsu

Another deep fried Japanese dish my family always enjoys :)


Recipe is from Nami from Just One Cookbook (the blog I visited the most this month LOL)
 
What you need:
 
3 chicken breast
2 tbsp sake
salt, black pepper
all purpose flour
2 eggs
panko breadcrumbs
oil for deep frying
 
Method:
  1. Rinse the chicken and pat dry with paper towel. Slice the chicken diagonally. This cutting technique is called “Sogigiri” in Japanese. Each piece will have more surface area so it will cook faster
  2. Put the chicken in a bowl and add sake, salt, and pepper. Set aside for 15 minutes
  3. Dust the flour on the chicken and remove excess flour
  4. Then dip it in beaten egg. Lastly, dredge the chicken in panko and remove the excess. If you have time, let the chicken sit in the refrigerator for 15 minutes
  5. Heat oil. Temperature should be 180degC. Read How To Deep Fry Food
  6. Put 2-3 pieces of chicken in at a time. If you put too many chicken pieces, the temperature of oil will drop too quickly and the chicken will end up absorbing too much oil
  7. Deep fry until both sides are golden brown, about 5-6 minutes. Then transfer to a wire rack or paper towel-lined tray to remove excess oil
  8. Between batches, make sure to pick up breadcrumbs. When you don’t pick them up, the breadcrumbs will get burnt and the oil will get darker. Make sure to keep the oil clean throughout deep frying


For the tonkatsu sauce, I made homemade version from Nami
Taste just like the store bought one - delicious!

What you need:

2 tbsp. worchestershire sauce
2 tbsp. ketchup
1 tbsp. oyster sauce
1 1/2 tsp sugar (original recipe 1 1/8 tsp)

Combine all ingredients above til well mixed


This post is for Asian Food Fest October 2013: Japan hosted by Alan from Travelling Foodies


Wednesday, October 9, 2013

AFF Japan - Karaage - Japanese Fried Chicken

I occasionally grabbed a bag of chicken karaage from supermarket frozen section for this, and I must observe every bite in case I see chicken skin
Yes, I hate chicken skin I always discards it in my every chicken dish. Hence my family doesn't eat it, either

This is the more garlicky version from Nami of Just One Cook Book
Yes, I love garlic I usually add a little more than suggested by recipe. Hence my family loves it, too

Hhhmmm... two similar sentences in one posting. Talking about the power of mum LOL

So satisfied with the result of my first trial of making karaage
Homemade is always the best. No unknown substances added, no foreign ingredients I never hear about used. Yes!


What you need:

500g skinless boneless chicken thigh
salt, ground black pepper
1/4 cup potato starch
1/4 cup plain flour
oil for deep frying

Seasoning:
1 inch ginger
8 cloves of garlic
1 tbsp light soya sauce
1 tbsp sake
1 tsp sesame oil
1 tsp sugar

Method:
  1. Rinse chicken, pat dry with paper towel and cut into 2 inch pieces (try to cut in almost uniform sizes so frying time will be the same). Season with salt and pepper and keep in a ziplock bag or an airtight container
  2. Grate ginger and garlic (I used chopper)
  3. Add in ginger and garlic to the chicken and the seasonings too. Keep refrigerated (covered) for at least an hour
  4. Heat oil to 170degC
  5. In a bowl, mix potato starch and plain flour
  6. Right before the oil is ready, add the potato starch and flour mix to the chicken. You do not need to mix it evenly. The uneven coating gives each piece its unique texture
  7. Gently drop each piece of chicken separately into the oil. Do not overcrowd. Deep fry 3-5 pieces at a time. If you put a lot of chicken in the oil, the temperature will drop quickly and chicken will end up absorbing too much oil
  8. Cook for 90 seconds, or until the chicken is cooked through and outside is light golden color. If the chicken changes color too quickly, then the oil temperature is too high. Either put a few more pieces of chicken in the oil or lower the heat. Controlling oil temperature is the key for deep frying
  9. Transfer the chicken onto a wire rack to drain excess oil. While resting on the wire rack, the chicken will continue to cook with the remaining heat
  10. Between batches (or even while cooking), make sure to pick up crumbs to keep the oil clean (otherwise oil will get darker)
  11. When you finish all the batches, then bring the oil to 180C
  12. Deep fry for the second time for 45 seconds, or until the skin is nice golden color and crispy
  13. Transfer the chicken onto a wire rack or paper towel to drain excess oil. Serve the chicken immediately

As explained by Nami:
Using potato starch gives crispier karaage than corn starch, even though it's a good substitute. Also, please take note that potato flour is different from potato starch

I also must thank Nami for the detailed explanation about deep frying, very useful!


Sunday, December 11, 2011

Bake Along #14 - Dorayaki - Japanese Pancakes

This time round I'm so very late for Bake Along event, lucky I managed to squeeze time to make some for breakfast this morning phew...

Dorayaki has been one of requests by Abby, my girl, since the first time she ate one at NEX, luckily I could find one tested recipe
Over there one counter sells a nice quality dorayaki with various toppings
I particularly love chocolate, greentea, cream cheese and of course the original red bean paste fillings
Abby loves chocolate - only, so I made chocolate filling, only :)


Recipe is from Daily Delicious with chocolate custard filling
Here's the recipe for the filling:

20g cornflour
20g plain flour
70g sugar
2 egg yolks
300ml fresh milk
unsweetened cocoa powder mixed with a little hot water (quantity as desired, I used 2 heaped tbsp of cocoa)
1 tsp chocolate emulco

Mix egg yolks and sugar also milk, put in a pot on low heat, stir til mixed well
When already hot, add in cornflour and plain flour, stir til incorporated, followed by cocoa mixture and chocolate emulco, stir well and let it cooked - keep on stirring til smooth

Personally, I found this recipe did give a delicious dorayaki but it didn't really yield as soft and fluffy texture as I expected to be. Some experiments with adjustment in the ingredients should be done

Please hop on Lena, Joyce and Zoe's sites who host this event for their delicious treats too :)

LinkWithin

Related Posts Plugin for WordPress, Blogger...