Pages

Showing posts with label LBT. Show all posts

Saturday, April 22, 2017

Banana Peanut Butter Chocolate Quick Bread

When you cannot decide whether to have chocolate or banana or peanut butter, have them all in one cake! Quick bread, in this case :)


Recipe is from IG @neuroticmommy


What you need:
 
1/3 cup creamy peanut butter, melted
3/4 cup sugar
3 medium bananas, mashed
1 tsp vanilla extract
1/2 cup cooking oil (I used rice bran)
2 eggs
1/2 cup cocoa powder
1 tsp baking soda
1 tsp baking powder
pinch of salt
1 cup whole wheat pastry flour
2 bananas, sliced for topping
a mixture of sugar and brown sugar to caramelize the bananas for topping
Option for topping: drizzle of melted warm peanut butter, and melted dark chocolate
 
Method:
  • Preheat oven to 175degC. Grease and line loaf pan (20x10cm)
  • Mix in peanut butter, banana, vanilla, oil, eggs. In another bowl, mix in sugar, cocoa, baking soda, baking powder, salt, flour
  • Pour in wet ingredients into the dry ingredients and mix until just combined
  • Bake for about an hour until the skewer test comes out clean
  • For the banana topping: In a small glass pot, combine sugar mixture and sliced bananas and cook over low heat til sugar melted and slightly caramelized
  • Just before serving, scoop the topping over the slice and serve. Best to serve warm

Banana bread-gasm LOL


This post is for LBT (Let's get Baking Together), a baking group which I joined years back, and when I searched for my last participation it was May 2014! Gosh! Hope I don't miss much :)
This month's theme is banana cake. Enjoy!

Friday, May 16, 2014

Soft Cinnamon Pretzel - In Just 30 Minutes!

This is my second soft pretzels. The first one I baked, it took me about an hour and a half. This recipe saves 2/3 of the time. Yes, only 30 mins! And the result is very very close!
I am a happy girl :)


I always like my soft pretzels fat! And I sprinkled way too much of cinnamon, but I love cinnamon, so that's good!:)


Recipe is from Sally's Baking Addiction

What you need:
(below is half recipe with some modification, yielded 4 fat pretzels)

3/4 cup lukewarm water
1 1/8 tsp active instant yeast
1/2 tsp salt
1/2 tbsp sugar
1 3/4 cup + 1/8 cup bread flour
1/8 cup bread flour (or plain flour) for kneading
3 cups of water
1/4 cup of baking soda
1 tbsp butter, melted
some mixture of brown sugar and ground cinnamon for sprinkling

Method:
  1. Dissolve yeast in lukewarm water, stir with a spoon about 1 minute. Some clusters of yeast will remain. Add sugar, stir
  2. Mix salt and flour. Stir in 1 3/4 cup flour mixture gradually. Add in the remaining 1/8 cup flour. You will find the dough is not sticky anymore. Poke it, if it bounces back, it's ready for kneading
  3. Preheat oven to 220degC. Line baking sheet
  4. Knead the dough on floured surface for 3 minutes and shape into a ball. Cut into 4 parts (the number of parts depends on how big / small you want your pretzels to be)
  5. Roll one part of the dough til forms a long rope. Take the ends and draw them together so it forms a circle. Twist the ends and bring them towards you, press them down into pretzel shape
  6. While doing the kneading, boil the water and sprinkle baking soda, stir
  7. Dunk the pretzels one by one for about 30 seconds each
  8. Bake for 10 minutes. Remove from oven and brush the pretzels with melted butter, sprinkle the cinnamon sugar mixture
  9. Put it back in the oven for another 5 minutes


Texture is the same as those recipes with proofing, soft with slight chewiness
One thing is, this pretzel is best eaten on the day of baking. It's a little harder the next day but reheating will give back the soft texture :)


This post is for LBT
The challenge for this month is soft pretzel


Look, I've wasted quite a bit of cinnamon sugar mixture :)

Tuesday, February 25, 2014

Bacon Onion & Cheese Quiche

This recipe has been in my to do list for ages
It's from one of my favourite blog, Joyce from Kitchen Flavours
Just like her, as much as I love pies, be it sweet or savoury, I am not too excited with the process of making
This is in fact only my second time in my adventure in kitchen baking savoury pie :)
It happens that this month challenge for Let's get Baking Together (LBT) is savoury pie, time to kick my butt and bake one LOL


What you need:

For the pastry:
200gr plain flour
1/2 tsp salt
90g cold unsalted butter, diced
4tbsp cold water

For the filling:
25g butter
1 large onion, thinly sliced
4 back bacon, chopped
3 eggs
300ml half and half
1/4 tsp freshly grated nutmeg
90g a mixture of Cheddar and Monterey Jack cheese - grated
salt and black pepper

Method:

Making pastry:
  1. Sift the flour and salt into a small bowl. Rub or cut in the butter until the mixture resembles fine breadcrumbs. Add 3 tbsp of the water and mix to a firm dough, adding more water if required. Knead until smooth, wrap in plastic wrap and chill for 20 minutes
  2. Roll out the dough on a clean, lightly floured work surface and use to line a 9in loose-based quiche pan. Press the pastry firmly into the sides and base of the tin and let it rise above the rim by about 1cm to allow for a little shrinkage during cooking. Prick the pastry base all over with a fork
  3. Line the pastry case with baking paper and baking beans and chill again for about 15 minutes. Preheat the oven to 200Cdeg with a baking sheet placed in it. Stand the quiche pan on the baking sheet and bake blind for 15 minutes
  4. Remove the foil and beans from the pastry case and return it to the oven for a further 5 minutes. Remove the pastry case from the oven and lower the oven temperature to 180degC
Making filling:
  1. Melt the butter in a large, heavy frying pan. Add the onion and chopped bacon, and sautee for about 10 minutes until the onion is soft and golden. Beat the eggs and the half and half together in a bowl. Add the grated nutmeg and seasoning to taste
Spoon the onion mixture into the cooked pastry case and evenly sprinkle over the cheese. Pour the egg and cream mixture slowly over the filling. Bake the quiche for 35-40 minute, or until the filling has just set. Remove from the oven, leave to cool, then gently ease the quiche out of the tin and transfer to a serving plate...YUM YUM!


Sunday, January 19, 2014

ABC January 2014 - Chocolate Cheesecake Brownies

Our first bake of the year for Avid Baker's Challenge (ABC)
This year of 2014 we continue baking great recipes from King Arthur Flour (KAF)
And the first bake chosen was this delicious fudgy chocolaty with yummy cheese topping brownies


I followed the recipe making half recipe with some changes:
For the brownie batter:
* I used 180g sugar (reduced from 224g for half recipe)
* I omitted chocolate chips
For the cheese batter:
* I used 60g caster sugar (reduced from 75g for half recipe)
* I used 1 tbsp plain flour (reduced from 29g for half recipe)
* I used whipping cream instead of heavy cream

For full recipe, it's required to use 9" x 13" pan
I did half recipe and used a rectangle pan which was a little too small. Hence the tall brownies. Luckily it didn't overflow during baking :)

Please view the full recipe HERE

My family loves this indulgence. DH still mentioned that it's a little too sweet to his liking but I found it's just nice. Who can enjoy brownies with no sweetness at all, anyway? LOL

This post is for Avid Baker's Challenge January 2014, a baking event hosted by Hanaa from Hanaa's Kitchen


You see the birthday decoration on the brownies?
I would like to dedicate this bake to Let's get Baking Together (LBT) to celebrate its 3rd year birthday. HAPPY BIRTHDAY LBT :)


Lastly, this post is also for Little Thumbs up organised by Zoe from Bake for Happy Kids and Doreen from My Little Favourite DIY, hosted by me, Alice from I Love.I Cook.I Bake


Friday, December 20, 2013

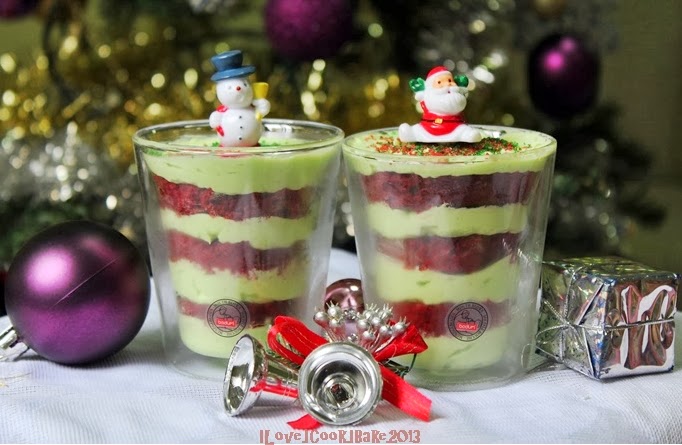
Red Velvet Cake With Cream Cheese Frosting In Jars

This month's challenge for LBT event, Cake In A Jar
I have no mason jar. Most of my glass jars from store bought jam or pasta sauce were disposed. I have a few but it's already used for my homemade jams
So in the end these are the "jars" I used :)


Layers of red velvet cake and cream cheese frosting
To make it looks more Christmas-ey I added a little green food coloring on the frosting :)
Sprinkled with red and green sand sugar, poked little Santa and Snowman cupcake topping and that's it :)


Layering them one by one in the jar is not so simple. Let alone make it neatly arranged. So I am pretty satisfied with this outcome :)


Recipe for the cake is from Joy Of Baking and the frosting is from Eugenie's Kitchen
 
Red Velvet Cake
 
What you need:
(below is full recipe, I only made half)
 
250g cake flour
1/2 tsp salt
2 tbsp. cocoa powder
113g unsalted butter, room temperature
300g sugar
2 large eggs
1 tsp vanilla extract
240ml buttermilk
2 tbsp liquid red food color (I mixed 1:1 noel red and cochineal red)
1 tsp white distilled vinegar
1 tsp baking soda
 
Method:
  1. Preheat oven to 175degC. Put the rack in the middle of the oven
  2. Butter two 9" round cake pans, line the bottoms with parchment paper
  3. Sift flour, salt and cocoa together. Set aside
  4. Beat butter til soft (2 mins). Add in sugar, beat til light and fluffy (about 3-5 mins)
  5. Add in egg, one at a time, beat well after each addition, scrape down the sides
  6. Add in vanilla extract, beat til combined
  7. Whisk buttermilk with red color
  8. With mixer in low speed, alternatively add in flour mixture and buttermilk to the butter mixture in 3 additions (beginning and ending with the flour)
  9. Combine vinegar and baking soda in a small bowl. Let it fizz then quickly fold into the cake batter
  10. Pour on the pans, smooth the tops. Bake about 30 minutes til skewer comes out clean
  11. Cool on the wire rack in the pans for 10 mins and remove from pan
  12. Cool further on wire rack
 
Cream Cheese Frosting
 
What you need:
 
113g unsalted butter, room temperature
100g icing sugar (original recipe: 125g)
200g cream cheese (original recipe: 142g)
1/2 tsp vanilla extract (or zest of 1 lemon)
 
Method:
  1. In a bowl add cream cheese, butter and icing sugar, also vanilla or lemon zest
  2. Cream together til homogenous
 
To assemble:
  1. Spoon frosting to the bottom of the jar, smooth the top. Place rounded cut piece of cake (thickness about 1 inch). Spoon more frosting on top of the cake, smooth the top
  2. Continue til there are 3 layers of cake. Last layer on top should be the frosting
  3. Decorate as desired
  4. My "jar" is wider at the top so the size of each cake is different. The bottom layer is 5cm, middle layer is 5.5cm while the top layer is 6cm
 

Oh yum! Such a sinful indulgence!


I'm also submitting this post to Baby Sumo's Christmas Recipe Collection 2013 hosted by hosted by Baby Sumo of Eat Your Heart Out


Sunday, November 24, 2013

Triple Chocolate Biscotti

This month's LBT challenge, biscotti
Recipe is from Dorie Greenspan via Brown Eyed Baker
So good, so chocolaty, especially eating it dipped in black coffee in the morning...heaven!


What you need:
(below is half recipe)

1 cup plain flour
1/4 cup unsweetened cocoa powder
1 tbsp instant espresso powder
scant 1/2 tsp baking soda
1/4 tsp baking powder
1/2 tsp salt
45g unsalted butter, room temperature
1/2 cup fine sugar
1 large egg, lightly beaten
1/2 tsp coffee emulco (original recipe: vanilla extract)
1/2 cup chopped white chocolate (original recipe: chopped almond)
57g semisweet chocolate chips
Demerara sugar, for dusting (original recipe: sugar)

Method:
  1. Place oven rack in the centre and preheat oven to 180degC. Line a baking sheet
  2. Sift flour, cocoa, espresso powder, baking soda, baking powder and salt
  3. Beat butter and sugar (medium speed) til pale, about 2 mins
  4. Add in egg and coffee emulco, beat another 2 mins
  5. Reduce speed to low and add in the dry ingredients in 3 additions, mix only til a dough forms
  6. Add in white chocolate and chocolate chips, mix
  7. Turn the dough onto a work surface, knead for awhile
  8. Roll dough into about 12 inches long log. Carefully transfer onto the baking sheet
  9. Flatten it with the palm of your hand, til it's about 1 inch high and about 2 inches across and sort of rectangular. Sprinkle the log with Demerara sugar
  10. Bake the log for about 25 mins, til it is just slightly firm. The log will spread and crack, it's fine
  11. Remove baking sheet from the oven, put it on a cooling rack and cool the log for 20 mins (leave the oven on)
  12. Using a long serrated knife, cut the log into slices about 3/4 inch thick. Stand the slices up on the baking sheet and bake the cookies again for 10 minutes
  13. Transfer to cooling rack, let cool completely and keep in an airtight container

It's really good to eat it plain - the use of butter in the recipe resulting in a crunchy biscotti but not as hard as those biscotti recipes without butter
Anyway biscotti is supposed to be hard, because traditionally it's eaten as a breakfast sweet treat dipped in black coffee
For this biscotti is no exception, either. It's super yummy to eat it after dipped in black coffee :)


Who can resist this??? Chocolate and coffee lovers, this is a must try!
 

Friday, October 11, 2013

Kue Satu

It's been a while since the last time I did my 'homework' for LBT, the last post was in March!
So glad the group has been restructured to keep up the flame alive :)

So, this is the task of the month
A very traditional Indonesian cookies mostly enjoyed by my parents' generation
Honestly, I never get the chance to taste this
Now that I know, I must say it's not bad - taste wise, but not the kind of cookies I would enjoy nor make again. The only person in my family enjoyed eating this was only my dad. My mum said he loved eating it during his childhood
Well, it's no regret going through the experiment. One curiosity killed is an achievement for baking enthusiast :)


I used recipe from my LBT baking friend, Rosdaniar
 
What you need:
 
100g fried green bean flour (I bought from Poon Huat)
50g caster sugar
2 tbsp water (I added 1/4 tsp more)
 
Method:
  1. Mix flour, sugar and water. Sprinkle water and mix well
  2. Sieve the mixture and shape with the mould (I used mould for kuih bangkit, but any chocolate mould can be used too except the silicone type)
  3. Arrange on an ungreased baking sheet
  4. Preheat oven to 120degC and bake for 15 minutes til firm
  5. Let cool and keep in an airtight container


The most frustrating part was the shaping. The dough was so crumbly and fragile that no matter how hard you press it to the mould, it'll stay crumbly when taking out from the mould and the tendency for the cookies to break was almost 100%!
I was pretty lucky to get more than 50% of the cookies in rather good shape
And it's also the noise from mould banging while taking out the cookies.. Don't bake this for you late night baking, you'll be in trouble LOL


This post is for LBT October challenge: Kue Satu

Sunday, March 24, 2013

Chocolate Hokkaido Chiffon Cupcake with Cream Cheese Filling

I've been delaying my intention of trying out this popular little cakes
This month's LBT challenge is happened to be Hokkaido chiffon cupcakes, no more excuse for delay :)


Recipe is from Sonia from Nasi Lemak Lover, with some modification
 
What you need:
 
Chiffon Cake
3 egg yolks
20g sugar
35g corn oil
60g milk
65g cake flour (original: 70g)
5g cocoa powder (I added)
1tsp chocolate emulco (I added)
3 egg whites
25g sugar
 
Filling
125g cream cheese
50g butter
about 7tbsp icing sugar, sifted
200ml whipping cream, chilled
 
Icing sugar, for dusting
 
Method:
  1. Pre-heat oven to 170C
  2. Arrange paper liners on baking tray
  3. Hand whisk egg yolk and sugar till pale in colour
  4. Add in corn oil and milk, mix well
  5. Sift in cake flour, stir to combine
  6. Beat egg white until foamy, gradually add sugar, and continue beat till soft peak form
  7. Take 1/3 of egg white and use a hand whisk to mix into egg yolk batter
  8. Fold in the balance egg white with a spatula till well combine
  9. Scoop batter into pre-arranged paper liners to about ¾ full
  10. Bake for 20-25 mins at middle rack 
For the filling:
 
  1. Beat cream cheese and butter til smooth. In another bowl (chilled), beat whipping cream with sugar till firm and stiff (over a bowl of iced water)
  2. Add in cream cheese mixture into whipping cream mixture, mix well with rubber spatula 
  3. Pipe filling into cupcake and dust with icing sugar. Refrigerated before consume


I love the texture of this cake, pillowy soft, with cream bursting in every bite, it's so rich and luscious, yum!
 

Sunday, January 13, 2013

THB #13 - Dark Chocolate Almond Cake (Happy Call)

Two years is fast! LBT turned two on Friday, hence the challenge for this month, any bake for celebration :)
So I chose to bake this yummy chocolate cake, decorated with sugar cookies which happened to be requested by Ian :)

I baked this yummy chocolaty cake in conjunction with the 13th bake for The Home Bakers, a recipe chosen by Jocelyn from Riceball Eats, from the book  "Coffee Cakes" by Lou Seibert Pappas
This time I baked using Happy Call pan and I was satisfied with the outcome
Soft and chocolaty, tasty too. A bit crumbly, perhaps cos I overbaked it a little
Very similar to brownies, but not the fudgy type
Very well received by my family, including the kids :)

I had only chopped almonds which I blended briefly, so I still could taste a little crunch from the almond bits :)
I used bittersweet chocolate and strong brewed coffee. I guess the coffee was a bit too strong I felt the cake was not sweet enough. Since I love the slight coffee taste in the cake, I would still use the same kind of brewed coffee and used semi sweet chocolate instead to get the right sweetness to my liking

Here for presentation I sliced the cake to bite size small squares
It's surprisingly pleasant to munch the cake together with the cookie :)


Please view Jocelyn's site to view the full recipe for the chocolate cake
As for the sugar cookies, I used the same recipe I made before from Rima


So glad I finally managed to find time to participate in The Home Bakers event this time, after I missed out the previous bake :)
This event is hosted by Joyce of Kitchen Flavours
Please visit HERE if you're interested in joining the fun :)

And to LBT, happy 2nd birthday! So glad to be able to share baking experiences together with the ever growing number of members, many turn to best friends :)
Many more years to come. Cheers!

Saturday, December 22, 2012

Japanese Rolled Cake

This was truly a challenge to be able to do this cake
It took three trials before I was pretty satisfied with the result, not the cake but more to the painting on the cake itself
The last trial I used slightly different recipe and that was a good decision to get it right
Now I know which recipe I shall use in the future
But will I make this again? I'm not sure. It took at least two hours for me to make, and it gave me a pretty high pile of dishes to wash wew.....
This cake is another example to prove that baking is indeed science
To be able to do it quite successfully does give a certain level of satisfaction and that matters :)

My first try - not too bad, but I burnt a little of the white color and it wasn't so smooth cos some parts were stuck at the baking paper that I had to peel super carefully with knife and arranged it back on the cake
I used Nutella for the filling

My second try - not too bad, either but I didn't like the christmas stocking, the red part wasn't smooth at all - even worse than the first try, and yes, some parts were still stuck at the baking paper
I used chocolate ganache for the filling
 
Finally it's smooth and firmly attached to the cake, I was pretty pleased with this one, except for the small stain on the tree and I used non stabilized whipping cream filling for this cake - it wasn't firm enough, hence the not so round shape of this rolled cake
I used whipped cream and cut strawberries for the filling


My first and second try were using the same recipe from Mba R, this recipe was used by many fellow Indonesian bloggers
It gave me a beautiful texture and yummy cake, it's really a keeper
But somehow, I couldn't be comfortable with the recipe for the batter to do the painting, even after the second try

My third try I used recipe from Miss B of Everybody Eats Well In Flanders
I must thank her for doing the translation and sharing it in her blog, it's a great help!
I was so pleased with the recipe for the painting batter, and the cake was yummy too, but more to thinner side


The recipe for the cake:

What you need:

5 egg yolks
40g sugar
40ml canola oil
60ml water
80g plain flour

150g egg whites
40g sugar
150g corn flour
1/2 tsp salt

For the painting:
50g egg whites
10g sugar
5g corn flour

For the egg yolk batter:
  1. Beat egg yolks and sugar til ribbon stage. In low speed, add in oil slowly, mix well
  2. Add in water slowly, mix well
  3. Add in flour and mix well til thick. Set aside

For the painting:
  1. Prepare swiss roll pan, grease and line with baking paper which has drawing of picture to be painted. Place the drawing facing down
  2. Beat egg whites and half of sugar til foamy, add in the remaining sugar gradually while beating in low speed til medium peak
  3. Add in corn flour and mix well briefly til well mixed
  4. Divide according the need of the painting, how many colors needed
  5. Mix each part with each color til well mixed and put it in piping bag
  6. Snip a very little hole at the tip of the piping bag and start painting starting from the outline first if there's one, otherwise start from darker color first
  7. Bake in preheated oven of 170degC for 1 minute each color
  8. Set aside

For the egg whites batter:
  1. Beat egg whites and half of the sugar and salt til foamy
  2. Add in the balance of the sugar gradually til medium peak
  3. Add in corn flour, mix well

  1. Scoop out 1/3 of the egg white batter into the egg yolk batter and fold in gently
  2. Add in the remaining egg white batter and fold in gently (do not over fold to avoid the batter being deflated)
  3. Pour the batter onto the prepared and painted pan, level
  4. Bake for approximately 15-20 minutes - do not overbake to avoid difficulty in rolling the cake later on
  5. After it's cooked, remove the cake from pan, peel the baking paper slowly and carefully
  6. When the cake is cool, flip the cake on another baking paper (now painting is facing down) Spread with filling and roll away from you using the baking paper
  7. Keep in the fridge for around 1 hour in the fridge til set before opening up the baking paper

I personally love both the cake recipes, but for the painting batter I definitely will use Miss B's recipe :)


I'm submitting this post to Aspiring Bakers #26 hosted by Alan of Travelling Foodies and LBT challenge this month

Friday, November 23, 2012

Indonesian Style Potato Gratin (Pastel Tutup)

This is a typical Indonesian dish, some eat as snack, some eat as a meal
The people said it's an influence from both Chinese and Dutch food
It's not exactly the same as potato gratin, quite different, but it's the same kind of dish
The usual potato gratin uses sliced potatoes layering the top of the dish as well as the bottom, sometimes at the centre too alternating with creamy filling
This dish I made also uses potatoes but mashed til smooth, and it's only placed at the top of the dish covering a layer of hard boiled egg slices on top of the not so creamy filling

It's been a few years since the last time I had this yummy savoury dish, such a great refresher to be able to have this dish again this time, in conjunction with this month's LBT challenge : pastel tutup :)
Quite easy to prepare, but involves a lot of chopping, and the filling has to be completely cool before covered with potato layer


Recipe is from my mum
(with this recipe below I got a 20x30cm rectangle pyrex and four 5" ramekins)

What you need:

For the potato layer:
10 medium size potatoes - steam, peel and mash
3 tbsp butter
2 pinches of ground nutmeg
salt, pepper, sugar

For the filling:
1 large onion, chopped
250g chicken breast - skinless, boneless, boil til cooked and then chopped finely
carrots - chopped finely
a handful of black fungus - soak til soft, chopped finely
bean vermicelli - soak til soft, cut short
two handfuls of frozen peas
10 hard boiled eggs - peel and slice thinly
1/2 cup fresh milk
enough water - around 2L
salt, pepper, sugar, ground nutmeg, a little butter

To sprinkle:
grated cheddar cheese

For the potato layer:
Mix all ingredients while the mashed potatoes are still warm

For the filling:
  1. Sautee chopped onion til soft and fragrant
  2. Add in chicken, carrots, and water
  3. Bring to boil and simmer til carrots turn soft, around 5 minutes
  4. Add in milk, stir well
  5. Add in black fungus, frozen peas, stir well til peas are cooked
  6. Add in salt, pepper, sugar, nutmeg, milk, stir well
  7. Adjust the taste and add in bean vermicelli
  8. Stir well, bring to boil and off heat
How to assemble:
  1. Pour filling on the pans and let cool (it has to be completely cool)
  2. Arrange egg slices on top after it's cooled and cover with potato layer (my mum just pressed by hand but I prefer to use piping bag)
  3. Brush the top with mixture of egg yolk and butter
  4. Put oven in grill mode (top heat only) and grill til the top is browned
  5. If cheese to be sprinkled on top, please do so after brushing the top with egg wash

I had some leftover potato in the piping bag, so I piped smiling faces on the ramekins and flowers on the pyrex :)


Oh, yum!

Saturday, October 20, 2012

Repost: Wingko Babad - Indonesian Baked Coconut Cake

Wingko babad is the theme for LBT challenge this month
I made some with the same recipe I did the last time I made it, but this time I shaped with cookir cutters and used skewers
It's much better eating this way, no sticky hand
Another intention was to attract my kids to at least give this a try, but still no avail
I should have made the chocolate version, actually - perhaps next time :)


Recipe can be found HERE
So yummy, burst with coconut flavor in every bite!

LinkWithin

Related Posts Plugin for WordPress, Blogger...