Pages

Showing posts with label chocolate. Show all posts

Monday, May 25, 2020

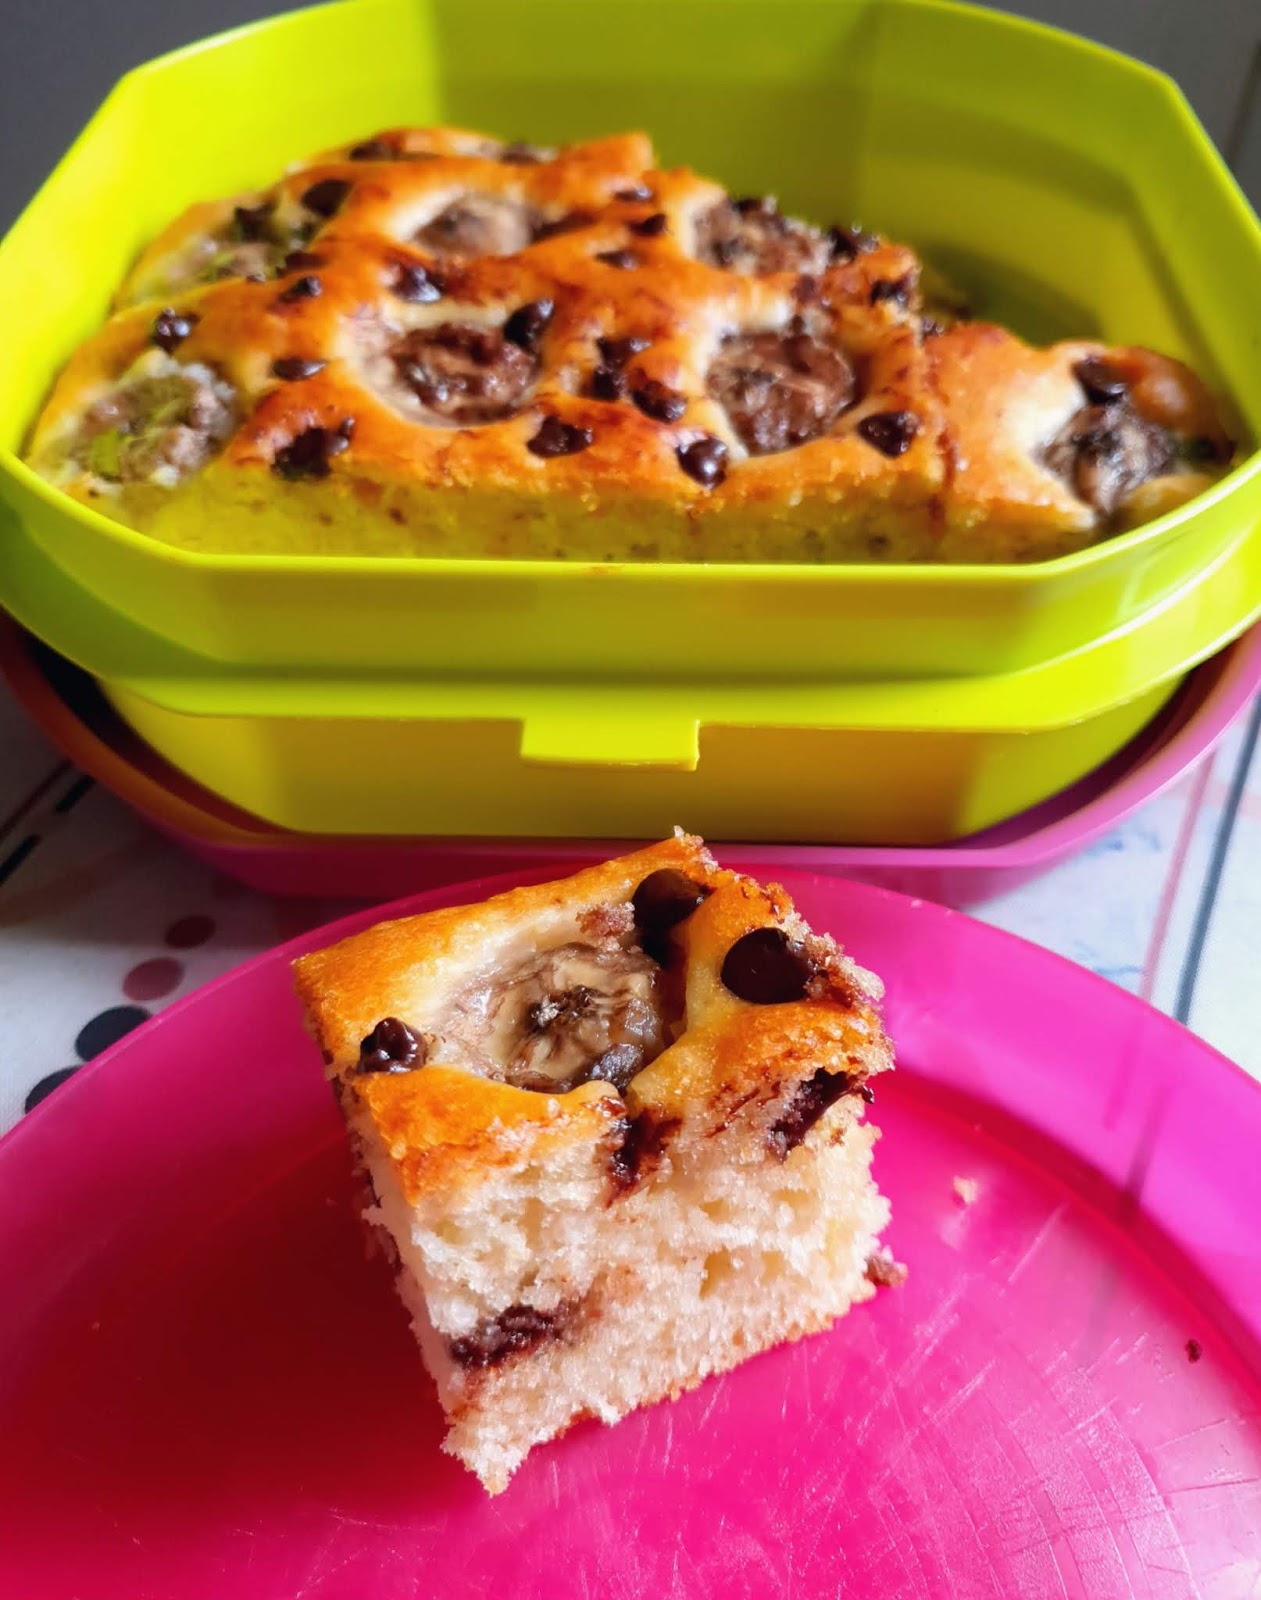
Banana Choco Chips Yoghurt Bread

Yummy treat for family and so easy to make. Using one bowl, just stir and bake :)


Recipe is from Cynthia Lim with my own modification

What you need:

300g plain flour
1tbsp baking powder
1/2 tsp baking soda
90g caster sugar
2 eggs (55g each)
160ml unflavored oil (I used rice bran)
200g yoghurt (I used plain, you can use fruity kind too but reduce sugar to 60g)
60ml milk
1tbsp vanilla paste (I used chocolate paste, I run out of vanilla)
a fistful of chocolate chips
2 bananas, sliced
more chocolate chips for topping

Method:
  1. Preheat oven to 190degC. Line baking pan with baking paper. I used 20cm square pan with 4cm height
  2. Mix eggs, oil, yoghurt, milk and vanilla paste in a bowl and stir well
  3. Add in flour, baking powder, baking soda and sugar and chocolate chips
  4. Mix gently just til combined. Do not overmix
  5. Pour batter into baking pan, Top with banana slices and more chocolate chips
  6. Bake for 30 minutes on the middle rack. Move up a level higher and bake for another 15minutes or when a toothpick comes out clean when inserted into the middle of the cake
  7. Remove from oven, and pan and let cool on cooling rack


Sunday, April 26, 2020

Simple Choco Balls


Yummy snack my mom used to make for us

What you need:
(I didn't measure)

Marie biscuits
Chocolate sweet condensed milk
Chocolate rice

Method:

  1. Crush biscuits until fine crumbs form (I used food processor)
  2. Pour in chocolate condensed milk until well mixed and reach consistency that can be rolled into balls, keep it moist to allow the chocolate rice to stick
  3. Pinch the dough and roll into balls, about 1tbsp each
  4. In a plate, pour chocolate rice
  5. Roll the balls on it until evenly coated
  6. Keep refrigerated


Sunday, August 13, 2017

Chocolate Coconut & Yuzu Fantasy Pudding

Pudding is one easy dessert to make liked by all, especially with kids
But for this pudding with a twist, it's different story. Not the most difficult challenge I ever encountered, but it's can be quite tricky too, more steps to do and timing is crucial here
A challenge by IG baking group homemadelovers, this pudding is nice and refreshing, you can choose any flavour you prefer
For me, I used chocolate and yuzu. Not common combination, but it actually worked :)


To make this pudding, you need to have 2 similar moulds, and then the first thing to do was to make  the "coconut" for the filling in the yuzu pudding. Followed by making both chocolate and yuzu pudding

What you need:
(with modification)

For the "coconut":
250ml light coconut milk
100ml fresh milk
100g sugar
15g plain / coconut Nutrijell (can replace with plain Konyaku jelly)

For chocolate pudding:
1150ml chocolate milk
10g plain agar agar powder
7g chocolate Nutrijell (can replace with plain Konyaku jelly)
150g sugar
1 tsp chocolate paste

For layered pudding:
A.
Yuzu layer:
600ml yuzu juice
7g orange / lemon Nutrijell (can replace with plain Konyaku jelly)
7g plain agar agar powder
70g sugar
B.
Coconut layer:
7g plain agar agar powder
500ml coconut water
100g sugar

For the glue:
7g plain agar agar powder
50g sugar
350ml water

Method:

To make "coconut"
  • Bring to boil all ingredients in a pot, keep stirring. Pour into one of the mould, let cool
  • When it's completely cooled, using either a spoon or fork, dredge the jelly into long strips resembling coconut flesh. You may grate it too. Keep aside (The taste is really like real coconut flesh!)
To make chocolate pudding
  • Bring to boil all ingredients, keep stirring and pour into the mould. Leave it to cool and set

To make layered yuzu pudding
(done in 2 separate pots together)
  • Bring to boil all ingredients, keep stirring. After boiled, keep the fire on at the very lowest
  • Get ready the other mould
  • Scoop 3 ladles of yuzu layer into the mould, leave it until it's half set (check by touching the surface lightly, you should feel a layer formed)
  • Now scoop 2 ladles of plain layer over the half set yuzu layer, and then sprinkle the coconut flesh and leave it until half set
  • Repeat until all both pudding used up and the height of the pudding is about the same as the chocolate pudding
  • (do not forget to off the fire used to warm up both pots!)
  • Leave it to cool and set

How to assemble:
  • Cut the chocolate pudding and layered yuzu pudding in the same manner
  • Place them alternately until it looks something like this:


  • Now cook all of the "glue" ingredients. Once boiled, gently pour bit by bit over the pudding. Slightly open the gaps in between to make sure they're glued well. Leave to cool
  • Take note of the different height of the pudding. I used small knife to level everything once it's cooled completely
  • Unmould the pudding and you're done! :)

Pretty, huh? :)


See the "coconut"? :)


This is not only pleasant to the eyes, it's yummy too :)


The modification I did, besides the flavour I chose, it's also the amount of jelly and agar agar powder used to suit my liking (I do not like it to be too firm)
As a result, it's more challenging to assemble as it's softer than it should be
Tough, but no regret :)
Will I make this kind of pudding again? Maybe. When I have the mood and the time :)
Tuesday, May 30, 2017

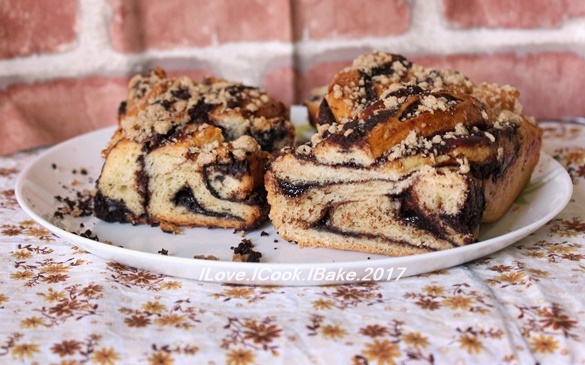
Chocolate Babka

First time hearing this name when I got this monthly bake along with friends from IG baking group called homemadelovers. This was my second bake together with them

Babka, a traditional Eastern European yeasted sweet bread with chocolate, nuts and cinnamon filling, usually twisted to shape and sprinkled with streusel
Never tried this bread before, but knowing the description, I have no doubt that my family and I will love it

So, here is my version. I omitted the nuts as my kids do not really fancy eating nuts


Recipe is from King Arthur Flour
 
What you need:
(half recipe below)
 
Bread dough:
114 to 142g lukewarm water
1 large egg
375g bread flour (original recipe used all purpose flour)
16g full fat milk powder
1 tbsp instant yeast
1/4 tsp ground cinnamon
50g sugar
1 1/4 tsp salt (or 1 tsp if using salted butter)
71g unsalted butter, room temperature
1/2 tbsp vanilla extract
 
Filling: (I made full recipe)
100g sugar
1/2 tsp ground cinnamon
28g cocoa powder
1/2 tsp espresso powder
57g melted butter
170g mini chocolate chips
113g toasted pecans or walnuts, chopped (I skipped)
 
Glaze: 1 egg with a pinch of salt, lightly beaten
 
Topping: (full recipe)
57g melted butter
1/2 tsp ground cinnamon
74g icing sugar
57g all purpose flour


Method:
 
  1. I used bread machine to do kneading and first proofing, it's about 30mins. Pour wet ingredients first, followed by dry ingredients. Mix with spatula until just combined and let it rest for 20mins. After that start the kneading process. After 5mins of kneading, add in butter
  2. After first proofing done, deflate and take the dough out of the pan. Place on a lightly floured table, cover with a damp cloth and let it rest for awhile
  3. To make the filling, combine sugar, cocoa powder, espresso powder and cinnamon. Stir in melted butter. The mixture will be a little grainy
  4. Flatten the dough with rolling pin to a rectangle shape of about 18" x 9" with about 1/4" thickness (if dough still 'fights back' please let it rest for another 10mins or so to relax the gluten)
  5. Smear with filling, come to about an inch of the edges. Scatter chocolate chips and nuts (if using) over
  6. Starting from the short end, roll it gently to form a log, sealing the ends. Cut the log into half lengthwise to make 2 pieces of dough of 10" length. Cut carefully to avoid the filling from spilling out too much
  7. With the exposed filling side up, twist the 2 pieces into a braid, tuck the ends underneath
  8. Place braided log into a 9" x 5" loaf pan
  9. Brush the top with glaze. Mix the ingredients for topping and sprinkle over the dough
  10. Cover loosely with cling wrap and let it rise for another 1hour or until it's very puffy and crowned a good inch over the rim of the pan
  11. Preheat oven to 150degC and bake the bread for about 35mins. Tent lightly with foil and bake for additional of 15 to 25mins until the loaf is golden brown
  12. Remove from oven and let it cool in the pan for 10mins. Transfer on the cooling rack to cool completely
  13. Slice the keep babka at room temperature wrapped or in the airtight container

Very delicious, sweet, chocolaty and soft bread. It turned a little hard the next day but with a slight warming up in the microwave it turned out back to perfection. Definitely bread I will bake again :)


Saturday, April 22, 2017

Banana Peanut Butter Chocolate Quick Bread

When you cannot decide whether to have chocolate or banana or peanut butter, have them all in one cake! Quick bread, in this case :)


Recipe is from IG @neuroticmommy


What you need:
 
1/3 cup creamy peanut butter, melted
3/4 cup sugar
3 medium bananas, mashed
1 tsp vanilla extract
1/2 cup cooking oil (I used rice bran)
2 eggs
1/2 cup cocoa powder
1 tsp baking soda
1 tsp baking powder
pinch of salt
1 cup whole wheat pastry flour
2 bananas, sliced for topping
a mixture of sugar and brown sugar to caramelize the bananas for topping
Option for topping: drizzle of melted warm peanut butter, and melted dark chocolate
 
Method:
  • Preheat oven to 175degC. Grease and line loaf pan (20x10cm)
  • Mix in peanut butter, banana, vanilla, oil, eggs. In another bowl, mix in sugar, cocoa, baking soda, baking powder, salt, flour
  • Pour in wet ingredients into the dry ingredients and mix until just combined
  • Bake for about an hour until the skewer test comes out clean
  • For the banana topping: In a small glass pot, combine sugar mixture and sliced bananas and cook over low heat til sugar melted and slightly caramelized
  • Just before serving, scoop the topping over the slice and serve. Best to serve warm

Banana bread-gasm LOL


This post is for LBT (Let's get Baking Together), a baking group which I joined years back, and when I searched for my last participation it was May 2014! Gosh! Hope I don't miss much :)
This month's theme is banana cake. Enjoy!

Thursday, July 28, 2016

Easy Peasy Homemade Chocolate Sauce

My kids love to eat desserts with chocolate sauce. Ice cream, waffles, pancakes.. they love it with chocolate sauce. I normally buy bottled one from supermarket. With many added unnecessary ingredients in it, I am contemplating to make homemade kind. And when I found this easy peasy recipe, I did make a batch and it's as good, if not better, and so well received by the kids they didn't know that it's not what they used to have haha.. From here I know I will not buy the commercial bottled chocolate sauce anymore in the future :)


Here is  the recipe (from Foodie Baker)

What you need:

1/4 cup cocoa powder (I used Varlhona)
1/4 cup + 2tbsp caster sugar (original recipe only used 1/4 cup)
50ml water
50ml fresh milk (original recipe doesn't use milk, only 100ml water. You may use 100% milk for creamier texture)
10g unsalted butter, diced

Method:
  1. Combine cocoa powder, sugar, water and milk in a small sauce pan. Bring to boil over medium high heat and whisk constantly til sugar and cocoa powder dissolved
  2. Remove from heat and stir in butter. Stir well and let cool. The sauce will thicken slightly when cooled
  3. Store in a glass jar and keep refrigerated

My personal opinion, it tastes even better than store bought ones :)


Love the texture too, smooth creamy and glossy :)
 

Saturday, May 7, 2016

Banana Chocolate Cheese Wrap Roll

Finally I am well. Got flu bug from Ian, a pretty bad one it took almost 2 weeks for me to finally function normally. Well, I felt better last weekend but somehow got worse again. Health is wealth. It's not fun to fall sick. So relieved now, phew...

Anyway, this post is in conjunction with invitation from Mission Foods Singapore to contribute some menu ideas for this coming Mother's Day tomorrow

So here is the first one, banana chocolate cheese wrap roll - a delicious sweet treat
I always love these three combination. Easy peasy to make and so yummy. You can prepare this for breakfast, or brunch or even as snack


What you need:
(1 serving)

1 Mission Original Wrap
1 sliced cheddar cheese, tear into small pieces (or grated cheddar cheese)
about 1 heaped tbsp chocolate rice
1 medium ripe banana
chocolate sauce for garnish


1. Heat a non stick cooking pan over low heat. Place one Mission Original Wrap on the pan followed by grated cheddar cheese on one side of the wrap (I found out on that morning that I had no grated cheddar left, so I used one sliced cheddar and tore it apart)


2. Add chocolate rice over the cheese
 
 
3. Add one peeled banana (I mistakenly sliced the banana into two LOL)

 
4. When cheese and chocolate rice start to melt, you will feel that the wrap starts to crisp too, slowly roll the wrap from one side to the other side
 
 
 5. And it's done :)
 

6. Transfer to a serving plate and drizzle some chocolate sauce and serve

 
Sweet creamy  chocolaty with a hint of saltiness. Delish!


Mission Foods with a special guest, Adam Liaw,  Australia Master Chef Season 2 winner, came up with a book of menu ideas "Quick and Easy" Dinners

 
There's some recipes I'm so intrigued to try. This is one of them, Smoked Salmon and Egg Wraps with Mustard-Dill Mayonnaise. Sounds so good!


Lastly, hope you like the roll as much as I do and if you prepare this for your mom, hope she will enjoy it too. HAPPY MOTHER'S DAY :)

Sunday, May 1, 2016

Easy Healthier Chocolate Mousse


This dessert came out smooth, chocolaty, rich and delicious
Secret ingredient? Silken tofu! Slashed more than half of the calorie compared with the common chocolate mousse dessert made using thickened cream
A serving of this is only a fraction of close to 100 calories, while the traditional recipe can be as high as 300 calories! You can eat this dessert in peace LOL


I decorated with kiwi slices just because I had nomore strawberries left LOL And see the red specks? My hands was itchy I sprinkled some red sanding sugar haha..


Recipe credit to Joanna Soh

What you need:

300g silken tofu
1/4 cup unsweetened cocoa powder
2 tbsp maple syrup
1.5 tsp vanilla extract
a little stevia (optional, if you find it's not sweet enough)

Method:
  1. Put all ingredients (except stevia) in a food processor and blend til smooth
  2. Taste and add stevia to sweeten
  3. Scoop in 3 serving bowls and chill in the fridge for a few hours to set
  4. Before serving, decorate with sliced fruits and/or nuts as preferred

Let's dig in! :)
 

Tuesday, December 29, 2015

Tender Loving Crackle Cookies

I missed out this bake for ABC (Avid Baker's Challenge) in June so when I was looking for cookies recipe I wanted to make for this year's Christmas, I decided to give it a try
And, I wasn't disappointed at all. The cookies were yummy, so fudgy and chocolaty with some crunch on the outside while soft and chewy on the inside. Really good!


And I also find the cracked cookies look pretty :)


Recipe is from Scientifically Sweet

What you need:
(I made double recipe as stated below)

142g unbleached all purpose flour
50g unsweetened Dutch processed cocoa powder (I used Valrhona)
200g brown sugar (original recipe used normal white sugar)
1 tsp baking powder (I used double acting)
1/2 tsp salt
84g cold unsalted butter, cut into small cubes
170g 70% dark chocolate, cut small (original recipe used bittersweet chocolate)
2 large eggs
1 tsp pure vanilla extract
2 cups icing sugar for rolling

Method:
  1. Preheat oven to 190degC. Line baking sheets with parchment paper
  2. Whisk together flour, cocoa powder, brown sugar, baking powder and salt. Pour into food processor and add in cubes of cold butter. Blitz til it resembles breadcrumbs (original recipe used rubbing method by hand which I found more time consuming). Stir in chopped chocolate
  3. Whisk together eggs and vanilla, add into the chocolate mixture and stir with fork til moistened and well combined. Cover with cling wrap and refrigerate for 30mins (mine was more than 1 hour)
  4. Pour icing sugar to a wide plate. Scoop dough (1 heaped tsp each) and drop to them on the icing sugar and roll them until fully covered
  5. Place on the lined baking sheet and bake for about 8mins until set but slightly soft at the centre
  6. Let cool on the baking sheet for a minute and then transfer to cooling rack
  7. Keep in an airtight container when it's completely cooled

My kids love these cookies that 10pcs were gone within a minute after the first batch out from the oven LOL


Every chocolate lover temptation :)


This post is linked at Cook and Celebrate: Christmas 2015 hosted by Yen from GoodyFoodies, Diana from The Domestic Goddess Wannabe and Zoe from Bake for Happy Kids at here.
 

Wednesday, September 30, 2015

Wholemeal Chocolate Milo Buns

To end my Milo adventure this month, I baked these yummy buns
I wish today is not the end of September as I still have a few Milo munchies recipes waiting to execute. But then again, I can always make them anytime and share here :)

These buns made using straight method, fuss free method which I like and yet the result is not compromised. They are soft, fluffy and delicious. With some goodness of wholemeal flour in it. My house was full of Milo and chocolate aroma during baking. Love it
My kids love them, which is no surprise. Chocolate with Milo in a bun? Who can say no? :)


See the first pic below. Notice the little tiny specks on the buns? It's because I used wholemeal flour to replace whole wheat flour. I usually use Origins brand organic wholemeal flour, but I had no stock this time, so I used Prima brand wholemeal flour which has coarser texture. To us, this change didn't give any effect at all


This is one of the part I enjoyed the most every time I bake bread. Tearing them apart LOL


Happy happy. Soft and fluffy. Chocolaty and yummy. Pass :)


Recipe is from Honey Bee Sweet

What you need:

315g bread flour
50g whole wheat flour
75g Milo powder
35g caster sugar
1/2 tsp salt
4g instant yeast
225ml chocolate milk
40g egg white
30g unsalted butter, room temperature
some chocolate chips for filling (optional - I added)

Method:
  1. Using breadmaker to knead, add in chocolate milk and egg white into the pan, followed by bread flour, whole wheat flour, Milo powder, caster sugar, salt. Lastly, add in yeast, make sure it's not in touch with salt
  2. Choose 'dough' function and press start. After 5mins of kneading, add in butter and let the machine does its job (about 1hr 30mins with proofing)
  3. After done, take out the dough from the pan and on lightly floured surface, divide into 50g balls
  4. If you want to add filling, flatten the ball and add in chocolate chips at the centre and seal the ball
  5. Place onto a lined baking pan (sealed side down)
  6. Let proof til doubled in size about 45mins
  7. Preheat oven to 175degC. Before baking, brush them with eggwash (I had 1 beaten egg mixed with 1 tbsp fresh milk) and then bake them for about 12-15mins til golden brown
  8. Once baked, remove from oven and transfer to cooling rack. Brush the top with butter
  9. Once cooled, keep in an airtight container

Enjoying every bite :)


This post is linked to the event Little Thumbs Up (September 2015: Milo) organised by Zoe of Bake for Happy Kids and Doreen of My Little Favourite DIY
 

Sunday, September 27, 2015

Moo Moo Chocolate Ferrero Snowskin Mooncakes

This year I made only two types of mooncakes, the all time loved cheesy shanghai mooncakes and chocolate snowskin mooncakes. The latter one is Abby's request, my chocoholic girl :)

This time I used Kenneth Goh's recipe for the snowskin mooncakes since I found it's so cute especially the moo moo white/brown combination :)
As for the filling, I used the same recipe I used last year with a slight modification, and I added Ferrero Rocher in the centre as a surprise. Yum!


My moo moo white brown color combination wasn't as neat as Kenneth's :)


A very nice surprise in the centre :)


Recipe below...
 
For the skin:
(for 50g mould)
 
What you need:
 
White portion:
38g kao fen
38g icing sugar
20g shortening
40g cold water
 
Chocolate portion:
38g kao fen
38g icing sugar
20g shortening
40g cold water
1 tbsp cocoa powder
 
Method:
  1. In a bowl, mix all ingredients for the white portion til form a soft dough. Weigh into 15g balls, let rest for 10mins. Do the same to the chocolate portion in another bowl, but weigh 10g instead, to make the total weight of 25g
  2. To assemble both colors: flatten white ball and then take 1 chocolate ball, divide into 4 little balls, flatten them and stick them on the flattened white balls, not touching one another. Flatten them one more time
For the chocolate filling, please view HERE
My modification this time:
  1. I didn't use Baileys, I replaced with fresh milk, so total = 3 tbsp
  2. I used 70% dark chocolate
  3. I added another 1 tbsp of custard powder, so total = 2 tbsp (result was better, not as sticky filling as what I got last year)
  4. I weighed 20g for the filling as I added Ferrero Rocher ball at the centre, if not it's 30g
Enough Ferrero Rocher (optional)
 
*Assemble the mooncakes by wrapping Ferrero Rocher with the flattened chilled chocolate filling til a ball formed and wrap the chocolate ball with the snowskin mooncake
Place in the floured mould, press and release
Keep in an airtight container and refrigerate
 
 
To chocoholics out there, must try! :)


HAPPY MID AUTUMN FESTIVAL EVERYBODY!

LinkWithin

Related Posts Plugin for WordPress, Blogger...