Pages

Showing posts with label LTU. Show all posts

Tuesday, March 29, 2016

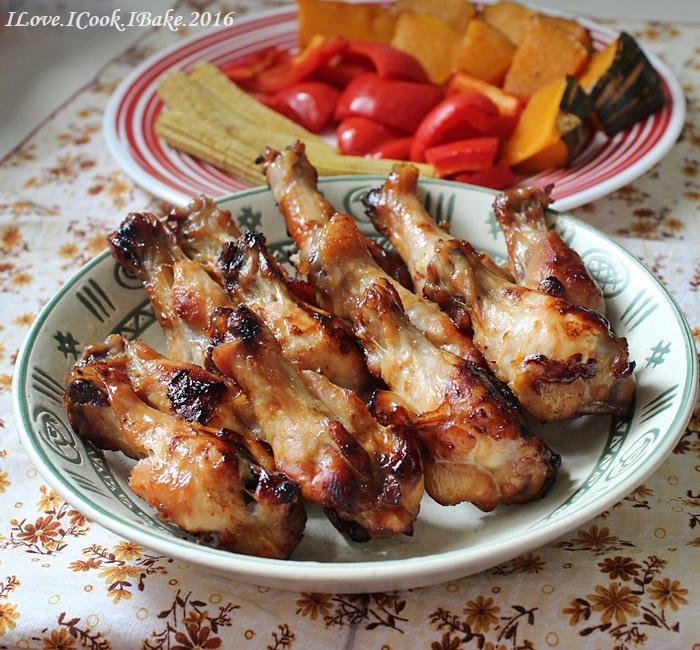
Baked Sticky Honey Chicken Drumlets

Saw Zoe from Bake for Happy Kids made this dish and it looks so good. Too bad my kids can't take spicy stuff so I omit the sriracha. Well, it happened that I didn't have it on hand too haha..
Anyway, this easy dish is finger licking delicious. I used only drumlettes as that's what my family likes. I enjoy eating it with roasted vegetables, while my kids ate them with rice! Haha..
The next time I bake this again, I definitely will use sriracha for my portion, I believe it'll be even yummier *slurp*


What you need:

4 packs of 300g drumlettes

Marinade:
80ml sriracha (I didn't use)
1/4 cup honey
1 tbsp light soya sauce
salt and black pepper

Method:
  1. In a bowl, mix in honey, light soya sauce, salt and black pepper
  2. Clean the drumlettes, discard extra fats and dump into an airtight container
  3. Pour in marinade and toss to coat, keep in the fridge overnight (original recipe only 15mins but I was kiasu haha..)
  4. Preheat oven to 220degC and lay the drumlettes on a lined baking tray and bake for 15mins
  5. Remove the tray from the oven and you will see the juices on it. That will slow down the drumlettes from caramelising. Remove the wings to another lined baking tray and put back into the oven to continue baking until the drumlettes are caramelised
  6. Serve immediately (original recipe used chopped spring onion, white sesame seeds but I didn't since the whole family crowd around me like hungry monsters when I took the tray out of the oven. I must reminded them that I need some for phototaking purpose haha...)


This post is linked to the event, Little Thumbs up organised by Doreen from my little favourite DIY and Zoe from Bake for Happy Kids and hosted by Joyce from Joy 'N' Escapade at this post


This post is also for  Bake Along, an event organised by Joyce from Kitchen FlavoursLena from Frozen Wings and Zoe from Bake For Happy Kids


Friday, March 25, 2016

Honey Yuzu Jam Chiffon Cake

Original recipe used lemon. Since I had some yuzu jam left that's expiring soon, I used that to replace the lemon juice. Nice texture, the typical chiffon cake kind, with delicious sweet and slight tang. Yum!

After unmoulding


Recipe is from Grace's Blog
(I only have 21cm chiffon mould, so I made 1.5 recipe instead as stated below)

What you need:

5 egg yolks
40g honey
30g oil (I used rice bran)
25g fresh milk
45g diluted yuzu jam with the bits chopped to small tiny pieces
105g cake flour

5 egg whites
40g castor sugar (I reduced slightly as yuzu jam is already sweet)
1/2 tsp lemon juice

Method:
  1. Combine honey and egg yolks in a mixing bowl, stir with hand whisk
  2. Add in oil, milk, yuzu jam and bits and mix well
  3. Add in sifted cake flour and mix well, set aside
  4. Beat egg white with lemon juice until frothy and then add in sugar in 3 batches, beat til shiny peak
  5. Add 1/3 of the egg white batter into the egg yolk mixture, fold til well mixed
  6. Add in the remaining egg white and fold in gently
  7. Pour the batter into the mould and bake in preheated oven of 180degC for about 30mins til well cooked
  8. Remove from oven, invert cake immediately and let cool completely before unmoulding

Note:
I got a not so tall chiffon cake using the recipe with 21cm chiffon mould. For taller cake, you may use smaller diameter mould


Pics below taken the next morning...

 
So soft!
 
 
Ah the holes...


This post is linked to the event, Little Thumbs up organised by Doreen from my little favourite DIY and Zoe from Bake for Happy Kids and hosted by Joyce from Joy 'N' Escapade at this post

Wednesday, March 23, 2016

Whole Wheat Honey Buns

I made these buns and the whole family enjoyed them so much it didn't last long
I must say they are indeed delicious and texture is really good, the usual cliché words we use - soft and fluffy. Indeed cliché but it's the truth! :)


I saw theses lovely buns from Grace's Blog and I had no regret trying it out. In fact, this is in my favorite bread recipe list now :)


Argh! Wrong focus! LOL


What you need:

250g bread flour
50g fine wholemeal flour
60g honey
10g milk powder
3g salt
160g fresh milk
30g whole egg
5g instant yeast
20g butter

Method:
  1. Using breadmaker, put in honey, milk and egg into the pan followed by flours, milk powder, salt, and lastly yeast
  2. Set into dough mode, and press start
  3. After kneading for 5mins, add in butter and let the machine do the whole kneading process and the first proofing
  4. Prepare 2 loaf pans, grease and line with baking paper
  5. After done, take out the dough and on lightly floured surface, knead a few times to release air bubble
  6. Divide into 50g dough each and shape into balls
  7. Place into the loaf pans, sealed side down and let it rise til doubled in size about 45mins
  8. Preheat oven to 180degC
  9. Sieve some bread flour on top before baking and bake for 25mins
  10. Remove from oven and unmould, let cool on the cooling rack

Can you see how soft and fluffy these buns are?


This post is linked to the event, Little Thumbs up organised by Doreen from my little favourite DIY and Zoe from Bake for Happy Kids and hosted by Joyce from Joy 'N' Escapade at this post


Below are the pics I took the night I baked this bread. Yes, I baked it at night for the next morning's breakfast, but some were quickly gone for supper haha.. The pics above were taken the morning before we ate them LOL


Do give this a try, you will not regret it :)

Sunday, March 6, 2016

Oaty Peanut Butter Energy Bars

A lot of energy bars sold out there. Snack that gives an impression as a healthier alternative
Well, I read many articles that they are actually not. Most are apparently are loaded with sugar, flavouring, preservatives and many other chemicals that the names I can't pronounce haha..
I am not into this kind of snack but I like to eat them too occasionally
After knowing the facts, I guess it's better to make my own at home whenever the craving sets in
As delicious, eaten with less worry :)
This is one recipe I have tried, and I like it :)


What you need:
 
115g creamy peanut butter
120g raw honey (original recipe was 170g but I found it too sweet)
80g rolled oats
1 tbsp chia seeds (original recipe used mixed seeds, can replace with mixed nuts and/or dried fruits)
 
Method:
  1. Over low heat in a pan, warm up peanut butter. When it's warm, add in honey and remove from heat
  2. Mix both til well incorporated
  3. Add in oats and mix well, followed by the seeds
  4. Transfer into a square tin or pan and press it down to make it evenly spread
  5. Chill in the refrigerate for about an hour and cut into 6 bars
 
Note:
Consume in moderation because peanut butter is high in fat, even though it's mainly the good fats in it haha.. and honey is high in sugar too, even though it's a better choice for sweetener
I usually limit this snack to 1 bar a day. The remaining can be kept well in the fridge


This post is linked to the event, Little Thumbs up organised by Doreen from my little favourite DIY and Zoe from Bake for Happy Kids and hosted by Joyce from Joy 'N' Escapade at this post


Monday, November 30, 2015

Mango & Avocado Salsa

Easy and so refreshing! I can't stop eating this. Yum yum :)


What you need:

1 avocado, pitted and diced
1/2 mango, peeled and diced
1/2 Japanese cucumber, halved and sliced
10 cherry tomatoes
1 red onion, peeled and diced
a handful of coriander leaves, chopped
juice of half a large lime
salt and black pepper to taste

Method:
  1. In a bowl, put together all ingredients and mix well
  2. Refrigerate before serving


This post is linked to the event Little Thumbs Up (November 2015: Mango) organised by Zoe of Bake for Happy Kids and Mui Mui of My Little Favourite DIY, and hosted by Jozelyn Ng of Spice Up My Kitchen
 

Mango Soft Milk Toast (1 Proof)

I was thinking to try baking bread with mango for Little Thumbs Up this month when I saw Edith of Rumbling Tummy made one and it looked so good I knew I had to try that
And I did yesterday. The result was a satisfying soft bread I could eat on its own. It stayed soft til now. And it's really tasty, too. The mango taste was not so obvious but it did made the bread sweet and fragrant. I added a little chopped dried mango and it just got better

This recipe has been going viral in some Facebook baking groups and after gave it a try I understand why. The texture of this milk bread is soft yet it has volume that makes you really full after eating just one thick slice. it's far from dense, so really pretty amazing
Another thing is the one time proofing. This is really a bonus from the usual long waiting two times proofing bread making process

Last night I took some pics but as you know I hate taking pics at night. But no choice since DH has been bugging me to do it cos he couldn't wait to try LOL


I got a small loaf and I separated each section so that it would cool faster. You can see the top crust was dark brown. Too dark.
I set my oven at 30mins and then I set my alarm clock on my mobile phone, too. When I came to check 30mins later, I saw the top was dark brown, too brown to my liking
I reckoned it's the pan I used, it's smaller than what's recommended. I guess it caused my bread rose high and I didn't check in time to salvage the situation. Another thing was, I didn't switch on the oven fan. I think that  was one of the reason, too. Luckily it's not burnt yet :)


What you need:

250g bread four (I used unbleached)
40g castor sugar
15g full cream milk powder (I used Fernleaf)
3g salt
3g instant yeast
25g butter, softened (I used extra virgin cold pressed coconut oil)
55g egg (1 medium)
60g fresh milk (I used Magnolia oats milk)
50g mango puree
30g chopped dried mango

Method:
  1. Using breadmaker to knead, I pour in room temperature egg, milk, coconut oil and mango puree, followed by flour, sugar, milk powder and salt in one corner. After that at the other corner, add in yeast. Start kneading cycle, usually it's 30mins
  2. After done, transfer the dough to a lightly floured surface, knead a few times and cut into 3 portion
  3. Flatten each dough and roll downwards. Place in a greased and lined baking pan (recommended 20x10x10cm) and bake in preheated oven of 180degC for 40mins (please check after 30mins)
  4. Remove from oven and transfer to the cooling rack. Brush the top with a little butter and let cool
 
This morning I had this for my breakfast and managed to take some pics, too :)


Still soft!


This post is linked to the event Little Thumbs Up (November 2015: Mango) organised by Zoe of Bake for Happy Kids and Mui Mui of My Little Favourite DIY, and hosted by Jozelyn Ng of Spice Up My Kitchen


Friday, November 27, 2015

Mango & Chicken Rice Salad

Ah, it's almost a month since the last time I blogged!
Kids exams, followed by family holiday, and then post holiday blues haha..
Now, I'm back :)

This salad I am going to share today is very refreshing and very filling at the same time
I enjoyed eating this dish, especially knowing that it's rather healthy, too
Bonus, it's easy to prepare :)


Source: Joanna Soh You Tube Channel

What you need:
(serves 2)

1 cup uncooked rice, cooked as instructed, and cooled (leftover rice is good, I used a mixture of red and white rice)
170g chicken breast, cooked as preferred (I seasoned with salt and pepper then pan fried  and shredded)
110g ripe mangoes, diced
140g Japanese cucumber, diced
1 stalk of spring onion, thinly sliced
1 tbsp chopped basil (I used 1 tsp dried basil)
salt and pepper to taste

Dressing:
juice from 1 large lime
1/2 tbsp sesame oil
1/2 tbsp rice vinegar
1/2 tbsp honey

Method:
  1. In a small bowl, mix all ingredients for the dressing, set aside
  2. In a separate large bowl, mix rice, chicken, cucumber, spring onion, basil and mango
  3. Drizzle the dressing over it and toss til evenly mixed
  4. Season with salt and pepper
  5. Best to keep it refrigerated for a few hours til it's chilled before serving


This post is linked to the event Little Thumbs Up (November 2015: Mango) organised by Zoe of Bake for Happy Kids and Mui Mui of My Little Favourite DIY, and hosted by Jozelyn Ng of Spice Up My Kitchen
 

Saturday, October 31, 2015

Pandan Buns With Coconut Filling

One of my favourite buns. I love pandan and anything with coconut :)


I love pull apart buns. Easy to shape and I love tearing them apart LOL


Recipe is from Mimi Bakery House with some modification
 
What you need:
 
The buns:
240g bread flour
20g sugar
3g yeast
3g salt
30g egg
mix water and 2 tbsp homemade concentrated pandan juice to make 120g
25g unsalted butter
 
beaten egg & fresh milk mixture for egg wash
a little extra butter to brush the buns
 
The coconut filling:
125g fresh grated coconut
5 tbsp coconut sugar
40g water
1 pandan leaves, knotted
1/2 tsp glutinous rice powder mixed with 1 tbsp water
 
Method:
 
For the filling:
  1. In a small pot, boil water and sugar til sugar dissolved completely, strain the liquid
  2. Transfer the liquid into a pan, add in coconut and pandan leaves. Stir until mixed well and continue cooking until the desired texture achieved
  3. Stir in glutinous rice mixture, mix well. Set aside for later use
For the buns:
  1. Into the breadmaker pan, add egg and pandan mixture. Followed by bread flour, sugar, and salt at one corner. Add in yeast at another corner. Set to dough function and let the machine do the kneading
  2. After 5mins, add in butter. After 1hour 30mins, dough is ready to shape
  3. Remove from bread pan and divide into 10 equal portions. Round into balls and leave it for 15mins covered with damp towel
  4. Flatten each ball and add coconut filling at the centre (about 2 heaped tsp) and wrap it up, pinch to seal and shape like a ball, place on a lined baking sheet pinched side down
  5. Proof them for another 45mins or til doubled in size
  6. Meantime, preheat oven to 175dec. Brush the dough with beaten egg & milk mixture and bake for 15mins approximately or til it's browned on top and sound hollow when tapped
  7. Remove from oven and transfer to cooling rack. Brush the top with a little butter

I think I can add more filling in the future. I want more coconut! :)


These are fragrant and yummy, full of coconut flavour buns. Love the taste
Texture wise, not the softest buns I ever baked. It turned a little harder the next day, but warming it up in a microwave for 15secs is enough to bring back the softness :)


This post is linked to the event Little Thumbs Up (October 2015 : Coconut) organised by Zoe of Bake for Happy Kids and Doreen of My Little Favourite DIY, and hosted by Jess from Bakericious
 

Thursday, October 29, 2015

Thai Style Prawn Avocado Rice Vermicelli Soup

This unique dish is surprisingly so good!
Inspired by Thai dish, tasty coconut base soup with a hint of sourness eaten with crunchy prawns and the green vegetables, added with the creamy avocado, slurping the noodles too at the same time
Not convinced? Give it a try :)


Recipe is from Café Delites

What you need:

500g prawns, deshelled and deveined
1 tbsp coconut oil
2 cups chicken / vegetable stock
2 cups light coconut milk
some baby bok choy, cut
2 stalks of spring onion, sliced
4 kaffir lime leaves
1 lemongrass, peel the outer layer and halve
2 garlic cloves, finely chopped
1/2 cup cilantro, roughly chopped
1 tbsp soya sauce
2 tsp fish sauce
a pack of rice vermicelli, prepare as instructed (I used brown rice vermicelli)
1 avocado, chopped
lime wedges, to serve
1/2 tsp crushed red chili flakes (optional, I didn't use)

Method:
  1. In a large deep pan, heat coconut oil and pan fry prawns til changed color and just cooked through. Remove from heat and set aside
  2. Using the same pan, pour both chicken stock and coconut milk, bring to boil and let it simmer. Add in garlic, lemongrass, spring onion and lime leaves. Followed by soya sauce, fish sauce and half of the cilantro. Lastly, add in bok choy
  3. Arrange cooked rice vermicelli in serving bowls. Scatter avocado and pour the soup over it and then sprinkle the remaining cilantro. Season with lime and serve immediately

Yummy hearty meal. Adding chopped red bird's eye chilies would be even better. Regretted for not doing that haha..


This post is linked to the event Little Thumbs Up (October 2015 : Coconut) organised by Zoe of Bake for Happy Kids and Doreen of My Little Favourite DIY, and hosted by Jess from Bakericious


Wednesday, October 21, 2015

Nasi Liwet Solo

That's the name. I do not know how to translate it in English LOL
A very fragrant and delicious Indonesian dish particularly from a city in Central Java called Solo I can't find in Singapore so no choice I must make my own whenever the craving sets in. And it's a pretty complicated as there are several dishes in it. A lot of ingredients involved, a lot of work too. But it's worth it. Seriously! :)


A dish typically served on a layer of banana leaf over the serving plate
It consists of tasty coconut rice, white curry chicken, stir fry spicy chayote, egg stew and yellow curry thick sauce. Put together and eat. Heaven!


Recipe is from Diah Didi's Kitchen
 
What you need & method:
 
For the tasty rice:
250g rice
2 Indonesian bay leaves (daun salam)
1 lemongrass, take just the white part and lightly pounded
enough salt
600ml coconut milk (I mixed 300ml coconut cream with 300ml water)
 
Method:
Mix everything in rice cooker and let it cook. When the switch turned to warm, let it stand for 15mins then fluff up the rice (the amount of coconut milk varies according to the type of rice used)
 
For the stir fry spicy chayote:
2 chayote, peeled and cut into thin strips
8 shallots, sliced
4 cloves of garlic, sliced
2 Indonesian bay leaves
2cm blue ginger, lightly pounded
6 large red chilies, discard the seeds (you can keep the seeds for spicier taste.. original recipe used 4pcs only as she added bird's eye chilies too)
10 green bird's eye chilies - whole (I skipped)
1/2 tbsp dried shrimp, soak in warm water to soften and grind til fine
1 tsp chicken stock powder
enough salt
1/2 tbsp coconut sugar
800ml coconut milk (I mixed 400ml coconut cream with 400ml water)
2 tbsp cooking oil
 
Method:
Heat oil in a pan. Sautee shallots, garlic and chilies til fragrant. Add in dried shrimp, bay leaves, blue ginger, mix well. Add in coconut milk, chicken stock powder, salt, coconut sugar and bring to boil. Add in chatoye, stir well and let everything cooked. Adjust the taste and you're done
 
For the white curry chicken:
1 whole free range chicken, washed and cleaned, discard unwanted fats and cut into 2parts
1L coconut milk (I mixed 500ml coconut cream with 500ml water)
2 Indonesian bay leaves
3 kaffir lime leaves
2 lemongrass, lightly pounded
3cm blue ginger, lightly pounded
1 tbsp coconut sugar
enough salt
To grind together: 8 shallots + 2 cloves of garlic + 6 roughly chopped candlenuts + 1 tsp coriander seeds + 2cm peeled yellow ginger
 
Method:
In a large wok or pot  add in the blended ingredients, chicken, coconut milk, bay & lime leaves, lemongrass, blue ginger and coconut sugar. Bring to boil and then let simmer til the chicken soft and  liquid thickened up. Add in salt, and adjust the taste. Transfer the chicken into another serving bowl and reserve the liquid to make the curry thick sauce
 
For the eggs:
4 hard boiled eggs, peeled
1.5L water
1 1/2 tsp salt
a handful of shallots skin
2 Indonesian bay leaves
 
Method:
In a pot bring to boil all ingredients and simmer til eggs turned brown. Transfer the eggs onto a serving plate
 
For the curry thick sauce (we call it "areh" in Indonesia):
2 beaten eggs
enough of the soup used to cook the chicken
 
Method:
In a heat proof bowl, mix eggs and soup and steam til cooked, about 20mins over medium heat


How to serve...
Place a layer of clean banana leaf, scoop some coconut rice over it added with the egg, spicy chayote, shredded chicken and the thick curry sauce
For those who like really spicy dish, you may eat with sambal belachan. Yum!


This post is linked to the event Little Thumbs Up (October 2015 : Coconut) organised by Zoe of Bake for Happy Kids and Doreen of My Little Favourite DIY, and hosted by Jess from Bakericious
 

Wednesday, September 30, 2015

Wholemeal Chocolate Milo Buns

To end my Milo adventure this month, I baked these yummy buns
I wish today is not the end of September as I still have a few Milo munchies recipes waiting to execute. But then again, I can always make them anytime and share here :)

These buns made using straight method, fuss free method which I like and yet the result is not compromised. They are soft, fluffy and delicious. With some goodness of wholemeal flour in it. My house was full of Milo and chocolate aroma during baking. Love it
My kids love them, which is no surprise. Chocolate with Milo in a bun? Who can say no? :)


See the first pic below. Notice the little tiny specks on the buns? It's because I used wholemeal flour to replace whole wheat flour. I usually use Origins brand organic wholemeal flour, but I had no stock this time, so I used Prima brand wholemeal flour which has coarser texture. To us, this change didn't give any effect at all


This is one of the part I enjoyed the most every time I bake bread. Tearing them apart LOL


Happy happy. Soft and fluffy. Chocolaty and yummy. Pass :)


Recipe is from Honey Bee Sweet

What you need:

315g bread flour
50g whole wheat flour
75g Milo powder
35g caster sugar
1/2 tsp salt
4g instant yeast
225ml chocolate milk
40g egg white
30g unsalted butter, room temperature
some chocolate chips for filling (optional - I added)

Method:
  1. Using breadmaker to knead, add in chocolate milk and egg white into the pan, followed by bread flour, whole wheat flour, Milo powder, caster sugar, salt. Lastly, add in yeast, make sure it's not in touch with salt
  2. Choose 'dough' function and press start. After 5mins of kneading, add in butter and let the machine does its job (about 1hr 30mins with proofing)
  3. After done, take out the dough from the pan and on lightly floured surface, divide into 50g balls
  4. If you want to add filling, flatten the ball and add in chocolate chips at the centre and seal the ball
  5. Place onto a lined baking pan (sealed side down)
  6. Let proof til doubled in size about 45mins
  7. Preheat oven to 175degC. Before baking, brush them with eggwash (I had 1 beaten egg mixed with 1 tbsp fresh milk) and then bake them for about 12-15mins til golden brown
  8. Once baked, remove from oven and transfer to cooling rack. Brush the top with butter
  9. Once cooled, keep in an airtight container

Enjoying every bite :)


This post is linked to the event Little Thumbs Up (September 2015: Milo) organised by Zoe of Bake for Happy Kids and Doreen of My Little Favourite DIY
 

LinkWithin

Related Posts Plugin for WordPress, Blogger...