Pages

Showing posts with label sponge cakes. Show all posts

Wednesday, April 19, 2017

Moist Vanilla Sponge Cake

People loves sponge cakes. Who doesn't?
Well, I found some who don't. They said sponge cakes tend to be at the drier side, some are chewy and making them choked when swallowing LOL
I know that feeling. I experienced that before whenever buying from outside cakeries
Even some sponge cakes I baked before give me a kind of the same feeling
Behold, here I present you one of the best - if not the best - sponge cake I have ever eaten


It's so pillowy soft, fluffy and most importantly, moist and free from additives like sponge gel
Bye bye dry and chewy sponge cake
From now on, this is gonna be my to go recipe for sponge cake, until perhaps, I can find a better one, which I doubt so haha..

Look at the texture *love*


Recipe is from IG @chenniezhang

What you need:

8 egg yolks
4 egg whites
100g caster sugar
75g plain flour
12g corn flour
115g melted butter
1 tsp vanilla extract

Method:
  1. Preheat oven to 180degC. Grease and line 24cm square pan (4cm height)
  2. Using electric mixer over highest speed, beat eggs and sugar until the thickness reaches ribbon stage (about 10 to 15mins depending on the mixer)
  3. Reduce the speed to the lowest and add in vanilla extract, followed by sifted plain and corn flour. Mix until just incorporated
  4. Off the mixer. Scoop about 1/4 of the batter into the melted butter and mix well until really combined. Pour the butter mixture into the remaining batter and fold in gently
  5. Pour the batter into the prepared pan and bake for about 20-30mins depending on the oven
  6. Check with skewer for doneness. Remove from oven, and transfer the cake to cooling rack
  7. Sprinkle / spread topping of your preference when it's completely cooled


Tuesday, November 15, 2016

Old Skool Vanilla Cake

This recipe has been going viral in Instagram with many Indonesian home bakers. They call it 'Bolu Jadul' (old skool cake)
All gave good reviews, so I had to give it a try too. And it's true that this recipe yields a nice and soft cake which also loved by my family
The texture is something like in between of sponge and butter cake. Yummy! :)


The recipe below...
 
What you need:
 
4 eggs (room temperature)
120g sugar
100g plain flour
20g milk powder
1/2 tsp baking powder
1 tsp vanilla extract
75g butter (melted)
 
some buttercream, chocolate spread, chocolate rice and grated cheese for topping
(I sprinkled 2/3 of the cake with chocolate rice and the remaining with cheese)
 
Method:
  1. Lightly grease 20cm square baking pan. Preheat oven to 150degC
  2. Sift together plain flour, milk powder and baking powder
  3. In another bowl, mix melted butter with vanilla extract
  4. Beat eggs and sugar til light and fluffy (ribbon stage - about 10mins on highest speed)
  5. Fold in flour mixture gently
  6. Scoop 1/4 of the batter and add into the butter mixture, stir til combined
  7. Pour back into the remaining batter and fold in gently
  8. Pour batter into the baking pan and bake for 30mins until skewer test comes out clean
  9. Remove from oven and transfer onto a cooling rack
  10. When cooled completely, add in topping by spreading buttercream and sprinkle with grated cheese, and spreading chocolate spread and sprinkle with chocolate rice
 
In this recipe, I used vanilla extract from Bake The Natural Way
They're kind enough to send me a set of their vanilla products for me to try out
 
The vanilla extract is quite subtle and nice, with some sweetness in it. For those prefer stronger vanilla flavor, some adjustment to the quantity is required
I had previously used it for making vanilla ice cream and I like it too :)


A set of Madagascan vanilla extract, vanilla powder and vanilla pods


My kids' choice


My choice


Nice cake with relatively easy preparation. A keeper :)


Sunday, April 7, 2013

THB #15 Orange-Frosted Sponge Cake

I baked this soft, fluffy and yummy cake yesterday and I was out the whole day today so I only can post now, luckily I'm still in time phew.... :)


First pic - last night just after I poured the frosting


The pics below - taken this morning


This cake is more to chiffon cake, to my opinion. I reduced the sugar used for egg yolks mixture to 1/2 cup from 1 cup and for egg whites mixture to 1/3 cup from 1/2 cup, and I found the sweetness is just nice for me. In fact, I didn't mind eating it plain without frosting :)

I used bundt pan since my chiffon pan with removable bottom is too small in size. I did struggle a little to remove the cake from the pan, hence the not so smooth top, and the frosting didn't help much to cover it up since the frosting I made was not smooth enough, either :(
And I found it's a little too runny for me, perhaps cos I only used half quantity of icing sugar than recommended. Nevertheless, it added some sweetness to the not so sweet cake, also infused more orange fragrance and taste, and best of all, it still can set very nicely the next day after kept overnight in airtight container in room temperature :)

I prefer to it the next day after the frosting has really set, very nice :)
Those who loves light fluffy cake must try this cake :) No oil, no butter, no guilt LOL

I'm submitting this post to The Home Bakers hosted by Joyce from Kitchen Flavours
where we bake recipes from the book Coffee Cakes by Lou Seibert Pappas
This recipe was chosen by Mimi from MiMi Bakery House
Please view the full recipe HERE


Want to view other members bake this cake? Click HERE

Tuesday, September 11, 2012

ABC September 2012 - Mile-High Vanilla Sponge Cake

I've baked sponge cakes before but this cake is a total winner in terms of softness and fluffiness
It's so soft, even softer than angel or chiffon cake! To me, this is not sponge cake, it's more to chiffon cake
Whatever it is, it's really nice in taste, and even though I read many reviews that it's rather dry, I didn't find it dry I could eat it plain, but of course eating it with sauce was even better :)
A little on the sweet side, but still aceptable


I have been trying to bake chiffon cakes but so far I couldn't make one with nice look, even though texture was fine
Even though this was not perfect, but it was the first one I could make a chiffon cake that can sit tall nicely :)


Extremely soft that it's not an easy task to cut a thin slice, and cutting with serrated knife is a must, it does make your life much easier :)


This is how my kids prefer to eat this cake - with Hershey's chocolate sauce :)
It indeed made the cake more moist and so delightful to eat :P


This is the bake of the month of September for Avid Baker's Challenge event hosted by Hanaa
Recipe is from the book The Weekend Baker by Abigail Johnson Dodge
Please hop on ABC's site to view other members baking this cake


Now I'm really keen in trying out the orange version or even pandan or chocolate :)


Sunday, April 29, 2012

Banana Choco Mousse Chocolate Layered Cake

Banana chocolate cake, a combination many can't resist
First time I sank my teeth in this delicious cake was a store bought one, from Awfully Chocolate and Secret Recipe
It's love at first bite LOL

I've tried to bake this cake long time ago, I think close to 3 years ago, for my sis' bday, way before I started this blog
The time when I thought I could bake, when I was still lack of knowledge, resulting in disastrous time in the kitchen preparing this cake, and a far from acceptable cake, in terms of the taste, texture and presentation

Now, I think I am pretty much equipped to retry baking this cake again :)
And this time I'm satisfied with the result, even though it's still not as pretty as the ones from the two bakeries I mentioned above
Recipe is from Aunty Yochana's site, mine is not as pretty as hers, either
It's not easy to compete with such a deco expert like her :o)

I'm using one 4" and 5" round pans
The pictures below is from the 4" round pan


I should have spread the mousse layers thicker, no complaint though...


What you need:

For the cake:
A
4 egg yolks (from 60g eggs)
100g castor sugar
120g self raising flour
1/2 tsp double acting baking powder
1/2 tsp baking soda
50g canola oil
1 tsp vanilla extract
B
4 1/2 egg whites (from 60g eggs)
1/4 tsp cream of tartar
60g castor sugar
C
30g cocoa powder
120g hot water
  1. Mix all A ingredients in a mixing bowl, stir with wooden spoon
  2. Mix together C and stir til smooth
  3. Add in C mixture into A mixture and stir til smooth
  4. Beat egg whites and cream of tartar from B for 2 minutes til frothy, pour in sugar gradually til egg whites become fluffy but not too stiff (soft peak)
  5. Fold in gently half of A mixture into B mixture
  6. Fold in the remaining A mixture into B mixture
  7. Do not overmix, if still can't well mixed, stop folding in
  8. Pour the batter into 9" round pan which has been greased, lined with baking paper and greased again
  9. Bake at preheated oven at 175degC for approximately 50 minutes or til the skewer comes out clean
  10. Cool and cut into 3 parts
For the mousse:

400g whipping cream
 1 tsp vanilla extract
1 tbsp geatin powder, mixed with 4 tbsp water, microwave for 20 seconds (note: use when still hot)
50g cocoa powder - sifted
80g icing sugar - sifted
1 1/2 tbsp nescafe powder mixed with 1 1/2 tbsp water
1 tbsp kahlua

*3 medium size del monte bananas, thick sliced and soak in lemon juice to prevent it from browning
  1. Beat the whipping cream til stiff
  2. Mix all other ingredients together and stir in to the whipped cream 
  3. Keep in the fridge
For the chocolate ganache I used the same recipe I used here
I microwaved for 30 seconds til it melted, let cool
How to assemble the cake:

Lay 1 cake layer and spread the mousse on top. Arrange sliced bananas on top of the mousse
Top up with the second cake layer, spread the mousse on top and arrange sliced bananas on top
Top up with the third cake layer
Cover the whole cake with the balance of the mousse and keep in the fridge til set
Pour the chocolate ganache over the cake and keep back in the fridge til set

Tempted?

DH did, these are his hands wanted to grab the cake LOL

Also I'm linking up this post to:

Wednesday, April 18, 2012

Japanese Strawberry & Raspberry Shortcake

I love this cake, my family love this cake too
Who doesn't?
Who can resist such a temptation?
A soft velvety sponge cake wrapped and layered in smooth light whipping cream with sweet tangy strawberries in between
Even before I started baking in my own kitchen, I always bought from bakeries :)
This heavenly cake I made was the second recipe I tried, you may view the first one HERE
I liked the first one I made, but this one...I looooovvveee!!!
Everything is much better, the taste, the texture, it has class I must say

Recipe is from Rima's site
Even though I couldn't make it as pretty as hers (it's a challenge to come close to it!), I was very happy and definitely will stick to this recipe, it's a keeper! :)
I added raspberries too while still using strawberries too, first layer at the bottom was with strawberries and the second cream layer was with raspberries
Arranged the remaining fruits on top of the frosted cake and that's it :)


What you need:

For the cake:

145g cake flour
15g corn flour
1 egg
5 egg yolks, whisk slightly with fork
150g unsalted butter
65g fresh milk
5 egg whites
100g castor sugar
1/4 tsp salt

250g fresh strawberries
170g fresh raspberries
  1. Preheat oven to 160degC
  2. Grease and line 8"square pan, wrap bottom with aluminium foil
  3. Heat butter and milk til melted and combined, do not boil
  4. Off heat and add in sifted flour, mix with wooden spatula
  5. Transfer to bigger bowl, add eggs, continue to mix til smooth
  6. In another bowl, beat egg whites on low speed til frothy, add salt and followed by sugar in 3 additions, beat til soft peak
  7. Pou 1/3 of egg whites mixture into egg/butter mixture, fold in gently, pour the rest and continue to mix gently
  8. Pour batter into pan, bake au bain marie for approximately 45minutes or til skewer comes out clean
  9. Remove from oven, after 5 minutes trasnfer to cooling rack
For the stabilized whipped cream:

2 tsp gelatin powder
8 tsp cold water
2 cups whipping cream, cold
1/2 cup ising sugar
1 tsp vanilla
  1. Chill mixing bowl and beaters in the freezer for 10 minutes
  2. Put cold water in small saucepan, sprinkle gelatin over surface of the water and let stand for 5 minutes
  3. Place saucepan over low heat, stir continuously with wooden spoon just until the gelatin dissolves. Remove the saucepan from the heat and cool to room temperature
  4. Remove mixing bowl and beaters from freezer. In the mixing bowl, combine whipping cream, sugar and vanilla and whip til slightly thickened. While beating slowly, gradually pour the gelatin into the whipped cream mixture
  5. Then whip the mixture at high speed til stiff
For sugar syrup:

1/4 cup sugar
1/4 cup water
1 tsp kirsch gel
  1. Combine in a small saucepan, bring to boil, stir in sugar til dissolved
  2. Let cool
To assemble:
  1. Reserve some strawberries for decoration (the pretty ones!)
  2. Dice the balance, mix with a little sugar, set aside
  3. Reserve some raspberries too for decoration and halve the balance
  4. Cut cooled cake into 3 parts
  5. Place 1 layer cut side up, brush with syrup, spread cream, arrange diced strawberries and spread again with cream
  6. Repeat with the 2nd layer (but this time with raspberries), put the 3rd layer cake on top, brush with syrup and layer thinly with cream
  7. Chill for 30 minutes at least
  8. Spread another layer of cream on top of the cake and chill for another hour, garnish with berries
This is in fact the first time I baked cake and decorated it with fresh raspberries, I have been wanting to do it for long, but always beaten up by the price so ended up with strawberries
But hey, once a while won't hurt huh? LOL

How I love this red bright sweet tangy full of antioxidant properties little fruits :)
I guess my once a while treat will be getting more often LOL


And I'm linking this with:


Monday, April 9, 2012

Gateau Africain 4 Mum's Birthday

Yesterday was my mum's birthday
I decided to bake one of her favorite cake, which I love too, Gateau Africain
It's a 3 layered soft chocolate sponge cake with creamy vanilla custard with a hint of rhum in between, really yummy!
My mum used to bake this cake for the family, now is my turn to bake for her :)

 
So here it is, with a simple decoration (you know I only can do simple deco right? LOL)
We had just a simple gathering last night, sang happy birthday, candle blowing and cake cutting :)

 
In case anybody wondering what is the meaning of the word OMA shown in the picture below...Oma is what many Indonesians call our grandmother, it's more to those influenced by Dutch background. My kids call my mum Oma, too so they requested to put the word on the cake :)


The cake was quite a huge one, so after the cake cooled, I halved and made it into a rectangle cake 10x20cm frosted by dark chocolate ganache and decorated the sides with Loacker dark chocolate wafers, tried to beautify the cake a little more with some little fondant decorations on top and wrapped the cake around with red ribbon :)


Somehow after I kept the decorated cake in the fridge for a few hours, the wafers were a little curled wew....


And the picture below were taken the next morning...
 
 
What you need:
(recipe is from my mum except the chocolate ganache is from Melly's site)
 
For the cake:
 
15 egg yolks
8 egg whites
160g fine sugar
175g cake flour
50g cocoa powder
100g butter, melted
  1. Preheat oven to 180degC
  2. Grease 22cm square pan and line with parchment paper and grease on top of the paper, set aside
  3. Beat on high speed eggs and sugar til it expands to doubled in size (mine tripled quite fast!)
  4. Add in sifted flour and cocoa on low speed
  5. Take 1/3 of the batter and mix with melted butter, pour back to the remaining batter and fold in gently til well mixed
  6. Pour batter into the pan and bake for approximately 30minutes or when the skewer comes out clean
  7. Remove from oven, wait for 5minutes before turning the cake to cooling rack
  8. Let cool completely
For the custard:
 
500ml fresh milk
100g fine sugar
50g plain flour
10g corn flour
2 egg yolks
1/2 tsp vanilla extract
1 tbsp butter
enough rhum
  1. Boil milk and sugar til sugar dissolved, until milk starts to bubble - stir continuously, off heat
  2. When it turns lukewarm, add in flour mixture and vanilla, mix well
  3. Add in egg yolks one by one slowly, and start to cook again medium low heat, keep stirring til thickened
  4. Add in butter and rhum, mix well and off heat
  5. Store in a container and let cool in the fridge
For the chocolate ganache:
 
250g dark chocolate, cut small
250ml whipping cream
40g unsalted butter
  1. Heat whipping cream in a pot over low heat til smooth and warm
  2. Add in chocolate and butter, mix well til all dissolved completely, off heat
  3. Keep stirring til smooth and thickened, let cool
  4. Store in a container and keep in the fridge
To assemble:
  1. After the cake is cool, keep in the fridge for a few hours (I kept it overnight) wrapped in clingwrap
  2. Take out from the fridge and cut into 3 parts
  3. Put one part on the cake base, spread with custard on top, top with the second part, spread another layer of custard on top, and then top with the third part
  4. Spread chocolate ganache all over the cake, make sure it's smooth at the top, the sides doesn't have to be so neat, cos it'll be covered with wafers
  5. Arrange wafers around the sides of the cake, and tie around with pretty ribbon
  6. Decorate the top of the cake as per you like
  7. I just made some shapes using my leftover fondant with cookie cutters
This is another all time favorite in my family and apparently very well known among Indonesians. If you google the name of this cake, those links appear are mostly from Indonesian bakers and/or bloggers
But I did see the recipe in All Recipes site too :)
 
So glad that mum enjoyed this cake as much as I do
Happy birthday to you mum, we all always love you *hugs and kisses*
 

Friday, December 30, 2011

Pandan Cheese Sponge Slices

Another delicious treat for festive season!
Somehow I always link Christmas with red, green and white, I think everybody does :)


Recipe is from Ricke's site

What you need:

A
4 egg yolks
30g sugar
1 tsp ovalette
1/4 tsp vanilla extract
1 tbsp fresh milk

B
4 egg whites
1/4 tsp salt
1/2 tsp cream of tartar / lime juice
50g sugar

C
60g plain flour
15g corn flour
1/4 tsp baking powder
all mix and sieve

D
1 tsp pandan paste
60g butter, melted
mix both

Topping:
buttercream/whipping cream
grated cheddar cheese
maraschino cherries with stem

Preheat oven to 190degC
Grease square pan 24cm, line with parchment paper and grease again on top, set aside
For A:
Beat egg yolks, sugar, ovalette til thick and pale, add in vanilla and milk, mix well, set aside
For B:
Beat egg whites, salt and cream of tartar til frothy, add in sugar gradually while continuously beating til soft peak
Pour gradually A into B while beating in low speed til well mixed
Add in C, either fold in with spatula or beat with mixer in low speed
Mix 1/3 of the batter into D, mix well, and pour back to the remaining batter, fold in gently til well mixed
Pour into pan, bake approximately 15-20mins, tap the pan slowly before putting into the oven to release some air bubbles
Cool on the cooling rack, after cooled, spread whipping cream and sprinkle grated cheese, cut into squares
Decorate with maraschino cherries

Really delicious, especially if you're into pandan! And the texture of this cake is so pillowy soft!
Definitely can't stop at one! :)))

I'm submitting these slices to  Aspiring Bakers #14: Creative Christmas Bakes (December 2011) hosted by Hankerie

Also I'm posting this for Sweets For A Saturday #50

Thursday, November 24, 2011

Soccer Black Forest Cake 4 Hubby's Bday

Yesterday was DH's bday
He requested for chocolate cake but this time I wanted to give a little twist instead of normal chocolate cake
So I baked this black forest, in fact it's my first time baking black forest
And also, he asked for soccer cake wew.... his fave sport among many others :)

At first I planned to bake 3D soccer ball cake, but I changed my mind and decided to bake soccer field cake instead with players on top

The problem was...it's so difficult to get the cake topper
Well, I did search pretty last minute, but I have seen it many times before and right on time when I needed one, it's out of stock everywhere wew....
So, I was contacting one online seller back in Indonesia who sells baking stuff, so fortunate she had one, so I arranged shipment to Singapore, bought a few small stuff to make full use of 1 kilogram shipping fee I gotta bear

One day before the day, I went to Poon Huat in the afternoon and saw many sets available! Aaarrrgghhh!!!
Worried that the shipment would come late, I bought a set
And in the evening, the parcel arrived...great!
So in the end, I now have 2 sets on hand LOL
The one used on the cake was the one I bought from Poon Huat

Well, having more than enough is still better than not getting what I need, so no complain.. I can give a set for my kids to play hihi...

Now the cake...the sponge cake recipe is from Sonia's site
Believe me, this cake is a keeper, I will definitely use the recipe for cake base again and again in the future! :)
Yummy in taste, seriously soft and fluffy in texture, and it's strong enough to hold thick layer of buttercream and toppers
I baked using 10inch rectangle pan to fit the theme


I cut the cake into two parts, brushed each top with heavy syrup from the canned dark cherries mixed with a little of kirsch, filling was whipped cream and dark cherries

Buttercream recipe was from HERE with slight adjustment, I made 1 1/2 recipe with sugar amount for 1 recipe, added 3/4 part with green coloring and mixed well (the remaining was for the lines)
Frosted the whole cake with green buttercream and I covered the sides with oreo crumbs
The lines were made using wrong tip, I should have used thinner one, mine was all fat lines LOL

You see... I guess I cut the cake unevenly :(

From this pic below that I have taken with my zero photography skill under the worst timing of the day - night time!, I hope you can see how soft this cake is :)

The bday boy and the kids, all of us really enjoyed the cake! So glad and thrilled to know that DH was delighted to see the cake he requested for was right in front of him :)

To my DH, happy bday...Love u always XOXO :)

Monday, October 24, 2011

Japanese Strawberry Shortcake...Happy B'day To Me :)

My sis wanted to buy cake for my bday yesterday but I told her that I planned to bake one for myself
She scratched her head and said, you're the bday girl and you're the one who's going to bake your own bday cake? :)

This is one of my favorite cake, but this was my first attempt...it's also one of Abby's fave :)
Satisfied with the result, soft, light and fluffy sponge cake layered and covered with whipping cream with cut strawberries in between layers, yum!
Abby has to have two slices everytime, in fact as I'm writing this, she is now eating the last slice :)
I'm so happy I can bake another fave cake of hers, as usually I'd run to Four Leaves everytime her cravings for this cake kicked in hihi...

Before you view the pics below, please pardon the quality of the frosting, you know me...my weakness in cake deco hehe...


Recipe is from Dailydelicious, I don't have 7" round cake pan, so I used 8" and sliced the cake into two instead of three

What you need:

For the cake:
3 eggs
90g sugar
90g cake flour (sifted)
20g unsalted butter (melted)
20ml milk

For the syrup:
80g sugar
100ml water
2 tsp kirsch gel (or you may change to other liqueur or 1 tsp vanilla extract)
===> Bring to boil over low heat in small pot sugar and water, let cool, add in liqueur

For the whipped cream:
400ml whipped cream
40g icing sugar
===> Beat til forms medium stiff peak

Preheat oven to 180degC
Line pan with baking paper
Beat eggs in high speed til lighter in color, gradually add sugar into the eggs and beat til ribbon stage
Take 3/4 cup of the mixture, mix with melted butter
Add in sifted flour into the remaining of the eggs mixture, fold in gently til well combined
Pour the 3/4 cup of the eggs+butter mixture into the remaining eggs+flour mixture, fold gently and follow with milk, fold in gently til well combined
Pour mixture into pan, bake for 25minutes approx
Let cool, once cooled cut into layers (either two or three as you like), brush each top with kirsch mixture
Place one layer of the cake, place cut strawberries on top of the cake, pour whipped cream over strawberries, put another layer of cake over the cream, and frost the top and sides of the cake with the remaining cream
Decorate with whole strawberries
Refrigerate

Homemade cake on birthday - what can be better? :)

Tuesday, June 7, 2011

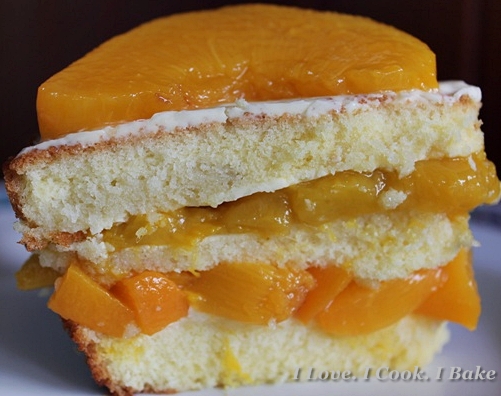
Mango & Peach Layered Sponge Cake

My lil princess Abby seems to need a break from chocolate
I was initially planning to try the highly raved banana chocolate cake, and when I told her, she said...chocolate cake again???
Oooppss...Okay...what do you want girl? I want mango cake! Oh...okay...

I happened to have some mangoes in the fridge - not much though, very sure it will be far from enough to bake one recipe, but this lazy mum was so reluctant to make a trip to less than 10mins walk to the nearest supermarket, so this mummy was happy to see a can of sliced peach unopened
Okay girl, is mango and peach cake allright? Yes, I love them both! Okay, set!

So I proceeded to my kitchen and prepared everything, yes - I baked the sponge cake first, and turned it to layered cake with the two fruits in between :)
Oh dear, I dun have whipped cream! And I saw a clear container with buttercream in it - yippe!

So, here it is..
Pic taken the next day - the last two 'imperfect shape' slices still survived *grin*
Bottom layer - chopped peach, top layer - chopped mangoes, topping - sliced peach - all sandwiched with buttercream in between
Taste heavenly!

Recipe for the sponge cake - the same as what I used for the failed mango mousse cake
This basic sponge cake recipe is a keeper!

I repeat the recipe here, as I dislike going back and viewing that failed cake I made ppfffff.... :P

What you need:
Using 20cm round pan)

100g cake flour
3 eggs, room temperature
90g caster sugar
20g unsalted butter, melted
2 tablespoons fresh milk
1 teaspoon vanilla extract

Sift cake flour, set aside. Line bottom and sides of an 20cm round pan with parchment paper, set aside
Pre-heat oven to 170degC. Position rack at the lower bottom of the oven
With an electric mixer, whisk eggs and sugar on HIGH speed for about 5 to 7 mins, until the batter double in volume and is ribbon-like (the beater should leave a ribbon-like texture when the batter is lifted up)
Turn to LOW speed and whisk for another 1 to 2 mins. Whisking at low speed helps to stabilise the air bubbles in the batter
Add sifted cake flour into the batter. With a spatula, gently fold in the flour until well blended. Take care not to deflate the batter. (To ensure proper folding in of the flour, you can add the flour in three separate additions)
Add the melted butter, fold with spatula until well blended
Add in fresh milk, vanilla extract and fold in gently with spatula
Pour the batter into the pan and bake for 30-35mins (mine was 25mins), or until a skewer inserted in the centre comes out clean. Unmold and invert onto cooling rack, cool completely

For the filling:
chopped mangoes
chopped peach
sliced peach
buttercream

I made the buttercream with this recipe

To make the layered cake:
Cut the cooled cake into 3parts
First part (bottom) - spread buttercream thinly on top, arrange chopped peach
Second part (centre) - spread buttercream thinly on top, place on top of the chopped peach (buttercream part facing down), spread the top part with buttercream thinly, arrange chopped mangoes
Third part (top) - spread buttercream thinly on top, place on top of the chopped mangoes (buttercream part facing down), spread the top part with buttercream thinly, arrange sliced peach

Note:
***Since it's pretty slippery to arrange fruits on top of buttercream and I dont like thick buttercream, after done with the layering, I immediately put the cake in the fridge (I put in the container to prevent the cake from drying)
***Original (and better) does not use buttercream, but instead whip non dairy whipping cream til stiff and arrange the fruits on top - this definitely a better way to hold the fruits - keep them in place :)

Saturday, April 9, 2011

Mango Mousse Cake 4Mummy's Bday

Can you imagine? Baked a cake for somebody's birthday and the cake turned out not as expected
Worse...it's mum's birthday!
That's what happened to me today...below is the story....

Have been planning to bake a birthday cake for my mum's birthday since she's in town - I asked her whether she prefers chocolate or fruity cake and she said she likes the latter one

After browsing many blogs and online recipe resources, I decided to bake mango mousse - since Thai honey mangoes are still available even though not as much
This was my first time making mousse cake as well as sponge cake
With so many recipes around, I chose the one from Happy Home Baking

At first I thought this gonna be a tedious, need a whole day to bake kind of cake, but I was wrong
This cake can't be categorized in simple cake (all layered cakes can't) but really, it's not so bad at all

Baking something that I never tried before for birthday cake for somebody as important as my mummy -WRONG!!!

The problem is not the cake, its in fact turned out perfect!
The sponge cake was perfect! It's really a keeper to use as cake base - unfortunately I didn't take a snap when it's just out of the oven
It's the mousse and the topping that messed the whole thing up!

The mousse: Since I'm still not so familiar with how "mousse state" looks like, I overbeat the whipping cream (lucky it's yet to turn into mashed tofu like texture, but very very close!)
No doubt the taste was excellent, but I ended up with lumpy and a little runny texture for the mousse, even after keeping in the fridge for more than 3 hours :(

Another big big big mistake I did...
The topping: Since I was disappointed with the mousse, I didn't want to use it as the cake topping, so it's only in between the 2 layers and I threw away the balance
Didn't want to have a bare plain birthday cake, but couldn't follow the recipe for the topping since I didn't have mango cordial
Cracked my unskilled brain and decided to arrange mango cubes on top and pour yellow agar agar
WRONG WRONG WRONG!!!

The top cake layer absorbed the agar agar so much that the texture changed, it expanded to double in size, became stiff and tasteless - it's like biting a sandy pudding :(
Luckily the mousse and the bottom cake layer was safe - still soft and moist, tasted yummy too

This is the cake before I knew about the "stiff sandy pudding"


Now you see the 2 pics below and you know what I mean when I said I'm really lousy at beautifying my bakings? So messy! I guess it's partly cos of my failed mousse *sigh*


I was shocked after cutting...you see below - the expanded stiff top cake layer :(

This is what I did - I cut and disposed the top cake layer only, assemble the remaining and eat! hihihi...
While munching, I imagined if only all is perfect, this cake were really superb!!!

Aside from the mistakes I have done, this recipe should have resulted in a beautiful and yummy mango mousse cake
As usual, mistakes made will leading to another try - soon! Hope my family can bear with me haha...
Perhaps I'll switch to strawberry or peach for the next try :P

This is the recipe:

For the sponge cake: ( I used 20cm round springform pan)

100g cake flour
3 eggs, room temperature
90g caster sugar
20g unsalted butter, melted
2 tablespoons fresh milk
1 teaspoon vanilla extract

Sift cake flour, set aside. Line bottom and sides of an 20cm round pan with parchment paper, set aside
Pre-heat oven to 170degC. Position rack at the lower bottom of the oven
With an electric mixer, whisk eggs and sugar on HIGH speed for about 5 to 7 mins, until the batter double in volume and is ribbon-like (the beater should leave a ribbon-like texture when the batter is lifted up)
Turn to LOW speed and whisk for another 1 to 2 mins. Whisking at low speed helps to stabilise the air bubbles in the batter
Add sifted cake flour into the batter. With a spatula, gently fold in the flour until well blended. Take care not to deflate the batter. (To ensure proper folding in of the flour, you can add the flour in three separate additions)
Add the melted butter, fold with spatula until well blended
Add in fresh milk, vanilla extract and fold in gently with spatula
Pour the batter into the pan and bake for 30-35mins (mine was 25mins), or until a skewer inserted in the centre comes out clean. Unmold and invert onto cooling rack, cool completely

For the mousse:

350ml whipping cream (35%) + 3-4 tbsp icing sugar (depending on the sweetness of the mangoes)
300g mango puree
200g mango cubes
17g gelatin powder
60ml hot water
1 tbsp rum

Dissolve gelatin powder in the hot water - keep warm for use later
Whip cream til 70% stiff or mousse state
Add gelatin solution into mango puree – mix well
Add mango gelatin solution into whipped cream, combine well

To assemble:
Cool the cake, cut into 2
Line the inner circumference of the springform cake pan with pectin / plastic cake tape (can grease the pan and line with parchment paper)
Put 1 layer cake onto cake pan, top with mango mousse
Add mango cubes, top with some mousse just enuf to cover the mango cubes
Chill for 15mins
Put in the other cake layer and pour all mousse over it
Chill cake 3 hrs b4 serving

Another way to assemble (with mousse circling the sides of the cake):
Line the inner circumference of the springform cake pan with pectin / plastic cake tape (can grease the pan and line with parchment paper) and trim the cake smaller than the cake pan
This way the mousse will cover the whole cake and no need to cream the cake – just add deco on top (mango slice will do)
The rest is the same as above method

Recommended topping:
=> mirror layer: mixture of mango cordial, water and gelatin powder
=> drop teaspoon on mango puree on the cake surface and swirl the puree with toothpick
1 tsp at the centre, and the rest at the clock position: 2, 4, 6, 8, 10, 12

Some tips:
*** If the whipping cream cant go stiff like mousse:
Chill stainless steel bowl and beater b4 using
Whip over a bowl of ice water
When cream starts to thicken, beat a further 10counts -> mousse state
If overwhip, fats will separate from the cream and will get mashed tofu like mixture -> what has happened to mine *hiks*
*** Take note:
Dry cake:
Over beat the egg whites
Bake in too high temp too long
*** When the cake is chilled and set, use hair dryer to warm all around the sides of the cake pan to release the cake

Having said all the terrible 'should have not been done' things, we still enjoyed the cake minus the stiff cake layer
In the future, I will save the first time trial bakings for normal days!

Happy birthday mum! Sorry for the cake incident *hugz and kisses*

LinkWithin

Related Posts Plugin for WordPress, Blogger...