Pages

Showing posts with label Best Recipes. Show all posts

Thursday, July 9, 2015

Pumpkin Cream Cheese Muffins

Happiness can be as simple as some muffins in the morning with a cup of coffee. At least for me haha.. These yummy muffins definitely can :)


What you need:
 
200g self raising flour
150g pumpkin, steamed and mashed
150g castor sugar
100g cream cheese
80g melted butter
50g fresh milk
3 eggs
1 tsp cinnamon powder
1/2 tsp baking soda
 
Method:
  1. Preheat oven to 180degC. Line muffin pan
  2. Whisk together mashed pumpkin (still hot) and cream cheese til well mixed. Add in eggs, milk and melted butter. Stir til well combined. Set aside
  3. In another bowl, mix in flour, sugar, cinnamon powder and baking soda
  4. Make a well in the centre and pour in the wet mixture. Fold in gently til just incorporated. Lumpy batter with some flour streaks here and there is alright. Do not overmix
  5. Pour batter into the muffin pan til 3/4 full. Bake for about 20-25mins til skewer comes out clean
 
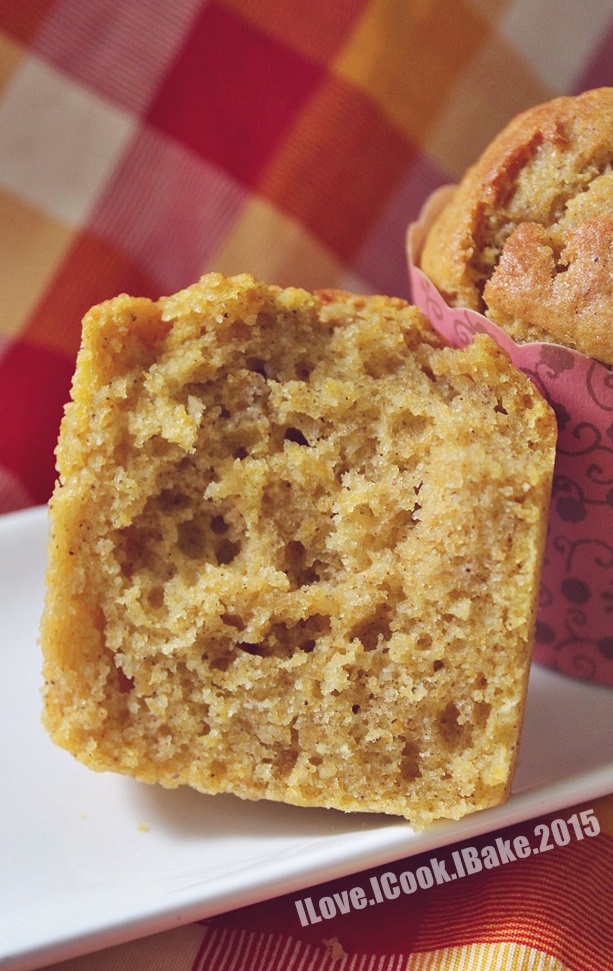
Delicious yummy muffins


Soft, moist, full of pumpkin and cinnamon flavour with a slight hint of the cream cheese. I like! :)
 
 
This post is for Best Recipes July 2015 event where the theme this time is I Have A Date With Pumpkin. This event is organized and hosted by Fion of XuanHom's Mom Kitchen Diary and co-hosted by Rachel from Simply Life 

Monday, June 29, 2015

Swiss Roll Meranti Copycat

Meranti swiss roll cakes is so popular in Medan, Indonesia. People visiting the place will not leave without it. I myself never visit the bakery but I did try eating the cake when my relative came to Singapore tagging this along for me :)
To me, it's just a normal swiss roll, the rich buttery kind, with different varieties of topping and filling, such as chocolate rice, blueberry, cheese, coffee, etc. It's yummy though, with a soft smooth texture

The famous Meranti swiss rolls


I then did some searching, and found one recipe tried by many Indonesian bakers, and they were happy with the result. So I made one, too :)


Recipe is in Indonesian language from HERE
Here's the English version...
 
What you need:
 
A
6 egg yolks
5 eggs
125g caster sugar
20g full cream milk powder
100g all purpose flour
1g double acting baking powder
1 tbsp water
 
B
125g butter (original recipe used 100g butter & 25g margarine)
1 tbsp vanilla extract
 
Filling:
blueberry or strawberry jam (I used strawberry)
 
Method:
  1. Heat oven to 180degC. Line 28cmx28cm swiss roll pan and grease
  2. Beat eggs and sugar til light and fluffy, doubled in size. Add in water, beat for a while and off mixer
  3. Sieve in milk powder, flour, baking powder and fold in gently with spatula
  4. Add in B and continue folding in the batter gently til well mixed
  5. Pour batter into the pan, lightly bang to release air bubbles (or you can tap the bottom of the pan too)
  6. Bake for 20-30mins (depending on the oven). To create 'skin' switch the heat to top heat for about 5mins after the swiss roll is cooked (watch out carefully)
  7. Remove from oven and on another piece of baking paper, invert the cake. Peel the top paper and leave to cool slightly
  8. Spread the jam and roll the cake away from you. Wrap tightly with the baking paper and put in the fridge for about 1 hour prior to serving. Cut and serve
 
My verdict, this recipe is really close to the original Meranti swiss roll. Rich, buttery, yummy
The texture reminds me of Lapis Surabaya (see how many eggs used, and you can see the resemblance haha)
This is definitely much more sinful than the usual swiss rolls, but indulging in it once a while in moderation is ok, I guess LOL


This post is for Best Recipes June 2015 event where the theme this time is Secret of Chiffon & Roll Cakes. This event is organized and hosted by Fion of XuanHom's Mom Kitchen Diary

Saturday, June 6, 2015

Pandan Chiffon Cake (Alex Goh)

This is my fourth time baking chiffon cake, and it's all pandan! haha.. It's time for me to switch to other varieties :)
This time is the famous chiffon cake recipe from Alex Goh :)


Still can't get the browned skin upon unmoulding the cake and look at the holes.. But aside from that, delicious soft and moist chiffon cake, another popular keeper recipe :)
 
 
I saw the recipe from Cook.Bake.Love
Here it is with slight modification I made...
 
What you need:
 
A
4 egg yolks
45g caster sugar
 
B
70ml coconut milk
45ml pandan juice
a drop of pandan essence (I added)
70ml canola oil
a pinch of salt
 
C
150g cake flour
1 tsp baking powder
 
D
4 egg whites
90g caster sugar
a pinch of cream of tartar
 
Method:
  1. Whisk A til dissolved. Add in B and mix well. Sift in C and mix til smooth. Set aside
  2. Starting with low speed for a minute then switch to high speed beat egg whites til frothy, add in cream of tartar and 1/2 part of the sugar from D. Beat til soft peak and add the remaining sugar. Continue beating til stiff peak, switch the last minute to low speed
  3. Fold in 1/3 of the meringue into the egg yolk mixture and mix well. Add in the remaining meringue and fold in gently til just incorporated
  4. Pour batter into 20cm ungreased chiffon cake pan, bang on the table top a few times to release air bubbles
  5. Bake in preheated oven of 175degC for 40mins. If in doubt, you can bake a little longer to be safe. For chiffon cake, slightly over baked is always better than under baked
  6. Invert the cake immediately after removing from oven. Let cool completely before removing from mould


This post is for Best Recipes June 2015 event where the theme this time is Secret of Chiffon & Roll Cakes. This event is organized and hosted by Fion of XuanHom's Mom Kitchen Diary

Saturday, May 16, 2015

Bake Along #78 No Bake Mango Cheesecake

This gonna be my last cheesecake contribution for Bake Along 4th birthday, happened to be the last day of submission too LOL
No bake cheesecake is a yummy refreshing dessert I love. DH loves this too over the baked version, even though his number 1 preference is still Japanese cheesecake :)


Argh! I always made a mess of the base crust :)


Recipe is from Cynthia from The Baking Biatch

What you need:

Base:
180g digestive biscuits (or marie biscuits)
80g melted unsalted butter

Cheesecake:
250g cream cheese (I used light cream cheese), room temperature
75g castor sugar
250g mango yoghurt
100g water
2.5tbsp gelatin powder
100g fresh mango cubes

Jelly topping:
125g mango puree from fresh mango
125g water
25g castor sugar
1 tsp gelatin

Method:
  1. Cut biscuits into small pieces and pulse in food processor til formed crumbs. Add in melted butter and pulse 1-2 times til well combined. Press the crumbs into a round spring form pan (I used 20cm) and refrigerate
  2. Prepare the cheesecake by mixing water and gelatin, stirring well before warming it up in microwave for about 15secs (til just warm)
  3. In a bowl, beat cream cheese and sugar over low speed til mixed and creamy. Add in cooled gelatin mixture and mix well. Add in yoghurt, and mix well
  4. Add in mango cubes and fold into the batter
  5. Pour onto the pan over the crust and keep in the freezer for about 2hours
  6. Prepare jelly topping by mixing all ingredients in a small pot over medium fire and bring to boil, stir continuously. Pour over the cheesecake in the pan, put back in the freezer for about 30mins or so
  7. Remove cheesecake from freezer. Using the back of a paring knife, run through the sides of the pan. Release the spring form pan and decorate the cake as desired with fresh fruits brushed with diluted jam for extra shine (and drool LOL) (I skipped this part as I am a lazy cake decorator haha)


I'm also submitting this post to the Best Recipes for Everyone May 2015 Event (Theme: My Favourite Desserts) organized by Fion of XuanHom's Mom and co-hosted by Aunty Young. Link is HERE


And lastly, this post is also linked to the event Little Thumbs Up (May 2015: YOGURT) organised by Zoe of Bake for Happy Kids and Doreen of My Little Favourite DIY, and hosted by Cheryl of Baking Taitai

Friday, May 15, 2015

Bake Along #78 Nutella Swirled Cheesecake with Nutella Fudge Sauce

Another cheesecake for Bake Along 4th birthday! :)
I love cheesecakes (read: I love ALL cakes) LOL. Give me any kind, I will eat it, be it baked or non bake cheesecake or Japanese cheesecake
But if I had to list down in order, the first in the list would be baked cheesecake, the creamy sinful type..yum! :)
I was drooling the first time I saw this cheesecake in Café Delites by Karina. In fact, almost all of her creations intrigue me. Not to forget how the beautiful photography skill she has which always manages to make me feel like licking my computer or tablet or hp screen LOL
Also knowing that she always tries to make an indulgence healthier, with all the nutrition facts included, it helps me to eat them with lesser guilt haha..
Anyway, I decided to give it a try, and look at this...


All the yummilicious factor is in the pic below, no explanation needed


Okay, now wipe your drool and read the recipe LOL
 
What you need:
(below is half recipe)
 
Base:
12 Oreo cookies, discard the filling
2 tbsp. virgin coconut oil
 
Cheesecake:
250g light cream cheese
150g light Greek yoghurt
2 eggs
1/4 cup caster sugar (I wanted to use Stevia but not too sure with the amount since Stevia is much sweeter than regular sugar)
1 tbsp corn starch
1/2 tbsp orange zest (I skipped)
1/2 tbsp vanilla paste
30g Nutella, warmed in the microwave for 30 secs
 
Nutella hot fudge sauce:
40g Nutella
2 tbsp chocolate milk (original recipe used regular milk)
 
Method:
  1. Preheat oven to 180degC. Grease a round springform pan (I only have 20cm size, so I used this, hence the short cake haha). Keep refrigerated
  2. Put oreo in the food processor til formed crumbs. Add in oil and pulse for a few times til well mixed
  3. Combine cream cheese, yoghurt, eggs, sugar in a bowl. Beat over low speed til smooth and creamy
  4. Add corn starch, orange zest if using and vanilla, beat til smooth and well combined for about 2mins
  5. Pour cheesecake over the oreo base and spoon the warmed Nutella onto the cheesecake. Using chopstick, make swirled pattern
  6. Bake for about 30-40mins until just set in the centre and the top lightly browned
  7. Remove from oven and leave it in the pan for about 15mins. Chill in the refrigerator for a minimum of 1 hour before serving
  8. Make the fudge sauce by mixing Nutella and chocolate milk in a small bowl. Microwave for about 30secs and mix well. Consistency should be a little runny
  9. Just before serving, arrange strawberries on top (or any other preferred fruits of your choice) and drizzle the sauce over it
 
I can eat plain just like this..


But eating the complete set with strawberries and the fudge sauce is the ultimate heaven! :)


I'm also submitting this post to the Best Recipes for Everyone May 2015 Event (Theme: My Favourite Desserts) organized by Fion of XuanHom's Mom and co-hosted by Aunty Young. Link is HERE


And lastly, this post is also linked to the event Little Thumbs Up (May 2015: YOGURT) organised by Zoe of Bake for Happy Kids and Doreen of My Little Favourite DIY, and hosted by Cheryl of Baking Taitai
 

Thursday, May 14, 2015

Bake Along #78 3 Ingredients Souffle Japanese Cheesecake

Oh! Bake Along is 4! How time flies! This year we celebrate with cheesecakes!
This easy 3 ingredients soufflé Japanese cheesecake has been pretty popular and tried by quite a number of bakers
Original recipe is from Ochikeron, one of You Tubers I like and subscribe :)


Somehow my top didn't brown enough. I guess I should have put the pan a little higher in the oven during baking or perhaps need to bake longer in my oven. Should try again :)


But regardless of that, this cake is really yummy. Light, moist, melt in the mouth and a very nice balance between the taste of the cream cheese and white chocolate. FYI, I'm not a fan of white chocolate. I am a dark chocolate eater. But I love this cake :)


What you need:
 
125g cream cheese, softened (I used Philadelphia light cream cheese)
120g white chocolate (I used Cadbury brand)
3 large eggs, cold
 
Method:
  1. Preheat oven to 170degC. Line the sides of 6" round pan with oiled parchment paper
  2. Separate egg yolks from the whites
  3. Put chopped white chocolate in a bowl and melt in double boiler using a very hot water, mix til smooth. Add in cream cheese and mix well. Add in egg yolks and stir well
  4. In another bowl, beat egg whites til firm peak. Mix 1/3 of the whites to the yolks mixture til well incorporated
  5. Add in the remaining whites and fold in gently til mixed
  6. Pour batter into the pan and water bath for 15 mins. After 15mins reduce temperature to 160degC and bake for further 15mins. Turn off the oven and leave the pan in the oven for another 15mins
  7. Remove from oven and let cool in the pan before transferring to cake container
  8. Chill in the fridge for a few hours before serving
  9. Just before serving, sieve icing sugar over the cake. Slice and serve

A bite for you?


This post is for Bake Along, an event organised by Joyce from Kitchen FlavoursLena from Frozen Wings and Zoe from Bake For Happy Kids


I'm also submitting this post to the Best Recipes for Everyone May 2015 Event (Theme: My Favourite Desserts) organized by Fion of XuanHom's Mom and co-hosted by Aunty Young. Link is HERE


Wednesday, April 29, 2015

Homemade Almond Dates Milk

I am not really milk drinker. Perhaps flavoured milk, but it's just once in blue moon I have the craving for one
When I decided to attempt on making almond milk, it's just a curiosity on my head
I did try store bought one in tetra pak, and I didn't really enjoy drinking it, mostly because of the strong smell of almond extract, which I hate
So, I was like, well, perhaps I could make better. So I tried. And it's something that I will not regret at all. In fact, I will be delighted to have this every single morning for breakfast! Yes, it's that delicious!
Oh, I'm a convert. Now I'm officially a milk drink. Homemade almond milk, that is :)


Recipe is from Oh She Glows

What you need:

1 cup raw almonds, soaked in water
3.5 cups filtered water
3 large pitted Medjool dates, chopped
3/4 tsp vanilla extract
small pinch of salt
1/4 tsp cinnamon (I skipped)

Method:
  1. Soak almonds in water for 8-12 hours (I soaked mine about 15hours)
  2. Soak dates for about 1 hour prior to making the milk. This step is optional, only when you feel the dates are too dry
  3. Rinse and drain almonds and place into a blender with filtered water, dates, and vanilla extract and blend on highest speed for about 1min
  4. Place a nut milk bag (I used cheese cloth but I reckoned nut milk bag is a better choice) over a large bowl and pour almond milk mixture into the bag. Gently squeeze the bottom of the bag to release the milk
  5. Pour milk into a glass jar, store in the fridge for up to 3-5 days. Shake jar very well before using as the mixture separates when sitting

This thick, creamy and delicious milk is so yummy on its own, to eat with cereal, to cook oatmeal or to make overnight oats. I was thinking to make some of the milk into chocolate flavoured, but perhaps next time. Meantime, I just enjoy this milk plain, something I almost never do! :)


This post is for Best Recipes
Recipe links HERE


Is that the reflection of my head on the glass? LOL


Monday, April 27, 2015

Orange Almond Dates Biscotti

This is actually my homework for Avid Bakers Challenge in February this year which I missed out
I finally did this, one yummy crunchy sweet munch, love it :)


Recipe is from Scientifically Sweet

What you need:

270g all purpose flour
2 tsp baking powder
1/4 tsp salt
100g whole raw almonds
75g unsalted butter
zest of 1 orange
2 large eggs
150g sugar
1 tsp vanilla extract
1/2 tsp almond extract (I skipped and I added another 1/2 tsp of vanilla extract)
85g dried dates without seeds, chopped
1 large egg, well beaten

Method:
  1. Preheat oven to 180degC, line a baking sheet with parchment paper
  2. In a large bowl, whisk flour, baking powder and salt. Stir in almonds, set aside
  3. In a small pot, melt butter and orange zest, set aside to cool slightly
  4. In another bowl, whisk eggs to blend. Gradually add in sugar, whisk til smooth
  5. Slowly whisk in melted butter and vanilla extract, and almond extract if using
  6. Pour this mixture into the flour mixture and stir til most flour absorbed. Add in dates and stir til soft sticky dough formed and dates evenly distributed
  7. Transfer dough to a lightly floured surface and divide into two parts. Roll each into 11 inches long log, flatten by hand until it's about 3 inches wide
  8. Brush top and sides with beaten egg and bake until golden brown and slightly cracked at the top, about 25mins
  9. Transfer baking sheet to a wire rack and let biscotti cool on the pan til cool enough to handle, about 10mins or so. Reduce oven temperature to 150degC
  10. Transfer each log to a cutting board and cut into slices, each approximately 3/4inch. Cut using serrated knife with a gentle sawing motion
  11. Place cookies, cut side down, back on the baking sheet and bake til very lightly golden, dry and crisp about 7mins each side
  12. Remove from oven and transfer cookies onto cooling rack. Let cool completely before storing into airtight container

I should have baked longer to get more browned top. And also, I had problem slicing the cookies because of the whole almond in it. I ended up having thick slices that I had to extend the baking time for each side to about 15mins


Yum! I love biscotti. Perfect with a cup of black coffee in the morning (or afternoon, or evening LOL)


This post is for Best Recipes
Recipe links HERE

Wednesday, April 15, 2015

ABC April 2015 Fudgy No Butter Gluten Free Almond Brownies

This recipe intrigued me. Luckily I was able to find time to bake it this morning
I mean, brownies with ground almonds, no butter, no gluten, no dairy, and it's fudgy? Must try, isn't it?

I must thank Hanaa, the host of Avid Bakers Challenge, for choosing this recipe, a fab one from Scientifically Sweet. Boy, this brownies is good, really good! :)

I laughed when I read how Christina described two little things that scare her. First, sharks. Second, baking without butter LOL I find it's so amusing, the mind of an avid baker :)

Yummy yummy brownies using a significant amount of almond meal which surprisingly works really well!


Super chocolaty, super fudgy, super delish! :)


Still not convinced with the pic above ? Look below! Too bad some parts are blurry haha..
It's so moist and fudgy I had problem making a neat cut! It's not an issue to me, by the way, cos I'm a happy girl while eating this chocolaty heaven :P


I made no change at all, except sung semi sweet chocolate chips instead of bittersweet
For full recipe, please view HERE

Abby loves this brownies, she ate a big slice in no time. Ian was sceptical after knowing there's almond in it, he did try a bite but after that said no more. Yeah, my fussy food critic in the house LOL
He did nibble some of the choco chips though. Look at his chubby fingers :)


Should I say this brownies is healthy? I personally think it's not really healthy as quite a lot of icing sugar is used, but it's definitely healthier than the usual brownies :) Talking about healthy, I wonder if this recipe works well with maple syrup or honey or fine brown sugar or coconut sugar...hmmm...probably I should try out :P
 
I found it's a little too sweet. I suspected it's the semi sweet chocolate chips. I didn't have bittersweet chocolate chips in hand, but I actually have 70% dark chocolate, should have used that instead. But, it's okay, I'm still one happy girl :)
 
 
This post is for Avid Baker's Challenge February 2015, a baking event hosted by Hanaa from Hanaa's Kitchen 


Also, this post is for Best Recipes
Recipe links HERE


Friday, April 10, 2015

Gluten Free Almond Flour Pizza Crust

This recipe intrigued me, especially since the source is from King Arthur Flour
I by far have never encountered any recipe from this site which failed me, it always ended up with a big hurray :)

So I gave it a try, not because I have problem with gluten, it's more to my curiosity for the texture and taste.
Easy to make, no kneading, proofing and waiting whatsoever. I used tomato sauce base and sprinkled with grated parmesan cheese. Topped up with sliced cherry tomatoes and Japanese cucumber, and lastly sprinkled with shredded mozzarella cheese. After baking, here it is - warm and crisp :)


What you need:

216g almond flour
14g coconut flour
1/2 tsp baking powder
1 tsp dried Italian herbs (optional - I skipped)
1/2 tsp salt
1/2 tsp ground black pepper
3 large eggs
25g olive oil

Method:
  1. Preheat oven to 175degC
  2. Whisk together almond flour, coconut flour, baking powder, herbs, salt and pepper, set aside
  3. In a separate bowl, whisk eggs and oil til frothy
  4. Mix in eggs mixture into the flour mixture, mix til shaped like a dough
  5. Shape into ball and transfer onto a lined with parchment paper work surface. Top with another parchment paper and roll til about 1/4" thick
  6. Remove the parchment paper on the top and slide the flattened dough with the parchment paper at the bottom into a baking sheet
  7. Bake the crust for about 15-20mins until the edges turned crisp and the surface started to get browned all over. Remove from oven (at this stage, you may freeze the dough for later consumption)
  8. Top with your preferred toppings (this time I used tomato based pasta sauce, grated parmesan cheese, sliced Japanese cucumber, halved cherry tomatoes and shredded mozzarella cheese - in that order), and return it to the oven. Bake for another 12-15mins, til cheese melted and the edges are golden brown. If you like browned cheese, broil the pizza for 1-2mins after baking
  9. Remove the pizza from the oven and serve


I like the combination of the crispy crust, the crunch from the cucumber, the juiciness from the tomatoes and the sauce, and both cheeses completed the taste. Yummy! Come, have a bite! :)


Honest opinion..
Taste wise, this cannot be compared with the usual normal yeasted bread pizza crust, it's just different. It definitely doesn't have the bread like texture, it's rather grainy, but it goes very well with the topping. I did eat a little bit of the crust without any topping, it's nice when warm and crispy
It's crisp when eaten right after baking, but gets soft and crumbly pretty fast, so my advice is, eat immediately after baking! :)

Will I bake this again? I don't think so, mainly because I was the only one in the family eating it, DH and the kids couldn't really accept it
But it's a good experience I will not regret, and one thing for sure, this is a must try for those having problem with gluten. One of the best alternatives, I must say :)


This post is for Best Recipes
Recipe links HERE


Thursday, March 26, 2015

Crispy Banana Fritters with Spicy Soy Dipping Sauce

I have been eyeing on trying this snack during MFF - Johor when I saw the fritters made by Gertrude of My Kitchen Snippets
I found it's an odd way of eating banana fritters dipped in spicy soya sauce. To me, soya sauce and anything with chilli are not to mix with any sweet treat
Anyhow, curiosity won me over and I gave it a try. My thought was, in any case, if I can't eat them together, I just use the dipping sauce to eat grilled fish or chicken :)
So, here it is...


Recipe is from My Kitchen Snippets
(she made a combination of banana and sweet potato fritters)
 
What you need:
 
For the batter:
(blend everything together)
200ml water
110g plain flour
25g rice flour
50g butter, room temp
1/2 tsp turmeric powder
3/4 tsp salt

4 bananas (I used pisang raja), sliced
oil for deep frying
 
For the dipping sauce:
2 bird eye's chillies
1 clove of garlic
1 tsp sugar
enough of dark sweet soya sauce
 
Method:
  1. Heat oil over medium heat
  2. Dip sliced bananas into the butter and then put into hot oil. Fry til golden. Remove from oil and drain on paper towel
  3. Making the dipping sauce: Grind bird eye's chillies , garlic and sugar using chopper, transfer into a small bowl. Pour in dark sweet soya sauce and mix well. Serve with fritters
 
First bite, I was like no, it's not for me. Second bite, third bite..actually, it's not that bad. It's a kind of blending pretty nicely inside your mouth, sweet and salty plus some spiciness all in one
Ask me whether I will eat banana fritters this way again in the future, I honestly say it's not my personal preference. But it's a good experience though, I'm glad I gave it a try :)
 
 
I like these banana fritters. Crisp on the outside, sweet and juicy on the inside. Nice!


This post is for Best Recipes for Everyone Mar2015 Event Theme: My Favourite Traditional Kueh by Fion of XuanHom's Mom and co-host by Joceline of Butter, Flour & Me


This post is linked to the event, Little Thumbs up organised by Doreen from my little favourite DIY and me, Bake for Happy Kids, hosted by Faeez from Bitter Sweet Spicy at this post

LinkWithin

Related Posts Plugin for WordPress, Blogger...