Pages

Showing posts with label Bake Along. Show all posts

Tuesday, March 29, 2016

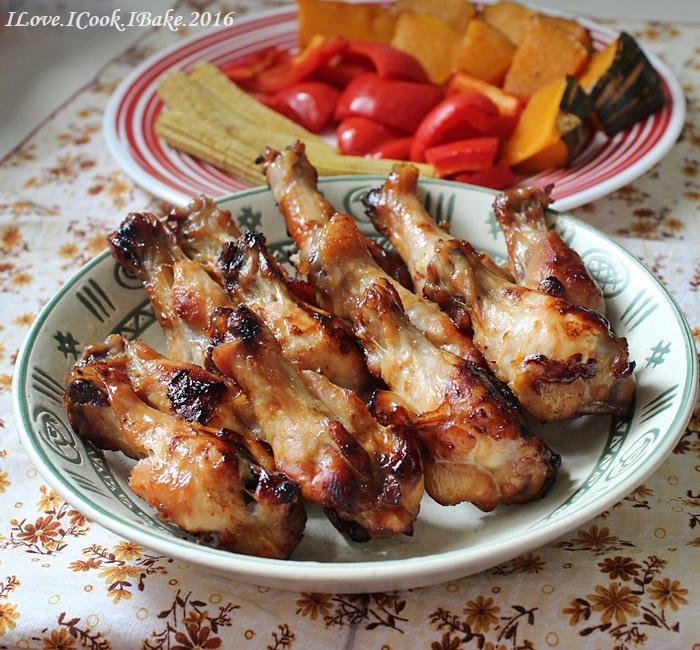
Baked Sticky Honey Chicken Drumlets

Saw Zoe from Bake for Happy Kids made this dish and it looks so good. Too bad my kids can't take spicy stuff so I omit the sriracha. Well, it happened that I didn't have it on hand too haha..
Anyway, this easy dish is finger licking delicious. I used only drumlettes as that's what my family likes. I enjoy eating it with roasted vegetables, while my kids ate them with rice! Haha..
The next time I bake this again, I definitely will use sriracha for my portion, I believe it'll be even yummier *slurp*


What you need:

4 packs of 300g drumlettes

Marinade:
80ml sriracha (I didn't use)
1/4 cup honey
1 tbsp light soya sauce
salt and black pepper

Method:
  1. In a bowl, mix in honey, light soya sauce, salt and black pepper
  2. Clean the drumlettes, discard extra fats and dump into an airtight container
  3. Pour in marinade and toss to coat, keep in the fridge overnight (original recipe only 15mins but I was kiasu haha..)
  4. Preheat oven to 220degC and lay the drumlettes on a lined baking tray and bake for 15mins
  5. Remove the tray from the oven and you will see the juices on it. That will slow down the drumlettes from caramelising. Remove the wings to another lined baking tray and put back into the oven to continue baking until the drumlettes are caramelised
  6. Serve immediately (original recipe used chopped spring onion, white sesame seeds but I didn't since the whole family crowd around me like hungry monsters when I took the tray out of the oven. I must reminded them that I need some for phototaking purpose haha...)


This post is linked to the event, Little Thumbs up organised by Doreen from my little favourite DIY and Zoe from Bake for Happy Kids and hosted by Joyce from Joy 'N' Escapade at this post


This post is also for  Bake Along, an event organised by Joyce from Kitchen FlavoursLena from Frozen Wings and Zoe from Bake For Happy Kids


Monday, December 14, 2015

Bake Along #89 Mocha Panettone

I never bake this famous Italian Christmas bread before. This is my first try and instead of doing the traditional kind, I followed Joyce from Kitchen Flavours, baking this yummy mocha panettone
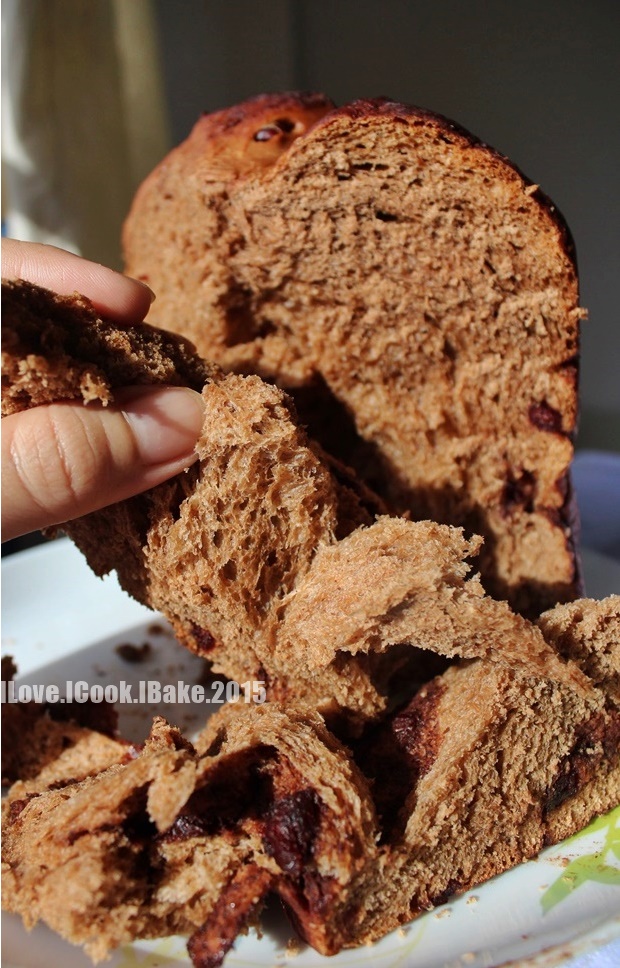
Yes, it's seriously yummy with the texture I always prefer in sweet bread of any kind - soft, fluffy and can last for a few days
This panettone is considered huge for my family to finish in a day, so I managed to see how it was until the third day. In room temperature, the bread stayed soft on the second day. It turned slightly harder on the third day but after microwaving for 15secs, it's back to the original texture.
Very pleased with this recipe. It's a keeper for my family
Like Joyce, I also added chocolate chips and dried cranberries into the bread
One problem when I kneaded the chocolate chips into the dough, it melted rather quickly. So in the end, not all chocolate chips could be mixed and those melted ones were blended into the dough, that's why my bread looked more brownish
No complain though, it still tasted delicious. I just wonder how is the perfect way to mix in the chocolate chips into the dough without making any chips to melt.. Any advice?

I baked this bread in the late afternoon, by the time it's ready it was in the evening already
These pics below were taken in that very evening once the bread was out from the oven


With my 15cm round pan, I got this over 14cm tall bread :)


I like to see the deep cross cut on top - looked great after baked (except for some burnt dried cranberries LOL)


After half an hour on the cooling rack, I had no more patience to tear the bread apart haha...


As usual, I never like taking pic of my bake in the evening, so I took more pics the next morning before I had it for my breakfast. See how different they are, so much more alive, nicer, clearer and appetizing :)


With my morning little angel posing LOL


I love tearing my bread apart and taking pics of it :)


Okay, here is the amazing recipe...
 
What you need:
 
2 tbsp instant coffee powder (I used Nescafe Gold)
2 tbsp hot water
140ml fresh milk
1 egg and 2 egg yolks
400g unbleached white bread flour
1 tbsp unsweetened cocoa powder (I used Hershey's)
1 tsp ground cinnamon
1/2 tsp salt
75g caster sugar
75g butter, softened
1 1/2 tsp dried instant yeast
115g chocolate chips (I used Hershey's)
1/3 cup dried cranberries
melted butter for glazing
 
Method:
  1. In a small bowl, mix coffee powder with hot water til dissolved. Pour into the bread maker pan and add in milk and eggs
  2. Sift bread flour and cocoa powder, and sprinkle over the liquid until it's covered completely. Add in cinnamon, followed by salt, sugar and butter. Place them in different corner of the bread pan. Make a small indent at the center of the flour mixture (not until touching the liquid) and add in yeast
  3. Set the bread machine to "Dough" function. Press start and let the machine do its job (kneading and first proofing about 1hr 30mins)
  4. Grease 6inch round deep pan and line with baking paper, making sure the paper is about 3inch higher than the pan height
  5. When the dough is done in the bread machine, remove it and put on a lightly floured surface. Punch lightly and knead in the chocolate chips and dried cranberries. Shape into a ball and leave for about 5mins covered with lightly oiled cling wrap
  6. Shape again the dough into ball that can fit into the pan. Place it into the base of the pan and cover with lightly oiled cling wrap. Proof in slightly warm place for 45-60mins or until you can see the dough has risen and almost touch the top of the baking paper
  7. Preheat oven to 200degC, brush the top with melted butter and cut a deep cross on top. Bake for 10mins
  8. Reduce the temperature to 180degC and bake for another 30mins until the skewer comes out clean and the bread is evenly browned all over (mine was shielded with aluminum foil after 20mins of baking and I removed 5mins before the baking ended)
  9. Remove from oven and leave it in the pan for about 5mins and transfer to cooling rack. Let cool before slicing (which I couldn't abide haha..)
  10. Store in an airtight container


This post is also linked at Cook and Celebrate: Christmas 2015 hosted by Yen from GoodyFoodies, Diana from The Domestic Goddess Wannabe and Zoe from Bake for Happy Kids at here.

Saturday, August 1, 2015

Bake Along #83 Devil's Food Cupcakes With Chocolate Frosting

This is the third devil's food cake recipe I made, but the first time I made it into cupcakes
This is the cake that is difficult to resist, at least in my chocoholic family, regardless of the name
I don't know why and have not done any research either, why the name. I mean, is it because devil likes chocolate cake, or what? LOL
Anyway, name aside, we enjoyed every bite of this rich, moist and chocolaty indulgence :)


These wonderful cuppies are not overly sweet, even when eaten with the frosting. Love it :)


Recipe is from the book Bon Appetit by Barbara Fairchild
 
What you need:
 
1/2 cup unsweetened cocoa powder (I used Valrhona)
2 oz milk chocolate, chopped (I used a combination of Cadbury 70% dark chocolate and Hersheys semi sweet chocolate chips - since that's all I had in my pantry LOL)
1/2 cup boiling water
1/2 cup buttermilk (I used plain yoghurt)
1 cup cake flour
3/4 tsp baking soda (I used 1 tsp double acting baking powder)
1/2 tsp salt
2/3 cup dark brown sugar
1/2 cup canola oil (I used rice bran)
1/2 cup sugar
2 large eggs
1 tsp vanilla extract
 
For the frosting:
4 oz semi sweet or bitter sweet chocolate, chopped
2 oz milk chocolate, chopped
(I used 6 oz Hersheys semi sweet chocolate chips)
2 tbsp whipping cream
1/2 cup sour cream (I used plain yoghurt)
1 tsp vanilla extract
1/4 cup icing sugar
 
Method:
  1. Preheat oven to 180degC. Line muffin pan with liners (I got 14 cupcakes)
  2. Combine cocoa powder and both chocolates in a bowl. Pour in boiling water and whisk til smooth. Add in yoghurt and stir til well mixed
  3. Whisk flour, baking powder and salt in another bowl, set aside
  4. In another bowl, beat both sugars, eggs, oil and vanilla til light and fluffy, about 2-3mins over high speed
  5. Beat in flour mixture, alternating with chocolate mixture, ending with the flour
  6. Scoop in each muffin liner about 3/4 full and bake for 15-20mins til skewer comes out clean
  7. Cool in the pans on cooling rack for 10mins and then transfer cupcakes to cooling rack, cool completely
  8. To make the frosting, Stir chocolate and cream also butter over saucepan of simmering water til melted and smooth. Remove from heat and add in yoghurt, vanilla and icing sugar. Mix well
  9. Pipe or spread over the completely cooled cupcakes


Thursday, July 16, 2015

Bake Along #82 Healthier Lemon Bars

Craving for some refreshing sweet treats during mid week? Can't wait for weekend cheat day?
You can try this lemon bars. Portion controlled and healthier ingredients used giving you only about 75 calories per serving. How good is that? :)


Taste wise, you don't have to compromise too much. These bars are yummy, and simple to make too :)


Recipe is from Mind Over Munch
 
What you need:
 
For crust:
1 cup flour (I used unbleached all purpose flour, you can use oat or whole wheat flour)
1/3 cup brown sugar (or sweetener of your choice such as stevia or coconut sugar)
1/4 cup coconut oil, solid
1/8 tsp salt
 
For filling:
3 eggs
1 egg yolk
1/2 cup freshly squeezed lemon juice
1/2 cup caster sugar (I wanted to use coconut sugar but I didn't want to ruin the bright yellow colour and I don't really fancy baking with stevia so I stick to caster sugar)
1/3 cup flour (I used unbleached all purpose flour, you can use oat or whole wheat flour)
zest from 1 lemon
 
Method:
  1. Preheat oven to 180degC
  2. Combine ingredients for crust using pastry cutter or fork til crumbly
  3. Press crust into a greased baking pan and bake for about 12mins, til slightly browned. Set aside
  4. Make the filling by whisking all ingredients til well mixed and then pour onto the cooled crust
  5. Bake for about 20mins til the filling is gelled and cooked through
  6. Cool completely and cut into 16 squares. Dust with sieved icing sugar before serving
 
As you can see there's some of the lemon filling managed to escape underneath the crust, hence a thin layer of the filling formed there making it looked like layered cake instead, I mean layered bar LOL


Saturday, June 13, 2015

Bake Along #80 Easy Lazy Mini Chocolate Croissants

This is for me. Easy and quick. Especially during this school holiday when I heard word 'mummy' being called out hundred times LOL
So for now, I made this. With the humid how weather recently and the running around bored kids at home, I do not think it's a good idea to try out the from the scratch croissant recipe which involving time consuming never ending refrigerating, freezing, rolling, folding, and not to mention high risk of butter melting. If that thing happens right now, I think I can tear the whole house down haha...


My easy peasy mini chocolate croissants using frozen puff pastry


Somehow the chocolate filling looks like red bean paste here in the pic below. But no, that is chocolate :)


What you need:
 
1 pack of frozen puff pastry
semi sweet chocolate chips
1 egg
1 tbsp water
 
Method:
  1. Thaw the puff pastry til easy to handle, and then on lightly floured surface, roll til flat in rectangular shape. Cut into smaller rectangular and cut each in diagonal to shape triangles
  2. Place semi sweet chocolate chips at the centre of each triangle and roll starting from the wider end. Twist the end and curve a little to crescent shape
  3. Place in lined baking tray and bake in preheated oven of 180degC for 20-25mins (mine was smaller size 20mins sufficed)
  4. Once it's browned, remove from oven and transfer to cooling rack
 
Those particular in choosing the best croissants, you can forget about trying this cheat recipe I did. This is enough to please my family. But of course, they will be more than happy to eat much better version of croissants too LOL


Friday, May 29, 2015

Bake Along #79 My Mother-In-Law's Madeira Cake (Nigella Lawson)

Like others, I'm also curious about the story behind the name of this cake
I found out that this cake's recipe is from Nigella Lawson's mother in law
It's typically an English tea cake served with Portuguese wine called Madeira, very popular during the early days

Easy to make, it's a typical fool proof butter cake. Well actually it's lighter than butter cake. It's like a cross between butter and sponge cake. Very nice with a lemony taste in every bite. I like it with a cup of hot tea. I wish I could try it with madeira wine :)


Recipe is from HERE

What you need:
(below is half recipe)

120g butter, room temperature
100g caster sugar
zest of 1 small lemon
2 medium eggs
30ml juice of lemon
105g self raising flour
45g plain flour
more caster sugar for sprinkling (I didn't use)

Method:
  1. Preheat oven to 170degC. Grease and line 1 standard size loaf pan
  2. Cream butter and sugar til light. Add in lemon zest and beat for awhile
  3. Add in egg one at a time followed by both flour alternating with lemon juice til well mixed
  4. Pour batter in the pan, sprinkle caster ugar if using, and bake for 45mins 
  5. Remove from oven when skewer test comes out clean, remove from pan and let cool in the cooling rack


Saturday, May 16, 2015

Bake Along #78 No Bake Mango Cheesecake

This gonna be my last cheesecake contribution for Bake Along 4th birthday, happened to be the last day of submission too LOL
No bake cheesecake is a yummy refreshing dessert I love. DH loves this too over the baked version, even though his number 1 preference is still Japanese cheesecake :)


Argh! I always made a mess of the base crust :)


Recipe is from Cynthia from The Baking Biatch

What you need:

Base:
180g digestive biscuits (or marie biscuits)
80g melted unsalted butter

Cheesecake:
250g cream cheese (I used light cream cheese), room temperature
75g castor sugar
250g mango yoghurt
100g water
2.5tbsp gelatin powder
100g fresh mango cubes

Jelly topping:
125g mango puree from fresh mango
125g water
25g castor sugar
1 tsp gelatin

Method:
  1. Cut biscuits into small pieces and pulse in food processor til formed crumbs. Add in melted butter and pulse 1-2 times til well combined. Press the crumbs into a round spring form pan (I used 20cm) and refrigerate
  2. Prepare the cheesecake by mixing water and gelatin, stirring well before warming it up in microwave for about 15secs (til just warm)
  3. In a bowl, beat cream cheese and sugar over low speed til mixed and creamy. Add in cooled gelatin mixture and mix well. Add in yoghurt, and mix well
  4. Add in mango cubes and fold into the batter
  5. Pour onto the pan over the crust and keep in the freezer for about 2hours
  6. Prepare jelly topping by mixing all ingredients in a small pot over medium fire and bring to boil, stir continuously. Pour over the cheesecake in the pan, put back in the freezer for about 30mins or so
  7. Remove cheesecake from freezer. Using the back of a paring knife, run through the sides of the pan. Release the spring form pan and decorate the cake as desired with fresh fruits brushed with diluted jam for extra shine (and drool LOL) (I skipped this part as I am a lazy cake decorator haha)


I'm also submitting this post to the Best Recipes for Everyone May 2015 Event (Theme: My Favourite Desserts) organized by Fion of XuanHom's Mom and co-hosted by Aunty Young. Link is HERE


And lastly, this post is also linked to the event Little Thumbs Up (May 2015: YOGURT) organised by Zoe of Bake for Happy Kids and Doreen of My Little Favourite DIY, and hosted by Cheryl of Baking Taitai

Friday, May 15, 2015

Bake Along #78 Nutella Swirled Cheesecake with Nutella Fudge Sauce

Another cheesecake for Bake Along 4th birthday! :)
I love cheesecakes (read: I love ALL cakes) LOL. Give me any kind, I will eat it, be it baked or non bake cheesecake or Japanese cheesecake
But if I had to list down in order, the first in the list would be baked cheesecake, the creamy sinful type..yum! :)
I was drooling the first time I saw this cheesecake in Café Delites by Karina. In fact, almost all of her creations intrigue me. Not to forget how the beautiful photography skill she has which always manages to make me feel like licking my computer or tablet or hp screen LOL
Also knowing that she always tries to make an indulgence healthier, with all the nutrition facts included, it helps me to eat them with lesser guilt haha..
Anyway, I decided to give it a try, and look at this...


All the yummilicious factor is in the pic below, no explanation needed


Okay, now wipe your drool and read the recipe LOL
 
What you need:
(below is half recipe)
 
Base:
12 Oreo cookies, discard the filling
2 tbsp. virgin coconut oil
 
Cheesecake:
250g light cream cheese
150g light Greek yoghurt
2 eggs
1/4 cup caster sugar (I wanted to use Stevia but not too sure with the amount since Stevia is much sweeter than regular sugar)
1 tbsp corn starch
1/2 tbsp orange zest (I skipped)
1/2 tbsp vanilla paste
30g Nutella, warmed in the microwave for 30 secs
 
Nutella hot fudge sauce:
40g Nutella
2 tbsp chocolate milk (original recipe used regular milk)
 
Method:
  1. Preheat oven to 180degC. Grease a round springform pan (I only have 20cm size, so I used this, hence the short cake haha). Keep refrigerated
  2. Put oreo in the food processor til formed crumbs. Add in oil and pulse for a few times til well mixed
  3. Combine cream cheese, yoghurt, eggs, sugar in a bowl. Beat over low speed til smooth and creamy
  4. Add corn starch, orange zest if using and vanilla, beat til smooth and well combined for about 2mins
  5. Pour cheesecake over the oreo base and spoon the warmed Nutella onto the cheesecake. Using chopstick, make swirled pattern
  6. Bake for about 30-40mins until just set in the centre and the top lightly browned
  7. Remove from oven and leave it in the pan for about 15mins. Chill in the refrigerator for a minimum of 1 hour before serving
  8. Make the fudge sauce by mixing Nutella and chocolate milk in a small bowl. Microwave for about 30secs and mix well. Consistency should be a little runny
  9. Just before serving, arrange strawberries on top (or any other preferred fruits of your choice) and drizzle the sauce over it
 
I can eat plain just like this..


But eating the complete set with strawberries and the fudge sauce is the ultimate heaven! :)


I'm also submitting this post to the Best Recipes for Everyone May 2015 Event (Theme: My Favourite Desserts) organized by Fion of XuanHom's Mom and co-hosted by Aunty Young. Link is HERE


And lastly, this post is also linked to the event Little Thumbs Up (May 2015: YOGURT) organised by Zoe of Bake for Happy Kids and Doreen of My Little Favourite DIY, and hosted by Cheryl of Baking Taitai
 

Thursday, May 14, 2015

Bake Along #78 3 Ingredients Souffle Japanese Cheesecake

Oh! Bake Along is 4! How time flies! This year we celebrate with cheesecakes!
This easy 3 ingredients soufflé Japanese cheesecake has been pretty popular and tried by quite a number of bakers
Original recipe is from Ochikeron, one of You Tubers I like and subscribe :)


Somehow my top didn't brown enough. I guess I should have put the pan a little higher in the oven during baking or perhaps need to bake longer in my oven. Should try again :)


But regardless of that, this cake is really yummy. Light, moist, melt in the mouth and a very nice balance between the taste of the cream cheese and white chocolate. FYI, I'm not a fan of white chocolate. I am a dark chocolate eater. But I love this cake :)


What you need:
 
125g cream cheese, softened (I used Philadelphia light cream cheese)
120g white chocolate (I used Cadbury brand)
3 large eggs, cold
 
Method:
  1. Preheat oven to 170degC. Line the sides of 6" round pan with oiled parchment paper
  2. Separate egg yolks from the whites
  3. Put chopped white chocolate in a bowl and melt in double boiler using a very hot water, mix til smooth. Add in cream cheese and mix well. Add in egg yolks and stir well
  4. In another bowl, beat egg whites til firm peak. Mix 1/3 of the whites to the yolks mixture til well incorporated
  5. Add in the remaining whites and fold in gently til mixed
  6. Pour batter into the pan and water bath for 15 mins. After 15mins reduce temperature to 160degC and bake for further 15mins. Turn off the oven and leave the pan in the oven for another 15mins
  7. Remove from oven and let cool in the pan before transferring to cake container
  8. Chill in the fridge for a few hours before serving
  9. Just before serving, sieve icing sugar over the cake. Slice and serve

A bite for you?


This post is for Bake Along, an event organised by Joyce from Kitchen FlavoursLena from Frozen Wings and Zoe from Bake For Happy Kids


I'm also submitting this post to the Best Recipes for Everyone May 2015 Event (Theme: My Favourite Desserts) organized by Fion of XuanHom's Mom and co-hosted by Aunty Young. Link is HERE


Saturday, January 31, 2015

Bake Along #74 Hot Milk Cakes With Strawberries & Cream

Very interesting recipe where a mixture of hot milk & butter poured in the batter, I must try :)
It yielded a tasty cake but to me, the cake is too dense. Luckily it's meant to eat with cream and strawberries with its juices, helps a lot to moisten the cake. In the end, it's pretty enjoyable, and my family didn't mind either :)


Recipe is from Bon Appetit Dessert Cookbook by Barbara Fairchild

What you need:
(I followed the modification from Joyce from Kitchen Flavours)

2 large eggs
1/2 cup + 4 tbsp caster sugar
3/4 tsp vanilla extract, divided
1 cup + 2 tbsp self raising flour
2/3 cup fresh milk
5 tbsp unsalted butter
1 pound strawberries, hulled and thinly sliced lengthwise
I/2 cup whipping cream (I used 200g)
1 tbsp icing sugar (I used 2 tbsp)

Method:
  1. Preheat oven to 220degC and grease 6 ramekins. Place them on baking sheet
  2. Beat eggs on high speed til thick for about 3mins. Add in sugar (1/2 cup) gradually and beat til pale and yellow about 1min longer. Beat in vanilla (1/2 tsp)
  3. Add in flour (sifted) and beat for 30secs. Bring milk and butter just to boil in a small pot, stir til butter melts. Beat hot milk mixture into batter and continue to beat for 30secs
  4. Divide batter mixture into ramekins and bake til firm to touch and pale golden, tops form rounded peaks in the centre, about 16mins. Cool them in the ramekins for about 20mins at least
  5. Toss strawberries and 4tbsp sugar, let stand for about 20mins
  6. Beat cream, icing sugar and vanilla extract (1/4tsp) til peaks form
  7. Remove cakes from ramekins, cut off the rounded tops and spoon cream and strawberries. Cover with top part of the cake, garnish the top with more cream and strawberries and some of the juice
  8. Serve immediately


LinkWithin

Related Posts Plugin for WordPress, Blogger...