Pages

Friday, July 22, 2011

My First Fondant Cake, My First 3D Car Cake

I usually make two cakes for my kids' birthdays - one to bring to school, one to eat at home
Ian's bday was a few days ago - 20th July
The one for school is already in the plan - it's a cake with edible image on top, he chose the pic himself - Lighting Mcqueen (what else *grin*)
I was more than clueless when Ian requested for a 3D car cake for his bday at home
To please the birthday boy whom is a super die hard car fanatic, I said yes, with much uncertainties in my mind (this explained my absence from updating my blog for the past few days hehe...)

I was planning to buy a car shape pan but I didn't in the end, I decided to carve the cake instead
Watching step by step tutorial in several videos in Youtube, again and again, and finally I decided to decorate the cake with fondant instead of buttercream - less hassle and I guess it'd be more fun, just like playing with playdoh - I guess, based on theory only :)
I have never ever made a fondant cake before, the only time was only decorating three small cupcakes - and it took me close to an hour for those three lil things *lol

Preparing the tools and ingredients, I realized fondant related stuff is really pricey, some stuff I just closed my eyes and told myself it's a one time investment hehe...
And the fondant itself, gee...I guess next time I will just make myself, but it's involving kneading - alot! so, gotta see other factors too like time, energy and the most important - mood! :)

Okay, so all tools and ingredients ready, and the war began...it took me two days to prepare the two birthday cakes, two hectic busy days - I should have been able to be more relax in the process if I didn't have to care for the kids and house at the same time! *faint*
Well, I too have to thank my family for their understanding cos these two days I didn't cook at all for them hihi...
I guess it's not only time constraint, but also mental pressure that made me feel so tired hehe...

In the end, whatever I felt during those two days were gone instantly when I saw Ian's eyes full of excitement, he was so delighted to see the car :)
Now I fully know, whats the meaning of self satisfaction when people love your creation, especially if it's your loved one :)
It makes you want to do even more, much more!

And to my surprise, I found out that I really enjoy playing with fondant! :)
But the most painful part was when you saw the cake being cut in seconds! *lol

So, here it is... I must say, it's still far from perfect, but knowing that my skill level in decorating is below ground zero, I can't help but feel proud of myself hihihi :)


The cake is Devil's Food Cake I made before - I made two recipes (leftovers were gone in seconds hihihi...)

Stacked them up with buttercream filling in between, shaped it like a car with a long knife utilizing my imagination to the maximum, covered the whole cake with buttercream, let it set in the fridge for a few hours 

Rolled the yellow fondant with the most expensive baking stuff I ever bought - PME fondant rolling pin (ppfff...), took the cake out from the fridge, cover it up with the yellow fondant, press press press...cut the remaining fondant at the sides with pizza cutter, smoothen with fondant smoother all over

I put the cake in my aircon room overnight (to prevent hot and humid Singapore weather)
The next day, on the birthday date itself, I did the deco

I prepared 2 oreo cookies, discard the filling and I had 4 round cookies, covered them up with black fondant and I got 4 wheels, painted the centre with silver pearl dust which I mixed with vanilla essence - and pasted them up with water
Measured and shaped the four windows with black fondant, the door handles, wipers, spoilers, licence plates - all with black fondant too (ooppss, I forgot to write the licence number hihihi...)
Mixed yellow fondant with orange food coloring for the front lights and red food coloring for the rear lights

Here is the happy boy - slicing my two days of hard work hihihi....

After the brutal action done by him...

My last pic - the uncut part hihihi...

Oh before I forgot, here is the cake I made for his school...


I was not pleased with this cake at all, I am not til now - I could have done better
The cake is moist chocolate cake I made for Abby's bday last year - delicious!
The difference is this cake is much bigger, I made two recipes in two pans and stacked them up together

Now, I had no idea that this cake is so fragile that it's a no no to lift it up, so when I did, it cracked into four parts - I was so panicky at that time and ready to bake another one recipe but then I tried to patch them up together like making a puzzle using buttercream as the 'glue' and it worked, so I just went ahead to paste the edible image - picture chosen by Ian himself :)

After everything done, I realized that the cracks were visible - but I couldn't do anything so no choice..
And also, cos the top cake was cracked, I didn't dare to cut the top part to level it up, so the cake did not have flat top - I only tried to make it as smooth as possible
Well, never mind the cracks, Ian and his friends' jaws were still dropped when saw this cake - hehe....

So....aside from all he hiccups, I really did have fun doing it
What a delight to see Ian very excited to have his mummy's amateur creations hihihi....

Happy birthday my lil boy - time flies so fast you are 4 yrs old now - be good okie...Mummy & Daddy also Abby love you *huggggzzzzz :)

Sunday, July 17, 2011

Pandan Chocolate Potato Swiss Roll

This is my second time to have pandan swiss roll, only with different filling and this time is not steamed but baked instead, also this used different ingredients


There's a story behind this swiss roll, but let me write the recipe first....

What you need:
(recipe adapted from Ricke's site)

200g potatoes - wash, steam, peel and mash til smooth
150ml coconut milk (I mixed 100ml kara coconut milk with 50ml water)
2 pandan leaves, tie a knot
6 egg yolks
3 egg whites
150g sugar
1/4 tsp salt
1/2 tsp vanillin powder
1 tsp pandan paste
50g plain flour - sift
50g margarine - melt and let cool

Prepare 2 greased and laid with parchment paper square pans - I used 22x22cm
Preheat oven to 200degC
Heat coconut milk and pandan leaves on medium fire til a little oily, off heat and let cool
Beat eggs, sugar and salt til thick and creamy, doubled in volume
Add in vanillin and pandan paste, mix well in low speed
Pour eggs mixture bit by bit into the mashed potatoes and beat with mixer in low speed til well incorporated
Add in plain flour, mix briefly
Add in coconut milk, mix
Add in a little of the batter to the melted margarine and mix well, pour back to the remaining batter, fold in gently til well mixed
Divide the batter into 2 and pour each to the prepared pans and bake for approximately 10minutes

Now, this is the story....

Actually my initial plan was not swiss roll
I was really craving for something with pandan, but not cake - so I decided to try one kind of Indonesian delicacy called "bingka" in pandan flavour - it's a sweet sticky pie like traditional Indonesian snack

The recipe used quite a number of eggs and little flour - very similar to swiss roll recipe (of course minus the potatoes hehe...)
The instruction was to beat the eggs, salt and sugar only til frothy and the sugar diluted
This is where I made the mistake - I overbeat the eggs mixture til almost doubled in volume!
I must have been dreaming to the 7th heaven - cos I was there in front of the mixer staring at it - blank stare :)

I ended up having 2 pans of cake instead, surprisingly the texture is really soft with a very slight chewiness - tastewise, it's delicious!
I scratched my head - wat to do, wat to do....hhhmmmm, should I just eat as it is? But I really feel like doing something about this cake...and then I was thinking, why don't I just roll it up?
Haha...this month's AB event makes me want to roll up whatever thing in front of me hihihihi....

So I transferred the cake on a parchment paper, spread the top with chocolate icing, put a long slice of the chocolate cheese black glutinuous rice swiss roll I made the day before...fortunately there's still a few slices left (put them to sacrifice - messed up its nice and round shape keke...) and rolled it up, spread a little butter on top and sprinkle grated cheddar cheese - voila! :)

Even though I didn't manage to eat the bingka pandan I craved for, I was made happy with something else which is nice in the end :)
And from my mistake, I now know that a nice swiss roll can be made of potato too *grin*

I & my hubby did eat some of the cake before it's rolled, I ended up rolling them up half of the original size, hence the lack of swirls hehe....
The recipe above is to make the swiss roll cake
To make bingka, the ingredients are the same, the only difference is only to beat the eggs and sugar+salt only til the sugar is diluted, or to play safe, use balloon whisk instead
I'll make the real bingka - will post the (same) recipe again :)

I'm submitting this unplanned swiss roll to Aspiring Bakers #9 Swiss Roling Good Times hosted by Lynn from Obsessedly Involved With Food at this LINK

Friday, July 15, 2011

Steamed Minced Meat With Tofu & Salted Eggs Patties

Original recipe used preserved vegetables mixed together with the meat
My kids don't fancy the veggies, so I changed to salted eggs
Yummy dish - best eaten with hot fluffy rice :)


What you need:

1 square piece pressed tofu
150g minced meat (I used pork)
salted egg yolk (with a little egg whites) OR 2 tbsp preserved vegetables

Seasoning:
1 tbsp dark soya sauce
1 tbsp sesame oil

Mash tofu and mix with minced meat, including the seasoning
(if using preserved vegetables, chop half  and add in the meat mixture)
Stir well til sticky
If using preserved vegetables -> lay the other half of the vegetables in a steaming dish and pour the minced meat mixture over it and press down onto the dish, steam on high heat for 20minutes
If using salted eggs -> pour the meat mixture into the steaming dish and put salted egg yolk on top (arrange with some distance), pour 1 tbsp of salted egg white over each yolk, steam on high heat for 20minutes

Note:
*Please do not attempt to use both salted eggs and preserved vegetables - it'll be way too salty
*You may soak the preserved veggies before cooking to reduce the saltiness
*Meat with a little fat will be more tender in texture when it's cooked


Thursday, July 14, 2011

Chocolate Cheese Black Glutinuous Rice Swiss Roll

I have been curious about bakings which using black glutinuous rice flour, but I simply could not find the flour here in Singapore
I ended up importing it directly from Indonesia - where many bakers use it for cake and brownies, aside from other Indonesian delicacies

I saw many also bake swiss roll using this flour, since it's relevant to this month's Aspiring Bakers event, I decided to give this a try
The result is not bad at all, taste wise - it's really nice, texture wise - it's soft and a little crumbly
Too bad I chose wrong pan size, I had a thick cake which difficult to roll, next time I should use bigger pan or I can just divide the batter into 2 pans
Lucky I still managed to roll it even though I couldn't get nice swirls...


What you need:

A
3 eggs
3 egg yolk
100g sugar
1 tsp ovalette
B
75g plain flour
50g black glutinuous rice flour
C
50g butter
1 tsp chocolate paste

Filling:
some butter and grated cheddar cheese

Beat A til thick (ribbon stage)
Add B (beat in low speed)
Fold in C slowly
Pour batter into a greased and laid by parchment paper pan (2pans of 22x22x4cm)
Bake in preheated oven of 200degC for 10-12minutes (til the surface is dry) - let cool
Put on a parchment paper, spread with butter, sprinkle some grated cheddar cheese and roll away from you using parchment paper

I'm submitting this swiss roll to  Aspiring Bakers #9 Swiss Roling Good Times hosted by Lynn from Obsessedly Involved With Food at this LINK

Wednesday, July 13, 2011

Sweet & Sour Fish

Nice, tasty and easy to make


What you need:

400g white fish fillet (I used toman fillet) - rinse and cut into pieces
1/2 red capsicum - cut small
1/2 yellow capsicum - cut small
1/2 green capsicum - cut small
1 medium tomato - cut small wedges
1/2 onion - chopped
1 tbsp potato starch
1 tbsp plain flour
(mix both flour well)

Marinade the fish with:
1 stalk spring onion, cut into 2parts
2 slices ginger
1/4 tsp salt
1/2 tbsp cooking wine

Seasonings:
3 tbsp tomato sauce
2 tbsp white vinegar
4 tbsp sugar
dash of salt
1/2 cup water
some potato starch - mix with a little water
1/2 tsp sesame oil

Marinade cut fish and set aside for 1 hour
Heat oil for deep frying. Coat fish with flour mixture and deep fry til golden brown
Remove and drain well
In a separate pan, heat a little oil and fry onion til fragrant. Stir in capsicum and tomato
Add seasoning and bring to a boil. Toss in fried fish and combine well briskly
Serve immediately

Yum!
Btw, when I shopped for capsicum that day, I saw orange and black capsicum too...yes, black!
But in the end I decided to stick to the common colors - red, yellow and green :)

Tuesday, July 12, 2011

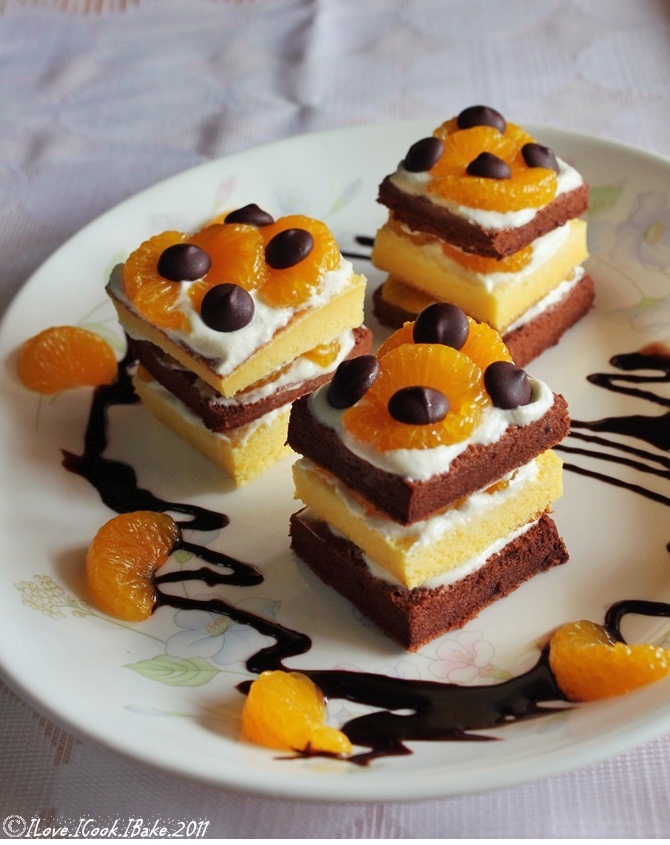
Chocolate Orange Layered Cotton Cake

Been seeing some bloggers did cotton cake - mostly are pandan
Looking at the name, I guess no need to ask about the texture - definitely as soft as cotton - so eager to try
At the same time, LBT challenge for this month is coicidentally also cotton cake - great timing :)

Was thinking to do pandan cotton cakes, but then I preferred something else which my kids will love to eat - they don't really fancy pandan - yeah, hopefully not yet, cos their mummy is a big fan of pandan *grin*

Looking around for recipes, I stumbled on Ike's site, she has 2 recipes which I loved to try both, so decided to do layered type, one is chocolate (of course) and the other one is orange - since I have many oranges in the fridge for now

So, here it is..

Look at the texture - soft & moist, melt in the mouth, before you know it you eat more than what you're supposed to hehehe...

What you need:

(For the orange cake)
A
7 egg whites
110g sugar
B
7 egg yolks
2 eggs
65g milk
25g juice of an orange
25g whipped cream
1/2 tsp vanilla essence
C
90g cake flour
90g butter
D
1/2 tbsp orange paste

Preheat oven to 170degC
Grease a square pan with butter, lay parchment paper on top, lightly grease at the top one more time with butter (I used 24x24x5cm)
Wrap the outer part of the pan bottom half with heavy duty aluminium foil to make it water proof
Beat A on high speed til soft peak
For B = heat up milk, orange juice and whipped cream (do not boil), add in eggs, vanilla, stir well with balloon whisk - set aside (keep it warm)
For C = melt butter, add in flour, stir til form paste
Mix B and C, stir well, add egg whites mixture bit by bit (folding in)
Add in orange paste, fold in slowly
Pour the batter in the pan, steambake for 35minutes approximately

(For chocolate cake)

60g butter
50g cake flour
15g cocoa powder
75g fresh milk
5 egg yolk
120g sugar
5 egg whites
3g cream of tartar

Preheat oven to 170degC
Lay a square pan with parchment paper (I used 20x20x4cm)
Melt butter, off heat, add in flour and cocoa powder, mix well
Heat up milk ( do not boil), pour in the egg yolks, mix well, add in the butter mixture, mix well
Beat egg whites, sugar and cream of tartar til soft peak
Mix a little bit of the egg whites mixture into the butter & milk mixture, mix well
Pour in the remaining egg whites mixture, fold in slowly til well mixed
Pour the batter into the pan, bake for 20minutes

For the filling:
whipped cream -> I beat with mixer til stiff
cut canned oranges and some whole canned oranges
some chocolate chips for deco

After the cakes are cooled, cut into smaller square shapes and place the bottom chocolate layer on the serving plate, put a spoonful of whipped cream and top it with cut oranges, top it up with another layer of the orange cake, do the same for the whipped cream and the oranges, top it up with another chocolate layer on top, put a spoonful of whipped cream on top and arrange whole oranges and chocolate chips as desired

Note:
*This cake is pretty fragile, so please handle with care
*Also make sure the whipped cream is stiff enough so can hold the oranges and the cakes well
*After finish baking, do not take out the cake immediately - just leave the oven door ajar for 20minutes or so - to avoid sudden shrinking of the cake cos of change of temperature
*This cake is very fast to prepare, everything has to be done at the same time, since heated items have to remain warm and whipped egg whites cant wait - so please prepare everything before start the process

This cake is really worth trying - easy to eat, suitable for all ages :)


Sunday, July 10, 2011

Steamed Pandan Swiss Roll With Banana & Nutella Filling

Fell in love the first time I saw this swiss roll at Camelia's site
Indeed it's so yummy :)


After I dipped in chocolate ganache - couldn't do as pretty though :P

What you need:

A
4 eggs
100g sugar
6g ovalette
1/4 tsp vanilla
1/4 tsp salt
100g cake flour
1/4 tsp baking powder
1 tsp pandan paste
50cc vegetable oil
50cc coconut milk

B
6 king bananas, cut into 2parts
nutella

100g chocolate - melted

Prepare a square pan (I used 2 pcs of 20x20x4cm cos I don't have bigger steamer - original recipe used 30x30x2cm), grease with butter (only the bottom, not the sides), lay parchment paper
Beat in high speed eggs, sugar, ovalette til ribbon stage, add in vanilla til evenly mixed
Add in flour and baking powder, beat in low speed til well incorporated
Add in pandan paste, oil, coconut milk, beat in low speed til well mixed
Pour the batter and steam on medium heat for 15minutes
After it's cooked, let cool on cooling rack
When it's cooled, lay the cake on parchment paper, spread with Nutella and sprinkle with chocolate rice, arrange bananas and roll the cake using parchment paper
Cut the roll (I cut mine around 7cm each)
Dip each end with melted chocolate

Note:
* wrap the steamer cover with a clean cloth
* do not open the steamer while steaming

Due to my pan size, I had some leftover batter, I made them to cupcakes, pour a little batter on each liner, put a piece of small cut banana, sprinkle with chocolate rice and pour batter to cover them, bake in preheated oven of 180degC for 15minutes
Makes 6 cupcakes

As soft and fluffy as the steamed ones, but with slightly different texture

I'm submitting these rolls to Aspiring Bakers #9 Swiss Roling Good Times hosted by Lynn from Obsessedly Involved With Food at this LINK

LinkWithin

Related Posts Plugin for WordPress, Blogger...