Pages

Sunday, March 29, 2020

Dalgona Coffee

I know this blog is dying, if not dead haha.. but I decided to start again, cos to me this blog is the most convenient reference
It's my recipe library and will remain so, hence start adding the collection from now on
Not much of a story telling like how I used to do though, just one recipe at a time, and of course with the pictures :)


Dalgona coffee
A nice twist of drinking coffee :)

What you need:

2 tbsp instant coffee powder
2 tbsp brown sugar
2 tbsp hot water
200ml cold milk

Method:

  1. Mix in coffee powder, brown sugar and hot water in a rather tall container. Whisk until soft peak, using electric mixer or hand whisk (they say 400 times of whisking by hand, but of course I chose hand mixer LOL)
  2. Pour milk into a serving cup
  3. Scoop the coffee mixture and place gently over the milk. Serve immediately


Sunday, September 3, 2017

Unicorn Ogura Cake

Ogura cakes has been very popular in the recent time, but I have never attempted to bake one
Until the homework of the month for homemadelovers was ogura cake, and in particular unicorn ogura cake, where we're challenged to play with colors in the cake
Okay, let's give a try :)
So this was my first try. At first I thought the texture would be something like chiffon cake, or sponge cake. But no, this was even better. It's like eating cotton (not that I ever ate cotton before LOL), moist cotton, yummy cotton. It's dangerously delicious, as it's so easy to eat
And I love the colors too


Fresh from the oven


Some slices for u? :)


Recipe as follows...
Original recipe is from Jeannie Tay

What you need:

5 egg yolks
1 egg
60ml vegetable oil
60ml fresh milk
85g plain flour
5 egg whites
1/2 tsp salt
100g caster sugar

Method:
  1. Preheat oven to 170degC. Prepare for au bain marie baking. Place a pan wider than the pan used for the batter in the oven. Line 18cm (7") square pan. Wrap half bottom of the pan with aluminium foil, one or two layers if you worry of leakage.  Bring a pot of water to boil (I used kettle)
  2. Beat eggs until thick over high speed. Lower speed,  add in oil, beat for a few seconds. Add in milk, beat again for a few seconds. Add in sifted flour and beat til just combined. The batter will not be too thick but not runny, either
  3. Divide batter into the same number as the color you want to use (mine was 4) into different bowls. Add in a couple of drops of food coloring. Fold in until the colors evenly combined. Set aside
  4. In another clean bowl, beat egg white over high speed until foamy. Add in sugar gradually. Keep beating until soft peak
  5. Divide the meringue evenly into the bowls with the colored batter. Fold in gently. Do not overmix!
  6. Spoon each color into the pan alternately until all batter used up, each about 1 heaped tbsp. Tap the bottom of the pan a few times to release trapped air bubbles
  7. Open oven door and carefully pour hot water onto the pan, just about 1/3 of the height. Very carefully, place the batter pan into the pan with hot water. Be extra careful, no need to rush!
  8. Bake for about 50mins. Check the doneness by tapping the top of the cake. When it's dry, it's should be ready
  9. Remove from oven, invert and gently peel off the baking paper. Invert one more time and let cool on a wire rack. Cut when the cake is totally cool

Okay, I was very happy with my first try, but somehow I felt it would have been a better cake if I baked a little longer. I felt the top should have been more brown and also the bottom part of the cake was too moist to my liking, especially on the second day
So, I gave it another go and this time I was more pleased with the result


The colors should have been a little lighter than this, though. This one was not so unicorn anymore LOL


This time definitely was more successful than the first one :)


Yummy! Nom nom :)


Sunday, August 13, 2017

Chocolate Coconut & Yuzu Fantasy Pudding

Pudding is one easy dessert to make liked by all, especially with kids
But for this pudding with a twist, it's different story. Not the most difficult challenge I ever encountered, but it's can be quite tricky too, more steps to do and timing is crucial here
A challenge by IG baking group homemadelovers, this pudding is nice and refreshing, you can choose any flavour you prefer
For me, I used chocolate and yuzu. Not common combination, but it actually worked :)


To make this pudding, you need to have 2 similar moulds, and then the first thing to do was to make  the "coconut" for the filling in the yuzu pudding. Followed by making both chocolate and yuzu pudding

What you need:
(with modification)

For the "coconut":
250ml light coconut milk
100ml fresh milk
100g sugar
15g plain / coconut Nutrijell (can replace with plain Konyaku jelly)

For chocolate pudding:
1150ml chocolate milk
10g plain agar agar powder
7g chocolate Nutrijell (can replace with plain Konyaku jelly)
150g sugar
1 tsp chocolate paste

For layered pudding:
A.
Yuzu layer:
600ml yuzu juice
7g orange / lemon Nutrijell (can replace with plain Konyaku jelly)
7g plain agar agar powder
70g sugar
B.
Coconut layer:
7g plain agar agar powder
500ml coconut water
100g sugar

For the glue:
7g plain agar agar powder
50g sugar
350ml water

Method:

To make "coconut"
  • Bring to boil all ingredients in a pot, keep stirring. Pour into one of the mould, let cool
  • When it's completely cooled, using either a spoon or fork, dredge the jelly into long strips resembling coconut flesh. You may grate it too. Keep aside (The taste is really like real coconut flesh!)
To make chocolate pudding
  • Bring to boil all ingredients, keep stirring and pour into the mould. Leave it to cool and set

To make layered yuzu pudding
(done in 2 separate pots together)
  • Bring to boil all ingredients, keep stirring. After boiled, keep the fire on at the very lowest
  • Get ready the other mould
  • Scoop 3 ladles of yuzu layer into the mould, leave it until it's half set (check by touching the surface lightly, you should feel a layer formed)
  • Now scoop 2 ladles of plain layer over the half set yuzu layer, and then sprinkle the coconut flesh and leave it until half set
  • Repeat until all both pudding used up and the height of the pudding is about the same as the chocolate pudding
  • (do not forget to off the fire used to warm up both pots!)
  • Leave it to cool and set

How to assemble:
  • Cut the chocolate pudding and layered yuzu pudding in the same manner
  • Place them alternately until it looks something like this:


  • Now cook all of the "glue" ingredients. Once boiled, gently pour bit by bit over the pudding. Slightly open the gaps in between to make sure they're glued well. Leave to cool
  • Take note of the different height of the pudding. I used small knife to level everything once it's cooled completely
  • Unmould the pudding and you're done! :)

Pretty, huh? :)


See the "coconut"? :)


This is not only pleasant to the eyes, it's yummy too :)


The modification I did, besides the flavour I chose, it's also the amount of jelly and agar agar powder used to suit my liking (I do not like it to be too firm)
As a result, it's more challenging to assemble as it's softer than it should be
Tough, but no regret :)
Will I make this kind of pudding again? Maybe. When I have the mood and the time :)

Tuesday, August 1, 2017

Mosaic Swiss Roll

Another challenging homework to do for IG baking group homemadelovers. Having tried a few times with no luck in getting the browned outer skin for the roll, I was so happy that finally I got it :)


This roll cake is called mosaic as it typically has colors in it, a combination of a few giving a nice shades as what we usually find in mosaic arts. This is something I still have to work on, my colors were barely visible LOL
As of the taste and texture, I cannot complain. It's soft, spongy and yummy. A great recipe I must say


Here's what you need:
 
8 egg yolks
2 egg whites
65g caster sugar
40g plain flour
20g corn flour
10g milk powder
100g butter, melt
a few different food color / paste of your choice (I used pink, green and yellow)
buttercream / jam of your choice for filling (I used Nutella)
 
Method:
  1. Prepare a swiss roll pan (25x30cm), grease and line. Preheat oven to 200degC
  2. Beat eggs, sugar until doubled in size
  3. Add in sifted  plain flour, corn flour and milk powder, mix well
  4. Add in a few tablespoons of the batter into melted butter and mix well
  5. Pour in the butter mixture into the remaining batter and fold in gently
  6. Scoop in a few tablespoons of batter to small bowls and add in color as preferred, fold in gently and scoop into piping bags. Also scoop in the remaining batter with no color added to a piping bag
  7. Pipe all of the colored batter alternately, and followed by the non colored batter over it
  8. Bake for about 20mins until the top evenly browned dry to the touch (I used 180degC for about 17mins and 5mins more with only top heat)
  9. Remove from oven, invert and remove the baking paper. Prepare another cooling rack with baking paper on it, place on the cake and invert once more, leave to lukewarm
  10. Spread the filling, and roll the cake. Tighten the baking paper on each side to secure the rolled cake and keep in the fridge for about an hour before slicing


I was so happy looking at the browned skin :)
This was the impatient me cutting the cake right after done with the rolling. Such a messy cut LOL


Neater cut after kept in the fridge for an hour
This cake is soft  and yummy. Another swiss roll recipe I will keep :)
Need to work on those colors! I want something more visible than this haha..


Tuesday, May 30, 2017

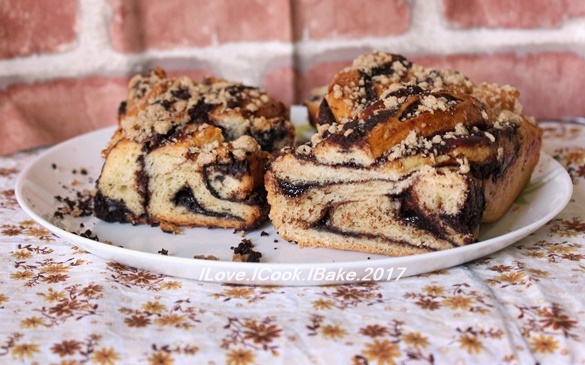
Chocolate Babka

First time hearing this name when I got this monthly bake along with friends from IG baking group called homemadelovers. This was my second bake together with them

Babka, a traditional Eastern European yeasted sweet bread with chocolate, nuts and cinnamon filling, usually twisted to shape and sprinkled with streusel
Never tried this bread before, but knowing the description, I have no doubt that my family and I will love it

So, here is my version. I omitted the nuts as my kids do not really fancy eating nuts


Recipe is from King Arthur Flour
 
What you need:
(half recipe below)
 
Bread dough:
114 to 142g lukewarm water
1 large egg
375g bread flour (original recipe used all purpose flour)
16g full fat milk powder
1 tbsp instant yeast
1/4 tsp ground cinnamon
50g sugar
1 1/4 tsp salt (or 1 tsp if using salted butter)
71g unsalted butter, room temperature
1/2 tbsp vanilla extract
 
Filling: (I made full recipe)
100g sugar
1/2 tsp ground cinnamon
28g cocoa powder
1/2 tsp espresso powder
57g melted butter
170g mini chocolate chips
113g toasted pecans or walnuts, chopped (I skipped)
 
Glaze: 1 egg with a pinch of salt, lightly beaten
 
Topping: (full recipe)
57g melted butter
1/2 tsp ground cinnamon
74g icing sugar
57g all purpose flour


Method:
 
  1. I used bread machine to do kneading and first proofing, it's about 30mins. Pour wet ingredients first, followed by dry ingredients. Mix with spatula until just combined and let it rest for 20mins. After that start the kneading process. After 5mins of kneading, add in butter
  2. After first proofing done, deflate and take the dough out of the pan. Place on a lightly floured table, cover with a damp cloth and let it rest for awhile
  3. To make the filling, combine sugar, cocoa powder, espresso powder and cinnamon. Stir in melted butter. The mixture will be a little grainy
  4. Flatten the dough with rolling pin to a rectangle shape of about 18" x 9" with about 1/4" thickness (if dough still 'fights back' please let it rest for another 10mins or so to relax the gluten)
  5. Smear with filling, come to about an inch of the edges. Scatter chocolate chips and nuts (if using) over
  6. Starting from the short end, roll it gently to form a log, sealing the ends. Cut the log into half lengthwise to make 2 pieces of dough of 10" length. Cut carefully to avoid the filling from spilling out too much
  7. With the exposed filling side up, twist the 2 pieces into a braid, tuck the ends underneath
  8. Place braided log into a 9" x 5" loaf pan
  9. Brush the top with glaze. Mix the ingredients for topping and sprinkle over the dough
  10. Cover loosely with cling wrap and let it rise for another 1hour or until it's very puffy and crowned a good inch over the rim of the pan
  11. Preheat oven to 150degC and bake the bread for about 35mins. Tent lightly with foil and bake for additional of 15 to 25mins until the loaf is golden brown
  12. Remove from oven and let it cool in the pan for 10mins. Transfer on the cooling rack to cool completely
  13. Slice the keep babka at room temperature wrapped or in the airtight container

Very delicious, sweet, chocolaty and soft bread. It turned a little hard the next day but with a slight warming up in the microwave it turned out back to perfection. Definitely bread I will bake again :)


Saturday, April 22, 2017

Banana Peanut Butter Chocolate Quick Bread

When you cannot decide whether to have chocolate or banana or peanut butter, have them all in one cake! Quick bread, in this case :)


Recipe is from IG @neuroticmommy


What you need:
 
1/3 cup creamy peanut butter, melted
3/4 cup sugar
3 medium bananas, mashed
1 tsp vanilla extract
1/2 cup cooking oil (I used rice bran)
2 eggs
1/2 cup cocoa powder
1 tsp baking soda
1 tsp baking powder
pinch of salt
1 cup whole wheat pastry flour
2 bananas, sliced for topping
a mixture of sugar and brown sugar to caramelize the bananas for topping
Option for topping: drizzle of melted warm peanut butter, and melted dark chocolate
 
Method:
  • Preheat oven to 175degC. Grease and line loaf pan (20x10cm)
  • Mix in peanut butter, banana, vanilla, oil, eggs. In another bowl, mix in sugar, cocoa, baking soda, baking powder, salt, flour
  • Pour in wet ingredients into the dry ingredients and mix until just combined
  • Bake for about an hour until the skewer test comes out clean
  • For the banana topping: In a small glass pot, combine sugar mixture and sliced bananas and cook over low heat til sugar melted and slightly caramelized
  • Just before serving, scoop the topping over the slice and serve. Best to serve warm

Banana bread-gasm LOL


This post is for LBT (Let's get Baking Together), a baking group which I joined years back, and when I searched for my last participation it was May 2014! Gosh! Hope I don't miss much :)
This month's theme is banana cake. Enjoy!

Wednesday, April 19, 2017

Moist Vanilla Sponge Cake

People loves sponge cakes. Who doesn't?
Well, I found some who don't. They said sponge cakes tend to be at the drier side, some are chewy and making them choked when swallowing LOL
I know that feeling. I experienced that before whenever buying from outside cakeries
Even some sponge cakes I baked before give me a kind of the same feeling
Behold, here I present you one of the best - if not the best - sponge cake I have ever eaten


It's so pillowy soft, fluffy and most importantly, moist and free from additives like sponge gel
Bye bye dry and chewy sponge cake
From now on, this is gonna be my to go recipe for sponge cake, until perhaps, I can find a better one, which I doubt so haha..

Look at the texture *love*


Recipe is from IG @chenniezhang

What you need:

8 egg yolks
4 egg whites
100g caster sugar
75g plain flour
12g corn flour
115g melted butter
1 tsp vanilla extract

Method:
  1. Preheat oven to 180degC. Grease and line 24cm square pan (4cm height)
  2. Using electric mixer over highest speed, beat eggs and sugar until the thickness reaches ribbon stage (about 10 to 15mins depending on the mixer)
  3. Reduce the speed to the lowest and add in vanilla extract, followed by sifted plain and corn flour. Mix until just incorporated
  4. Off the mixer. Scoop about 1/4 of the batter into the melted butter and mix well until really combined. Pour the butter mixture into the remaining batter and fold in gently
  5. Pour the batter into the prepared pan and bake for about 20-30mins depending on the oven
  6. Check with skewer for doneness. Remove from oven, and transfer the cake to cooling rack
  7. Sprinkle / spread topping of your preference when it's completely cooled


LinkWithin

Related Posts Plugin for WordPress, Blogger...