Pages

Monday, October 14, 2013

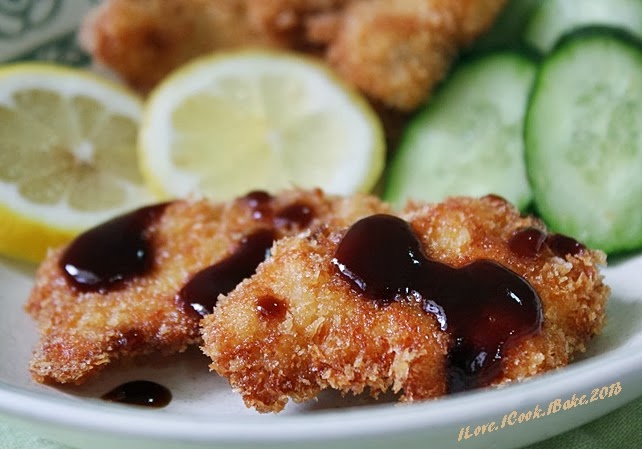
AFF Japan - Chicken Katsu

Another deep fried Japanese dish my family always enjoys :)


Recipe is from Nami from Just One Cookbook (the blog I visited the most this month LOL)
 
What you need:
 
3 chicken breast
2 tbsp sake
salt, black pepper
all purpose flour
2 eggs
panko breadcrumbs
oil for deep frying
 
Method:
  1. Rinse the chicken and pat dry with paper towel. Slice the chicken diagonally. This cutting technique is called “Sogigiri” in Japanese. Each piece will have more surface area so it will cook faster
  2. Put the chicken in a bowl and add sake, salt, and pepper. Set aside for 15 minutes
  3. Dust the flour on the chicken and remove excess flour
  4. Then dip it in beaten egg. Lastly, dredge the chicken in panko and remove the excess. If you have time, let the chicken sit in the refrigerator for 15 minutes
  5. Heat oil. Temperature should be 180degC. Read How To Deep Fry Food
  6. Put 2-3 pieces of chicken in at a time. If you put too many chicken pieces, the temperature of oil will drop too quickly and the chicken will end up absorbing too much oil
  7. Deep fry until both sides are golden brown, about 5-6 minutes. Then transfer to a wire rack or paper towel-lined tray to remove excess oil
  8. Between batches, make sure to pick up breadcrumbs. When you don’t pick them up, the breadcrumbs will get burnt and the oil will get darker. Make sure to keep the oil clean throughout deep frying


For the tonkatsu sauce, I made homemade version from Nami
Taste just like the store bought one - delicious!

What you need:

2 tbsp. worchestershire sauce
2 tbsp. ketchup
1 tbsp. oyster sauce
1 1/2 tsp sugar (original recipe 1 1/8 tsp)

Combine all ingredients above til well mixed


This post is for Asian Food Fest October 2013: Japan hosted by Alan from Travelling Foodies


Sunday, October 13, 2013

THB #24 - Peach Cashew Coffee Cake

The Home Bakers bakes recipes from the book Coffee Cakes by Lou Seibert Pappas
I discovered many similar recipes from this book
Nevertheless, it's yummy, and easy to make. So, why not?
This cake is one of them :)


 Chosen by Chaya from Bizzy Bakes, this is a cake well received by my family, except Ian who doesn't like fruits haizzz...


I baked half recipe and followed the recipe, replacing granulated sugar with caster sugar, reducing by half (since I used canned peached) and omitted nutmeg (not preferred by my family)

For full recipe, please visit HERE


This post is for The Home Bakers hosted by Joyce from Kitchen Flavours

Friday, October 11, 2013

Kue Satu

It's been a while since the last time I did my 'homework' for LBT, the last post was in March!
So glad the group has been restructured to keep up the flame alive :)

So, this is the task of the month
A very traditional Indonesian cookies mostly enjoyed by my parents' generation
Honestly, I never get the chance to taste this
Now that I know, I must say it's not bad - taste wise, but not the kind of cookies I would enjoy nor make again. The only person in my family enjoyed eating this was only my dad. My mum said he loved eating it during his childhood
Well, it's no regret going through the experiment. One curiosity killed is an achievement for baking enthusiast :)


I used recipe from my LBT baking friend, Rosdaniar
 
What you need:
 
100g fried green bean flour (I bought from Poon Huat)
50g caster sugar
2 tbsp water (I added 1/4 tsp more)
 
Method:
  1. Mix flour, sugar and water. Sprinkle water and mix well
  2. Sieve the mixture and shape with the mould (I used mould for kuih bangkit, but any chocolate mould can be used too except the silicone type)
  3. Arrange on an ungreased baking sheet
  4. Preheat oven to 120degC and bake for 15 minutes til firm
  5. Let cool and keep in an airtight container


The most frustrating part was the shaping. The dough was so crumbly and fragile that no matter how hard you press it to the mould, it'll stay crumbly when taking out from the mould and the tendency for the cookies to break was almost 100%!
I was pretty lucky to get more than 50% of the cookies in rather good shape
And it's also the noise from mould banging while taking out the cookies.. Don't bake this for you late night baking, you'll be in trouble LOL


This post is for LBT October challenge: Kue Satu

Wednesday, October 9, 2013

AFF Japan - Karaage - Japanese Fried Chicken

I occasionally grabbed a bag of chicken karaage from supermarket frozen section for this, and I must observe every bite in case I see chicken skin
Yes, I hate chicken skin I always discards it in my every chicken dish. Hence my family doesn't eat it, either

This is the more garlicky version from Nami of Just One Cook Book
Yes, I love garlic I usually add a little more than suggested by recipe. Hence my family loves it, too

Hhhmmm... two similar sentences in one posting. Talking about the power of mum LOL

So satisfied with the result of my first trial of making karaage
Homemade is always the best. No unknown substances added, no foreign ingredients I never hear about used. Yes!


What you need:

500g skinless boneless chicken thigh
salt, ground black pepper
1/4 cup potato starch
1/4 cup plain flour
oil for deep frying

Seasoning:
1 inch ginger
8 cloves of garlic
1 tbsp light soya sauce
1 tbsp sake
1 tsp sesame oil
1 tsp sugar

Method:
  1. Rinse chicken, pat dry with paper towel and cut into 2 inch pieces (try to cut in almost uniform sizes so frying time will be the same). Season with salt and pepper and keep in a ziplock bag or an airtight container
  2. Grate ginger and garlic (I used chopper)
  3. Add in ginger and garlic to the chicken and the seasonings too. Keep refrigerated (covered) for at least an hour
  4. Heat oil to 170degC
  5. In a bowl, mix potato starch and plain flour
  6. Right before the oil is ready, add the potato starch and flour mix to the chicken. You do not need to mix it evenly. The uneven coating gives each piece its unique texture
  7. Gently drop each piece of chicken separately into the oil. Do not overcrowd. Deep fry 3-5 pieces at a time. If you put a lot of chicken in the oil, the temperature will drop quickly and chicken will end up absorbing too much oil
  8. Cook for 90 seconds, or until the chicken is cooked through and outside is light golden color. If the chicken changes color too quickly, then the oil temperature is too high. Either put a few more pieces of chicken in the oil or lower the heat. Controlling oil temperature is the key for deep frying
  9. Transfer the chicken onto a wire rack to drain excess oil. While resting on the wire rack, the chicken will continue to cook with the remaining heat
  10. Between batches (or even while cooking), make sure to pick up crumbs to keep the oil clean (otherwise oil will get darker)
  11. When you finish all the batches, then bring the oil to 180C
  12. Deep fry for the second time for 45 seconds, or until the skin is nice golden color and crispy
  13. Transfer the chicken onto a wire rack or paper towel to drain excess oil. Serve the chicken immediately

As explained by Nami:
Using potato starch gives crispier karaage than corn starch, even though it's a good substitute. Also, please take note that potato flour is different from potato starch

I also must thank Nami for the detailed explanation about deep frying, very useful!


Thursday, October 3, 2013

Bake Along #52 Hokkaido Milk Loaf

This is one bread recipe sitting for quite long in my endless to do list
Great time to try out, finally! :)

I chose the straight method by Angie's Recipes
I tried Tang Zhong method once quite a while back and failed miserably. I wasn't in the mood to accept any failed bake with a big heart for now, so I avoided Tang Zhong for the time being LOL

Very happy with the result. This is one plain yet flavourful bread I definitely will make again
This recipe is officially in my fave bread now! :)


I should have used bigger loaf, but this is the only size I have
My kids named this "flower bread" haha...


It's a joyful feeling tearing them apart! :)


Soft, fluffy and tasty, too!


You can put whatever you feel like having - Nutella, jam, peanut butter, cream cheese - anything. I don't even mind eating it plain :)


What you need:
(below is half recipe)

270g bread flour
30g cake flour
1 1/4 tsp instant yeast
15g milk powder
40g caster sugar
4g salt
45g egg
125ml fresh milk, scalded
75g whipping cream

Method:
  1. Put all wet ingredients into the breadmaker pan (egg, milk, cream) followed by the dry ingredients (mix together in a bowl: bread flour, cake flour, milk powder, sugar, salt - and pour together)
  2. Make a well in the centre of the flour mixture in the breadmaker pan and pour in yeast
  3. Start breadmaker (dough programme) and let knead for 30 minutes followed by 1 hour proofing (first proofing)
  4. Take out the dough and divide into 3 equal portions, leave to proof for 20 minutes in a large bowl
  5. Flatten and shape each dough to oval, fold each side to the centre and flip (sealed side down)
  6. Flatten with roller into a long rectangle (length about 30cm) and then roll away from you like when you make swiss roll
  7. Arrange all 3 side by side in a lined loaf (I used 20x10cm) and leave to proof (second proofing) til doubled in size - between 30-45 minutes depending on the weather
  8. Preheat oven to 170degC and bake for 35 minutes til golden brown
  9. (I found my bread turned brown at the top pretty fast, so I tented it for the last 10 minutes of baking)
  10. Remove from oven and let cool on the rack

This delicious bread is for Bake Along , a baking event organised by  Joyce from Kitchen FlavoursLena from Frozen Wings and Zoe from Bake For Happy Kids where we baked our 52nd treat :)

Monday, September 30, 2013

Easy Flatbread Pizza (Ree Drummond)

The word 'easy' in a recipe always excites me
Hence my pick on this recipe by The Pioneer Woman
Thanks to Zoe from Bake for Happy Kids for choosing Ree Drummond as the star chef of this month. I always like Ree, but by end of this month, the word 'like' has turned to 'love' Now she's in my top favourite chefs list :)

Okay, now back to pizza :)

I wanted to use naan bread for this recipe - just like Ree, but DH was craving for wraps, so wrap it is, it made super flat bread pizza LOL


This is really delicious! My first vegetarian pizza. It's gonna be a routine topping for my pizza I am sure! :)
 

Even though this is great, but I think using naan bread would be better, at least I would taste some fluffy bread beneath those yummy cheesy roasted veggies...


What you need:

any flatbread you like
jarred marinara sauce (I used Prego mushroom tomato pasta sauce)
jarred pesto sauce (I used Leggo's)
roasted vegetables (I used sliced yellow capsicum, halved cherry tomatoes, sliced shitake mushroom and sliced Japanese cucumber)
sliced mozzarella (I used grated)
grated parmesan cheese (my addition)

Method:
  1. Drizzle the vegetables with olive oil, salt and pepper. Roast in the preheated oven of 230degC til well roasted
  2. Spread bread with your preferred sauce (I made one with tomato pasta sauce and another one with pesto sauce)
  3. Arrange sliced mozzarella on top (I sprinkled grated mozzarella)
  4. Arrange roasted vegetables on top of the cheese
  5. Sprinkle grated parmesan on top of the vegetables (my addition)
  6. Bake for 15 minutes til cheese melted

Here's another version for my kids. They did not fancy vegetarian pizza haha...
I used tomato pasta sauce with sliced ham and button mushroom


I'm submitting this post to Aspiring Bakers #35: A Palate for Pizza (September 2013) hosted by Joey of Little Accidents in the Kitchen


This post is also linked to Cook like a Star, organised by Zoe from Bake for Happy Kids, Yen from Eat your heart out and Mich from Piece of Cake

Sunday, September 29, 2013

Homamade Pandan Extract

One of the easiest yet so useful, and the best part is homemade
Only two ingredients, pandan and water


This was after 3 days...


Inspiration from Sonia from Nasi Lemak Lover

What you need:

20g pandan leaves (use mature leaves), wash and clean, pat dry
200g water

Method:
  1. Cut pandan leaves into small pieces
  2. Mix into a blender with water, blend til fine
  3. Pour blitzed pandan in a fine strainer, squeeze out the juices
  4. Pour the pandan juice into a glass container, cover and leave it in the fridge
  5. When you see a thick layer formed at the bottom, pour away the upper layer of water and retain the pandan paste (concentrated pandan juice)
  6. You may keep in the fridge for about 2 weeks or til it turns bad


This post is linked to the event, Little Thumbs up organised by Doreen from my little favourite DIY and Bake for Happy Kids, hosted by Joceline from Butter. Flour and Me, at this post

LinkWithin

Related Posts Plugin for WordPress, Blogger...