Pages

Friday, November 30, 2012

Steamed Marie Biscuit Cake With Chocolate Chips (Happy Call)

This cake is popular among Happy Call Fans Facebook group
There are two versions - baking and steaming, both using Happy Call pan
The recipe is slightly different between steaming and baking, simply because steamed version always produces cakes which are more moist, hence the lack of liquid ingredients in the recipe
Both recipes received 100% great reviews, and loking at the unique ingredient used - marie biscuits to replace flour, also how easy and quick to make this cake, made me decided to give it a try :)

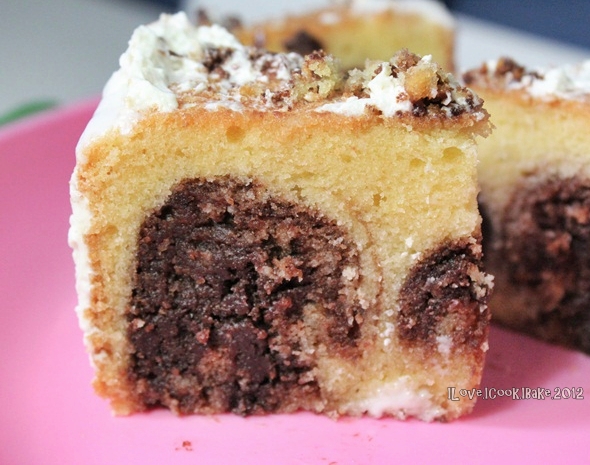
I made the steamed version, and oh how true the comments I read about how good this cake is
It is so tasty, delicious and the texture is so moist, soft and fine! I love it and so is my family


Recipe is from Happy Call Experience and Recipe Sharing Facebook group

What you need:

150g softened butter (I used unsalted butter)
120g caster sugar
3 large eggs, lightly beaten
150g original Marie biscuits, crushed and processed into powder form
1/4 tsp baking powder
1/4 tsp salt (I added)
cocoa powder (I omit this and replaced with 3 handfuls of semi sweet chocolate chips)
  1. Prepare 2 cups of water in Happy Call pan and bring to boil
  2. Grease square 18 cm square pan, bottom and sides
  3. In a mixing bowl, beat sugar and butter til pale, light and fluffy (high speed)
  4. Reduce to low speed, add in eggs one at a time til well incorporated
  5. Add in salt, baking powder and Marie biscuits, mix well
  6. Fold in chocolate chips til evenly distributed
  7. Pour batter into the prepared pan, and put in Happy Call pan with the boiling water inside, steam medium low heat for 10 minutes
  8. Check the water in the pan, you may add a little more
  9. Reduce the fire to very low heat and continue to steam for another 30 minutes

Note:
The original recipe divided the batter into two, add cocoa powder into one part of the batter
Pour the plain batter into the pan first, followed by the chocolate batter and make marble effect with chopstick

This is actually my second try to make the cake
The first time was yesterday, I used the same recipe above which was meant for steaming method but I was so blur I baked it instead using Happy Call pan
The result was not too bad, actually, still tasted yummy, but it turned a little dry and hard the next day


I'll definitely find time to try to make the baked version again, using the other recipe supposedly for baking :)
For the steamed version, yes, definitely I will make it again - my kids enjoyed it so much, that's a motivation! :)


I'm submitting this post to Aspiring Baker #25 Steaming Hot Cakes (Nov 2012) hosted by Miss B of Everybody Eats Well In Flanders

Wednesday, November 28, 2012

Kedah Perlis MFF - Fried Fish Cake (Lempiang Ikan)

My second dish for Malaysian Food Fest: Kedah Perlis, also a dish I know the whole family will love
And it's a good way to make my kids eating fish, hence I divided the batter into two parts, one used chilli and the other one did not
One thing I forgot was the lime leaves used
The supposedly nice fragrant was apprently not well received by them
After a few bites they complained about the 'lemony' taste
Noted that the next time I make this I will omit the lime leaves too for them (but not for me LOL)


This yummy dish tastes really similar to Thai fish cake, even the chilli dip
Recipe is from My Kitchen Snippets' site

What you need:

300g fish paste (I blended tilapia fillet til smooth)
2 long beans - finely chopped
3pcs kaffir lime leaves - finely chopped
1 spring onion - finely chopped
1 small egg
1 red chilli - finely chopped
1 tbsp chilli paste
1 tbsp oyster sauce
salt (I didnt use cos the chilli paste I used had salt in it)
1/2 tsp pepper
1/2 tsp sugar
cornstarch to coat
  1. Mix everything except long beans and cornstarch
  2. Add in long beans and keep in the fridge for 30 minutes
  3. Shape into balls, flatten into disc and coat with cornstarch
  4. Fry both sides til golden brown
Sauce:
2 fresh red chillis - ground into paste (I used 1 tbsp chilli paste)
3 tbsp white vinegar
6 tbsp sugar
4 tsp cornstarch
200ml water
salt
  1. Mix all ingredients in a pot and bring to boil
  2. Simmer til thick
Serve immediately. Dip the fried fish cake into the sauce. Yum!

I am submitting this to MFF: Kedah Perlis hosted by Table for 2...or more


Kedah Perlis MFF - Mango Kerabu (Kerabu Pelam)

This is one dish from Nothern part of Malaysia caught my eyes for this month's Malaysian Food Fest - Kedah & Perlis
Never know any of their dish, I just followed what others made and this is one of my choice that finally I could make time to prepare

It's very similar to my favorite Thai mango salad
I didn't put cut red bird's eye chilli cos my mum can't take too spicy and I don't mind not having it in this dish, either
I didn't put crushed peanuts cos we don't really fancy having it in this salad

Sour, sweet, so refreshing! Best eaten chilled and after keeping it at least an hour in the fridge to let the dressing absorps well


Recipe from Phong Hong with some modification I made

What you need:

2 young mangoes, peeled and grated
10 cherry tomatoes, halved
5 shallots, thinly sliced
2 red bird's eye chillis - chopped (I didn't use)
2 tbsp dried prawns, soaked, drained and fry til crisp and golden in color

Dressing:
juice from 3 large limes
2 tbsp fish sauce
1 tbsp plum sauce
5 tbsp light brown sugar (I added)
1 shallot, thinly sliced

Garnish: crushed peanuts (I didn't use)
  1. In a bowl mix all dressing ingredients, set aside
  2. In a large bowl, mix all salad ingredients 
  3. Pour dressing over the salad
  4. Keep in an air tight container and refrigerate for at least 1 hour
  5. Serve chilled

I am submitting this to MFF Kedah Perlis Month hosted by Table for 2...or more

Sunday, November 25, 2012

Steamed Pandan Cheese Layered Cake

Recipe is from the book Magic Steamed Cake by Alex Goh
Nice taste and texture. Soft and tasty cake. A request made by Ian sice he's craving for pandan cake, one of his favorite cakes :)

Original recipe used red bean filling made in cupcakes, but I chose to use 20cm round pand, sliced the cake into two, spread a thin layer of buttercream and sprinkle grated cheddar cheese and I had a pandan cheese layered cake :)

This is a big cake. I still have extra batter so I poured onto individual muffin mould lined with muffin paper liners, I got four not so full cupcakes
If you make this for a small family, I suggest make half recipe
I made one recipe and it's too much for my family I shared some with my neighbours :)

The color was a little too pale, cos I omitted the green coloring and replaced with a tiny drop of pandan paste instead to enhance the flavour


What you need:
(modified to suit my family liking)

A
240g eggs (I use 5 medium eggs)
250g sugar
1/2 tsp salt
120g canola oil

B
2 tsp pandan juice
1 tiny drop of pandan paste
200g coconut milk (I used 100ml Kara + 100ml water)

C
400g flour
1 tsp baking soda
4 tsp double action baking powder
  1. Preheat steamer, wrap the cover with clean cloth, and prepare a 20cm round pan, greased
  2. Whip A til sugar dissolves and slightly thicken
  3. Add in B, mic until well blended
  4. Fold in sieved C, mix until well combined
  5. Pour 1/2 of the batter into the pan, steam for 15 minutes
  6. Pour the remaining batter into the pan, and steam for another 30 minutes (Please judge yourself when pouring the remaining batter. I poured til almost 3/4 full and I poured the remaining batter on the cupcake moulds)
  7. After the cake cooled, cut into two, spread buttercream and sprinkle grated cheddar cheese for filling

Friday, November 23, 2012

Indonesian Style Potato Gratin (Pastel Tutup)

This is a typical Indonesian dish, some eat as snack, some eat as a meal
The people said it's an influence from both Chinese and Dutch food
It's not exactly the same as potato gratin, quite different, but it's the same kind of dish
The usual potato gratin uses sliced potatoes layering the top of the dish as well as the bottom, sometimes at the centre too alternating with creamy filling
This dish I made also uses potatoes but mashed til smooth, and it's only placed at the top of the dish covering a layer of hard boiled egg slices on top of the not so creamy filling

It's been a few years since the last time I had this yummy savoury dish, such a great refresher to be able to have this dish again this time, in conjunction with this month's LBT challenge : pastel tutup :)
Quite easy to prepare, but involves a lot of chopping, and the filling has to be completely cool before covered with potato layer


Recipe is from my mum
(with this recipe below I got a 20x30cm rectangle pyrex and four 5" ramekins)

What you need:

For the potato layer:
10 medium size potatoes - steam, peel and mash
3 tbsp butter
2 pinches of ground nutmeg
salt, pepper, sugar

For the filling:
1 large onion, chopped
250g chicken breast - skinless, boneless, boil til cooked and then chopped finely
carrots - chopped finely
a handful of black fungus - soak til soft, chopped finely
bean vermicelli - soak til soft, cut short
two handfuls of frozen peas
10 hard boiled eggs - peel and slice thinly
1/2 cup fresh milk
enough water - around 2L
salt, pepper, sugar, ground nutmeg, a little butter

To sprinkle:
grated cheddar cheese

For the potato layer:
Mix all ingredients while the mashed potatoes are still warm

For the filling:
  1. Sautee chopped onion til soft and fragrant
  2. Add in chicken, carrots, and water
  3. Bring to boil and simmer til carrots turn soft, around 5 minutes
  4. Add in milk, stir well
  5. Add in black fungus, frozen peas, stir well til peas are cooked
  6. Add in salt, pepper, sugar, nutmeg, milk, stir well
  7. Adjust the taste and add in bean vermicelli
  8. Stir well, bring to boil and off heat
How to assemble:
  1. Pour filling on the pans and let cool (it has to be completely cool)
  2. Arrange egg slices on top after it's cooled and cover with potato layer (my mum just pressed by hand but I prefer to use piping bag)
  3. Brush the top with mixture of egg yolk and butter
  4. Put oven in grill mode (top heat only) and grill til the top is browned
  5. If cheese to be sprinkled on top, please do so after brushing the top with egg wash

I had some leftover potato in the piping bag, so I piped smiling faces on the ramekins and flowers on the pyrex :)


Oh, yum!

Tuesday, November 20, 2012

Chocolate Sponge Swiss Roll

Ian always loves chocolate swissroll covered in chocolate rice sold in NTUC Hypermarts
This time I baked a similar one for him, but bigger in size and of course, better cos it's homemade :)


Recipe is from Sonia's site which I modified a little

What you need:

5 egg yolks (medium eggs)
50g canola oil
50g milk
20g caster sugar
70g cake flour
15g cocoa powder

5 egg whites (medium eggs)
1/4 tsp lemon juice
60g caster sugar
  1. Lightly whisk egg yolk with sugar. Add in oil, stir to combine
  2. Add in milk, combine well
  3. Fold in cake flour, mix well, set aside
  4. Add in lemon juice into egg white, beat til foamy
  5. Gradually add in sugar, beat til stiff peak
  6. Take 1/3 portion of the egg white mixture, use hand whisk to mix with egg yolk mixture til light
  7. Fold the balance of egg white mixture into egg yolk mixture, mix well
  8. Pour batter on lined swissroll pan, and bake in preheated oven of 160degC on medium rack for 25 minutes
  9. Turn the baked sponge on a piece of baking paper. Slowly peel off the attached paper from the cake
  10. Place a new piece of baking paper over the cake, invert the cake again
  11. Slice 45deg angle at another end, so the end of sponge will neatly attached to the cake at the end of rolling
  12. Make few slits on the whole cake
  13. Spread evenly a layer of filling
  14. With the shorter side facing you, roll the cake up tightly to form a swissroll
  15. Wrap with clingwrap and let it set

I used nutella for the filling and spread a thin layer of buttercream all over the swissroll, and sprinkle chocolate rice on it


Sonia is right, this recipe is a keeper to make swissroll
Spongy, soft and light, taste really good, and most importantly - easy to roll :)

Friday, November 16, 2012

Baked Fusilli (Happy Call)

First time using Happy Call pan for baking pasta, and it's not disappointing at all


Recipe is from Dessy

What you need:
(I modified a little to suit my family liking)

1 packet of fusilli (original recipe using macaroni), prepare as directed
3 cloves of garlic, crushed
1/2 large onion, chopped
7 slices of breakfast ham, cut square
100g minced chicken
a pack of button mushroom, sliced thinly
1/2 tsp of dried basil
a handful of mozarella cheese + extra to sprinkle on top
grated cheddar cheese to sprinkle on top
salt, sugar, black pepper to taste
a big bottle of Prego parmesan and roasted garlic pasta sauce
half of the Prego bottle of water
a little olive oil
  1. Heat oil in a wok, sautee garlic and onion til soft and fragrant
  2. Add in minced chicken, stir well til change color
  3. Add in ham, stir well. Followed by mushroom
  4. Stir well til mushroom soft
  5. Pour the content of Prego sauce followed by water, stir well
  6. Add in basil, salt, sugar and black pepper, stir well, adjust the taste and bring to boil
  7. Add in fusilli, stir till well incorporated. Add in mozarella cheese and stir well til cheese melted
  8. Prepare Happy Call pan, slightly oiled
  9. Pour cooked fusilli, sprinkle with grated cheddar cheese and mozarella cheese
  10. Bake over low flame for 15 minutes
  11. Flip the pan, bake for 10 minutes
  12. Slide the pan to the left side to bake the right side, bake for 3 minutes
  13. Slide the pan to the right side to bake the left side, bake for 3 minutes
Note:
Original recipe used lasagna sheet at the bottom

Baked pasta is ready to serve with parmesan powder and tabasco sauce
Yum!

Thursday, November 15, 2012

ABC November 2012 - Velvety Pumpkin Tart

Been a while since the last time I made tart, a great change after baking all those cakes :)
This is the first bake I made using pumpkin
I'm not a fan of pumpkin, so I never think that I would love any bake with pumpkin
This tart has proven me wrong
It's so delicious I ate two slices at one go after kept it in the refrigerator for 3 hours, and I had to refrain myself from opening the fridge and eating more!


This tart is really easy to make, just mix all ingredients for the crust, press on the pan, and bake for awhile
Beat all ingredients with electric mixer and you have the filling
Pour on the crust, continue to bake and that's it
Let cool, keep in the fridge for 3 hours at least and it's ready for consumption
One thing is, I do not have pie pan with removable bottom, so it's quite a struggle to have a piece of pie with nice cut

I made slightly more than half recipe with 18cm pie pan
Using digestive biscuit instead since I'm not a fan of ginger biscuits
I couldn't find canned pumpkin which is not pumpkin pie filling, so I made my own pumpkin puree - which I think it's better :)
I didn't use ground cloves, simply cos I have no stock
Reduced sugar used for the filling and added some butter for the crust to make it more moist

This recipe is from the book The Weekend Baker by Abigail Johnson Dodge, a great book with so many tried and tested keeper recipes
Such a luscious, creamy filling on a delicious crust, pure indulgence indeed!
I am seriously thinking of being more adventurous with pumpkin :)

Thanks to Avid Baker's Challenge event for allowing me to experience the unexpected :)
This post is for you :)

Wednesday, November 14, 2012

Fish & Chips

Recipe for the fish is from Vivi's site
The fries - it's frozen supermarket bought LOL

Served with cream of tartar - store bought too, and bottled chilli sauce


Crisp outside, juicy inside - yum!


What you need:

2 tilapia fillets, cut as desired (can also use sutchi / dory)
salt, pepper
1 tbsp rice flour
canola oil for frying

For the batter:
250g plain flour
1 tsp salt
1 tsp baking powder
1/2 tsp pepper
1/2 tsp chicken stock powder (optional)
1 egg
350ml soda water
  1. Rinse fish fillet and, dry with kitchen towel
  2. Sprinkle with salt and pepper
  3. Prepare rice flour on a small plate
  4. Mix all batter ingredients
  5. Heat oil in a wok
  6. Coat fish with rice flour and dip in the batter, deep fry til golden brown
  7. Serve immediately with french fries, tartar sauce and chilli sauce

Very nice! I love the crispy batter while the fillet inside was still oh so juicy
Perhaps I should try replacing the soda water with my favorite beer, I heard many great reviews about this one :)

Tuesday, November 13, 2012

Steamed Moist Chocolate Cake

This is the first cake always comes into my mind everytime I think of steamed cake, chocolate steamed cake in particular - all time favorite!
It's been many times I made this cake and every bite always makes me go hhhmmmm... :)
So luscious, rich and moist, chocolaty, and soft, too
Another excellent point is, it's really easy to make! No mixer required -> my favorite! :)


I posted this cake before, when I made it for my sis' bday, you may view HERE
I realized I didn't write the recipe in that posting - only link up to the original recipe, so here it is....

Recipe is from Cooking Crave

What you need:

180g butter
200g caster sugar
200g evaporated milk
2 eggs, slightly beaten
100g plain flour
50g cocoa powder
1/2 tsp baking powder
1/2 tsp baking soda
1 tsp vanilla extract
2 tbsp dark rhum
  1. Preheat steamer, wrap the cover with clean cloth and line + grease 8" round pan
  2. Mix caster sugar, evaporated milk, vanilla essence and butter in a saucepan
  3. Stir over low heat til sugar dissolves and butter melts
  4. Remove from heat, let cool
  5. Add in beaten eggs, stir well
  6. Sift flour, cocoa, baking powder and soda
  7. Pour egg mixture over the flour mixture and stir well (cake batter should be runny)
  8. Pour batter onto the pan, steam for 10 minutes on high heat, reduce the heat to low and steam for another 45 minutes

Chocolate fudge topping:

200g sweet condensed milk
1/2 tsp vanilla extract
2 tbsp corn / canola oil
20g cocoa powder - sifted
a pinch of salt
  1. Bring to boil sweet condensed milk, oil and cocoa til thicken
  2. Add in salt and vanilla
  3. Pour over cooled cake, keep refrigerated

Note:
* For me, I prefer to eat this cake warm. I will warm the refrigerated cake for 15 second before consuming
* This time I used low fat version for both evaporated milk and sweet condensed milk and it didn't change the texture nor taste of this cake


Friday, November 9, 2012

Indonesian Style Palm Sugar Steamed Cupcakes

This is the second time I made this steamed cupcakes
It's very famous in Indonesia, we call this 'bolu kukus'
The one I made this time was using palm sugar
As you know most steamed cakes have similar texture - soft and a little chewy, but this cake is rather different, it's very soft and fluffy, love the fine texture and taste really delicious :)


Recipe is from Nien's site (I made half recipe)
 
What you need:
 
200g palm sugar
100ml coconut milk
100ml water
250g plain flour
1/2 tsp baking soda
1/4 tsp double action baking powder
1 egg
50g sugar
125ml canola oil
1/4 tsp salt
  1. Bring to boil palm sugar, coconut milk and water, sift and let cool
  2. Preheat steamer, wrap the cover
  3. Prepare the mould (it's a special mould, you may view the pic below)
  4. Line cupcake case in each mould
  5. Mix together plain flour, double action baking powder, baking soda and salt - sift
  6. Beat egg and sugar til ribbon stage
  7. Add in the cooled palm sugar water mixture, mix well
  8. Add in flour mixture alternating with oil in three stages, mix just til blended
  9. Pour batter into the mould til almost full
  10. Steam for 20 minutes (medium high fire) 
Here is the pic of the mould (I just googled and picked one pic that's similar to the moulds I have)

I will definitely make this cake again!

I'm submitting this post to Aspiring Baker #25 Steaming Hot Cakes (Nov 2012) hosted by Miss B of Everybody Eats Well In Flanders

Wednesday, November 7, 2012

Pandan Chiffon Cake

My second try making pandan chiffon cake
The first one failed miserably, the cake collapsed and wrinkly everywhere, even though texture and taste wise I was quite satisfied
The shape put me off from taking a picture of the cake, we just tear apart and eat it LOL

This time, I was pretty - not fully - pleased with everything, the shape, texture and taste
Now, I guess I am ready to be more adventurous in baking chiffon cakes :)


Recipe is from All That Matters, a recipe for chiffon cake that's lower in sugar and fat - I like! :)

What you need:

A
4 egg yolks
30g fine sugar
1/4 tsp salt
40g corn oil
140g coconut milk + pandan juice
(140g coconut milk blended with 10 torn pandan leaves, and strain)

B
120g cake flour
1/2 tbsp baking powder
(both above to sift 2 times)

C
5 egg whites
50g castor sugar
1/2 tsp cream of tartar
  1. Whisk yolks and sugar til sugar dissolves
  2. Add in oil and salt, whisk and add in coconut milk with pandan juice, stir well
  3. Fold in sifted flour mixture and mix well
  4. In another bowl with mixer, beat the egg whites til frothy. Add in sugar gradually and beat til soft peak (flop)
  5. Add in cream of tartar, beat til stiff peak
  6. Fold in 1/3 of the whites into the yolk mixture with spatula til incorporated
  7. Pour the mixture into the remaining egg whites and fold in gently til incorporated
  8. Pour batter into 21cm chiffon tube pan. Bang the pan lightly on the table to get rid of the air bubbles
  9. Oil a piece of aluminium foil and cover the pan loosely. Bake in a preheated oven of 170degC for 10 mins
  10. Lower the temperature to 160degC and bake for 20 mins
  11. Lower the temperature to 150degC and bake for 10 mins. Remove foil, bake 5-10 minutes to brown the surface
  12. Remove from oven and immediately invert the pan and let cool completely
  13. When it's completely cooled, run a sharp knife along the edges to remove the cake from the pan

So soft and fluffy with great taste, too - yum! :)

Monday, November 5, 2012

THB #11 - Banana Cashew & Coconut Coffee Cupcakes

I love banana cake!  Be it dense and moist, light and spongy - all types, and also all kinds of combinations - with chocolate, cheese, nuts, coffee, etc
And for this eleventh bake for The Home Bakers, the combination is rather unique - with coconut flakes, and it's mixed in the cake
I was eager to know the texture and taste of this cake, I love coconut in cakes, too!
So I baked it last weekend and I made just half recipe in muffin pans
With 1/4 cup of batter in every mould, I had 10 cakes

I love this cake! Even though the texture was a little more compact, but it's still soft and so moist! Taste wise, oh so yummy! The banana flavour combined with the crunch from the coconut flakes, the delicious cinnamon and nutty topping - it's really a brilliant idea to combine all those ingredients together!


I followed the recipe exactly, using more bananas than it's required though - for half recipe I used 2 large bananas. I replaced sour cream with plain low fat yoghurt
Also I used cashew nuts instead, simply cos that was what I had in stock :)
Oh and I only had light brown sugar, so I used that
I used dark rum liqueur, and since I couldn't find sweetened flaked coconut, I made my own from desiccated coconut
Baked the cupcakes for approximately 25 minutes

Here's the recipe to make sweetened flaked coconut from desiccated coconut, I googled I found one from livestrong.com

What you need for the DIY sweetened flaked coconut:

1/2 cup desiccated coconut
1 tbsp icing sugar
1 1/2 tsp canola oil
2 tsp water (or 4 tsp if you omit the oil)
  1. Mix desiccated coconut with icing sugar in a bowl
  2. In a separate bowl, mix oil and water
  3. Pour liquid mix over the sugared coconut, mix well
  4. Let mixture sit for at least 10 minutes until coconut absorps all liquid. Stir mixture once or twice
  5. Use immediately

For full recipe, please hop over to Kit's site
This recipe was chosen by her - great choice, Kit! :)


This post is for The Home Bakers hosted by Joyce
An event for baking enthusiasts using recipes from the book Coffee Cakes by Lou Seibert Pappas


Saturday, November 3, 2012

Nutella Marbled Cake - Aurora Tiered Birthday Cake 4 Abigail

1 November was my 'lil princess 7th birthday
How time flies! I still remember what happened every single minute during the 10 hours I spent in the hospital waiting for her arrival.. and now, she's a sweet young girl celebrating her 7th birthday!

As usual, it's the special request birthday cake from the birthday girl
This time, she never specified any character she wanted on the cake. She just wanted a tiered cake, and it had to be a three tiered cake
Oopss! Something I never did before! Let alone three, I haven't even made two!
And thinking about smoothing the whole tiered cake with buttercream, it frustrated me even before I made the buttercream!
So, I decided to use fondant this time - the decision made with all my fingers and toes crossed since I, as you all know, am not good in cake decorating at all :)
But everything for my girl - I guess all mummies will agree with me :P

So, 31 October was the cake baking day, I baked Nutella cake using the recipe from Sam's site
This is the second recipe I made for Nutella cake and I definitely will stick to this recipe  This cake is really good, trust me!
It tasted better and had texture that I prefer, moist! Yes, I like moist butter cake
Well, anybody ever know somebody who likes dry butter cake? LOL
Just for reference, you may view the first recipe I made HERE
It's slightly different cos it's not marbled cake, it's plain butter cake with Nuttela mixed in the batter and then baked. It's nice, but this one is better :)

It's a really tiring day, I cooked, took care of the kids and house, baked two recipes of this cake, made buttercream, assembled the cake and crumb coated the cake and finally, the most daunting part - did the 'piling up high like mountain' dishes :-O
I was exhausted at the end of the day, my legs were so painful for long period of standing

The next day, on the day itself early morning I took out the cake from the fridge and rolled out the fondant
Big mistake of the day: I covered the cake with fondant while the cake was still cold
The next thing I knew, it started to have condensation everywhere
I could only stare in despair, for I couldn't do anything to remedy the situation
But I still went ahead to do the little deco here and there and in fact, I used the condensation as glue LOL
What worried me was the whole fondant would collapse, so I kept checking on the cake, patted here and there, tried to smoothen everywhere with my hands dusted with icing sugar wew.... Ants would love my house on that day :)
Luckily nothing major happened to the cake, I learnt my lesson and problem solved after I moved to cake into air conditioned room
But, as a price to pay for my negligence, some parts of the cake wasn't smooth at all :(

After done with everything, I was quite satisfied, despite the condensation tragedy
It's only my second fondant cake, after all (read: self consolation) LOL
Abby was thrilled and she was the one who took the initiative to choose and place Princess Aurora on top :)


The delicious cake, a must try!
I didn't manage to do the marble effect nicely, but who cares? The taste was just too awesome it didn't matter anymore :)


The excited birthday girl :)


Happy birthday my sweet little princess Abigail  XOXO :)

LinkWithin

Related Posts Plugin for WordPress, Blogger...