Pages

Showing posts with label butter/pound cakes. Show all posts

Monday, June 1, 2020

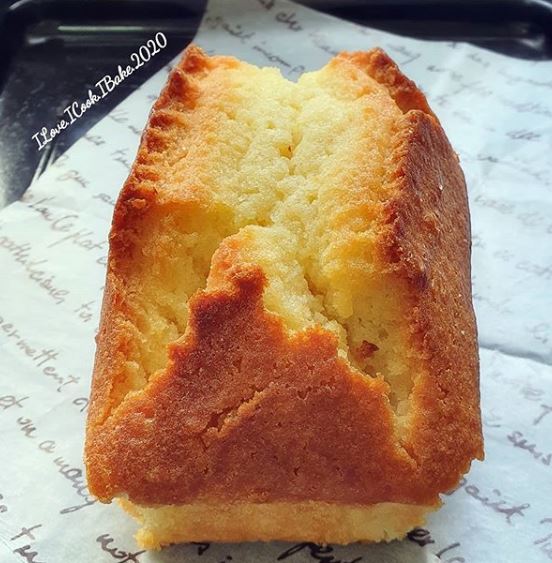
Whipped Cream Buter Cake


Yummy cake with a very fine crumbs. Not those fluffy sponge cake as what the name is, but it's soft and delicious. Easy to make too
Will be nice with some addition of cheddar cheese, mixed dried fruits or chocolate chips
Infusing orange or lemon flavor will be great too


Source: Tintin Rayner adapted from My Mind Patch

What you need:

Ingredients A:
100g caster sugar
90g butter

Ingredients B:
3 large eggs
1tsp vanilla paste

Ingredients C:
110g cake flour
1/4 tsp salt
1/4 tsp baking powder

Ingredient D:
70g whipped cream, room temperature

Method:
  1. Preheat oven to 180deg. Grease and line a loaf pan 20cm in length (I used 20cm square pan hence the shorter cake)
  2. Mix A until pale and fluffy, about 5mins on high speed
  3. Reduce speed to medium and add in eggs, one at a time with about 15secs gap time, last will be the vanilla paste
  4. Add in C and D in alternate. Start and end with C
  5. Pour into the prepared baking pan
  6. Steam bake at the middle rack for 25mins
  7. Remove the waterbath and continue baking one rack higher at 170degC for 30mins
  8. (mine was shorter cake so the timing was 20mins and 15mins)
  9. Remove from oven, and transfer to a cooling rack
  10. When it's warm, use cling wrap to wrap it to retain the moisture


Tuesday, November 15, 2016

Old Skool Vanilla Cake

This recipe has been going viral in Instagram with many Indonesian home bakers. They call it 'Bolu Jadul' (old skool cake)
All gave good reviews, so I had to give it a try too. And it's true that this recipe yields a nice and soft cake which also loved by my family
The texture is something like in between of sponge and butter cake. Yummy! :)


The recipe below...
 
What you need:
 
4 eggs (room temperature)
120g sugar
100g plain flour
20g milk powder
1/2 tsp baking powder
1 tsp vanilla extract
75g butter (melted)
 
some buttercream, chocolate spread, chocolate rice and grated cheese for topping
(I sprinkled 2/3 of the cake with chocolate rice and the remaining with cheese)
 
Method:
  1. Lightly grease 20cm square baking pan. Preheat oven to 150degC
  2. Sift together plain flour, milk powder and baking powder
  3. In another bowl, mix melted butter with vanilla extract
  4. Beat eggs and sugar til light and fluffy (ribbon stage - about 10mins on highest speed)
  5. Fold in flour mixture gently
  6. Scoop 1/4 of the batter and add into the butter mixture, stir til combined
  7. Pour back into the remaining batter and fold in gently
  8. Pour batter into the baking pan and bake for 30mins until skewer test comes out clean
  9. Remove from oven and transfer onto a cooling rack
  10. When cooled completely, add in topping by spreading buttercream and sprinkle with grated cheese, and spreading chocolate spread and sprinkle with chocolate rice
 
In this recipe, I used vanilla extract from Bake The Natural Way
They're kind enough to send me a set of their vanilla products for me to try out
 
The vanilla extract is quite subtle and nice, with some sweetness in it. For those prefer stronger vanilla flavor, some adjustment to the quantity is required
I had previously used it for making vanilla ice cream and I like it too :)


A set of Madagascan vanilla extract, vanilla powder and vanilla pods


My kids' choice


My choice


Nice cake with relatively easy preparation. A keeper :)


Friday, May 29, 2015

Bake Along #79 My Mother-In-Law's Madeira Cake (Nigella Lawson)

Like others, I'm also curious about the story behind the name of this cake
I found out that this cake's recipe is from Nigella Lawson's mother in law
It's typically an English tea cake served with Portuguese wine called Madeira, very popular during the early days

Easy to make, it's a typical fool proof butter cake. Well actually it's lighter than butter cake. It's like a cross between butter and sponge cake. Very nice with a lemony taste in every bite. I like it with a cup of hot tea. I wish I could try it with madeira wine :)


Recipe is from HERE

What you need:
(below is half recipe)

120g butter, room temperature
100g caster sugar
zest of 1 small lemon
2 medium eggs
30ml juice of lemon
105g self raising flour
45g plain flour
more caster sugar for sprinkling (I didn't use)

Method:
  1. Preheat oven to 170degC. Grease and line 1 standard size loaf pan
  2. Cream butter and sugar til light. Add in lemon zest and beat for awhile
  3. Add in egg one at a time followed by both flour alternating with lemon juice til well mixed
  4. Pour batter in the pan, sprinkle caster ugar if using, and bake for 45mins 
  5. Remove from oven when skewer test comes out clean, remove from pan and let cool in the cooling rack


Saturday, August 30, 2014

Product Review: Bosch MaxoMixx Hand Blender & Tionk Butter Cake

I'm so excited and honoured to get the opportunity to have Bosch sent me one of their latest kitchen gadget, MaxoMixx Hand Blender model MSM87180, delivered right to my doorstep!

I never expect it comes in such a big box :)
 
 
When I opened it up, I was like - whoaaaa! LOL
 
 
This multi tasking set comes with different attachments with different functions, such as chopping, blending, whisking, grinding, and even crushing ice!
I really love the base unit. Shiny silver metallic colour, very classy!
 
Before I decided which one I would use first, I took out the whole set and explored each and every part of it. It looks complicated but believe me, it's very easy to use!
I am one gadget idiot, and it took minutes for me to understand how it works
 
 
The hand blender is so sturdy and nice looking too. Love it!


This release button has another one at the other side and to press together to operate. It works so easily!


On button. It has turbo speed function too


Adjustable speed control


Universal cutter L and XL


The ice crush blade


Blender jug and whisk, and look at the hand blender blade just behind the jug
 
 
Okay. Now time to decide what to make. I had quite a few in mind, but I finally baked the popular tionk butter cake by Fiona Lau
 
What is tionk? It actually is typical butter cake - with a softer and fluffier in texture
It bounces back whenever pressed, hence the name. Cute, isn't it? :)
I was really curious because of the rave reviews. After I had my first bite, I understand why it's so popular. It's soft, fluffy, buttery, so delicious, so addictive!
 
My all time favourite butter cake I always use is HERE
It's actually very similar to this butter cake, if I can't say exactly the same LOL
The only difference is the dairy used. It uses milk instead of whipping cream
Anyway, both are equally fabulous. The usage of whipping cream here is a great idea to finish up whatever balance of whipping cream you have in the fridge
 
Why I didn't have the picture of the whole cake? Because half of it was gone in minutes - thanks to my family. Even my fussy boy loves it! He messily cut the cake himself without asking me to get another slice after he had one big slice. Look at the picture below, the bigger portion of the cake on the right had a weird shape. yes, it's his work LOL


Here's the recipe...
 
What you need:
 
240g cold unsalted butter, cut into cubes
5 large eggs
200g sugar
220g self raising flour
50ml whipping cream
1 tsp vanilla extract
 
Method:
  1. Preheat oven to 160degC. Separate the egg yolk from the whites
  2. With electric mixer, beat egg whites til frothy, add in sugar gradually, and beat til stiff peak
  3. In another bowl, beat butter til creamy and pale, add in vanilla extract and mix well
  4. Add in egg yolk one at a time and mix well
  5. Add in 1/2 of the flour, mix well. Add in whipping cream, mix and add in the remaining flour, mix
  6. Mix in 1/3 of the egg whites and stir til evenly mixed. Add in the remaining egg whites and fold gently til just incorporated
  7. Pour batter into lined 8" round pan. Tap hard the pan before putting it in the oven - at the sides and the bottom part
  8. Bake for 60-70mins til skewer comes out clean
 
So, I decided to use the whisk to beat the egg yolk mixture, while my other mixer did the egg whites. I adjusted the speed to the lowest and I pressed the on button and I was shocked. I never expect it's so powerful. I didn't need to increase the speed for this. Super like! :)
I took the picture below with my mobile phone using my other hand. Apology for the quality :)


Such a temptation - guilty pleasure! LOL
 
 
Anyone want to try?
 
 
Back to the gadget. Overall, I'm very pleased with it. And it seems that they all will work pretty hard assisting me in the kitchen LOL
Stay tuned for more recipes using the hand blender set in the coming months :)
 
 
This post is linked to the event Little Thumbs Up (August 2014 Event: Flour) - organised by Zoe (Bake for Happy Kids) and Mui Mui (My Little Favourite DIY) and hosted by Diana from Domestic Goddess Wannabe


You see the tionk tionk cake? :)
 

Sunday, July 13, 2014

THB #33 Holiday Cranberry Nut Rum Cake

One more late post for The Home Bakers (THB)
It's bake no.33 chosen by Diana from Domestic Goddess Wannabe


She mentioned this cake as 'to die for'
To me, this cake resembles Christmas fruit cake which I am not a fan of
What's good is, this is the better version! I, the 'not into fruit cake in Christmas' person, did enjoy eating this cake! :)


I didn't have bourbon or whisky in stock, so I just used dark rum. And I used toasted walnuts instead of pecan. I mixed golden raisins and chopped dates, soaked them in rum before use. And for cranberries, I used frozen
 
For full original recipe, please view HERE


My bake for The Home Bakers hosted by Joyce from Kitchen Flavours - bake no. 33


Thursday, July 10, 2014

THB #32 Raspberry Almond Coffee Cake

Many thanks to Joyce from Kitchen Flavour, the host of The Home Baker
She gave me permission to link my super late bakes
It's supposed to be done in March and I did this cake somewhere early June and I just posted today! I must fight this "blogging blue" that has been dragging too long! :)


This cake was chosen by Angela from the Charmed Cupcake
Simple to make, yet so yummy. My kind of cake :)
Soft, moist, sweetness mixed with the tang from the raspberry and the bonus crunch from the almond. So perfect with a cuppa!


I baked half recipe with 10x20cm rectangle pan. Didn't do any change to the measurement of the ingredients this time. Just perfect :)
Please view HERE for the full recipe

My bake for The Home Bakers - bake no. 32


Tuesday, June 24, 2014

THB #37 Fresh Pineapple Cashew Nut - Upside Down Cake

I have been a lousy blogger lately. Missed out many bakes from many events. Never did any update for close to a month. School holiday. Ridiculous hot humid weather. Plus over a week away from Singapore. All equal to l.a.z.y hahaha...

Anyway, I do not want to miss this one bake today. Why? Because I have chosen it! LOL
It's for the event The Home Bakers (THB), a baking event initiated by Joyce from Kitchen Flavours - which by the way I have missed quite a few *grin*
Well, actually, I have baked #32 and #33 a few weeks ago. I will post and link it in THB's site - if allowed :)

Back to this bake...
Original recipe used macadamia nut but it suggested cashew too, so I chose the latter
I love upside down cake - always. Cake and fruits together, soft, sweet and moist - what's not to like?
This cake is no exception. Every bite burst with the juice from the fresh pineapple cuts, so sweet, soft and moist cake thanks to the syrup. Yum!
It's a cake with fine texture - love it! The crunch from the nuts is a not to be missed added bonus
An addictive sweet treats!


I baked half recipe using a 8" round pan

What you need:
(full recipe)

Fruits layer:
3 tbsp unsalted butter
2/3 cup firmly packed light brown sugar (I used dark brown sugar - this explained my dark looking cake LOL)
1 tbsp light corn syrup
1/2 ripe pineapple, peeled, cored and cut into 6 to 8 slices 1/2 inch thick
1/2 cup unsalted macadamia nuts or cashew nuts (I used cashew)

3 tbsp unsalted butter, room temperature
2/3 cup granulated sugar
2 large eggs
1 tsp vanilla extract
1 1/2 cup cake flour
1 1/2 tsp baking powder
1/4 tsp ground nutmeg (I omitted)
1/4 tsp salt
3/4 cup fresh milk

Method:
  1. Preheat the oven to 175degC
  2. To make the fruit layer: In a heavy 9" ovenproof skillet (I used non stick pan and quickly transferred the caramel onto 8" round baking pan), melt the butter over medium heat. Add the brown sugar and corn syrup and cook, stirring constantly, until the sugar melts and the mixture is bubbly. Cut the pineapple slices crosswise into 3-inch pieces and immediately arrange the slices in the caramel in one layer. Place the nuts in the gaps between the pineapple slices
  3. In a large bowl, beat the butter and granulated sugar with an electric mixer until light and fluffy. Add the eggs, one at a time, and vanilla, and beat well. In a medium bowl, combine the flour, baking powder, nutmeg and salt. Stir to blend. Beat the dry ingredients into the creamed mixture alternately with the milk in 2 additions. Spread the batter evenly over the fruit layer
  4. Bake for 35 to 40mins (mine was 25mins), or until the cake is golden brown and a skewer inserted and comes out clean. Remove from the oven and let cool in the pan for 2 minutes. Then turn upside-down onto a serving plate. Serve warm or at room temperature, cut into wedges

This recipe from the book Coffee Cakes by Lou Seibert Pappas is another keeper. I reckon it will be nice with other kind of fruits, too


This bread is the 37th bake for The Home Bakers - hosted by Joyce from Kitchen Flavours, where we bake from the book Coffee Cakes by Lou Seibert Pappas


And since this cake used butter, I'll also submit this post to Little Thumbs Up organised by Bake For Happy Kids, and My Little Favourite DIY, hosted by Jozelyn from Spice Up My Kitchen at this post. You may post anything you make using butter as one of the ingredient! :)
 

Friday, March 28, 2014

Bake Along #59 Chocolate Marble Cake

A classic marbled cake. At times I can crave for it. So many recipes I want to try. I have tried this, and this, even marbled with Nutella. And I love all three!
Now fourth recipe to put to the test. I want to try the recipe Ju from The Little Teochew shared, originally from BBC Good Food


What you need:

 225g butter , softened
225g caster sugar
4 eggs
225g self-raising flour
3 tbsp milk
1 tsp vanilla extract
2 tbsp cocoa powder

Method:
  1. Heat oven to 180C. Grease a 20cm cake tin and line the bottom with a circle of greaseproof paper
  2. Preparing the batter: By food processor: Put all the ingredients (except the cocoa powder) and whizz for 1-2 mins until smooth. By mixer: Beat the butter and sugar together, then add the eggs, one at a time, mixing well after each addition. Fold through the flour, milk and vanilla extract until the mixture is smooth
  3. Divide the mixture between 2 bowls. Stir the cocoa powder into the mixture in one of the bowls. Take 2 spoons and use them to dollop the chocolate and vanilla cake mixes into the tin alternately. When all the mixture has been used up, tap the bottom on your work surface to ensure that there aren’t any air bubbles. Take a skewer and swirl it around the mixture in the tin a few times to create a marbled effect
  4. Bake the cake for 45-55 mins until a skewer inserted into the centre comes out clean. Turn out onto a cooling rack and leave to cool
 
This is one typical traditional marble cake. Nice and delicious. Soft but a little dry and rather crumbly. Finer texture would be better, too. If I were to bake using this recipe again, I would replace the cocoa powder with melted dark chocolate. It would be more moist, which I like. Or if cocoa powder was the only option, I would use good one, such as Valrhona to get better color and taste :)
 
I guess the next recipe I'd love to try is another marble cake Ju shared from Life Is Great. It looks so good! :)
Oh which one first? Ok, I shall try both :P
 
 
In the meantime, let me have my cuppa with a slice (or two) of this cake :)


This post is for Bake Along #59, an event organised by Joyce from Kitchen Flavours, Lena from Frozen Wings and Zoe from Bake For Happy Kids


Friday, February 28, 2014

Lemon Yoghurt Cake (Barefoot Contessa)

This cake is yummy! No wonder so many good reviews about it
So moist and soft. Sweet and tangy. Addictive!

Update:
Rebaked this recipe using the proper pan size and I got pretty result and better taste and texture too :)


Recipe is from HERE

What you need:

1 ½ cup all-purpose flour
2 tsp baking powder
½ tsp salt
1 cup plain whole-milk yoghurt
1 1/3 cup sugar, divided (I reduced to 170g and 50g - as suggested by Zoe from Bake for Happy Kids)
3 extra-large eggs (I used 65g with shell)
2 tsp grated lemon zest (2 lemons)
½ tsp pure vanilla extract
½ cup vegetable oil
1/3 cup freshly squeezed lemon juice
For the glaze: (I skipped)
1 cup confectioners’ sugar
2 tbsp freshly squeezed lemon juice

Method:
  1. Preheat the oven to 175degC. Grease an 8 ½ x 4 ¼ x 2 ½-inch loaf pan (I used 20cm square pan). Line the bottom with parchment paper. Grease and flour the pan
  2. Sift together flour, baking powder, and salt into one bowl. In another bowl, whisk together the yoghurt, 170g sugar, the eggs, lemon zest, and vanilla. Slowly whisk the dry ingredients into the wet ingredients. With a rubber spatula, fold the vegetable oil into the batter, making sure it’s all incorporated. Pour the batter into the prepared pan and bake for about 50 minutes (mine was about close to 35 mins as my cake was lower), or until a cake tester placed in the center of the loaf comes out clean
  3. Meanwhile, cook the 1/3 cup lemon juice and remaining 50g sugar in a small pan until the sugar dissolves and the mixture is clear. Set aside
  4. When the cake is done, allow it to cool in the pan for 10 minutes. Carefully place on a baking rack over a sheet pan (I poked the cake all over) While the cake is still warm, pour the lemon-sugar mixture over the cake and allow it to soak in. Cool
  5. For the glaze, combine the confectioners’ sugar and lemon juice and pour over the cake (if using)


This post is for Little Thumbs Up, an event organized by Zoe of Bake for Happy Kids and Doreen of my little favourite DIY. Every month we bake / cook with one chosen ingredient in it, and this month the theme is lemon and the host is Grace from Life can be simple at this post


Friday, February 14, 2014

Two Cakes 4 Two Occassions In A Day

Happy Valentine's Day!
Here's my cake for this special day where love is in the air everywhere you go :)


This is red velvet cupcakes using recipe from Joy Of Baking

What you need:

1 1/4 cup (125 grams) sifted cake flour
1/4 tsp baking powder

1/4 tsp salt
1 tbsp (10 grams) regular or Dutch-processed cocoa powder
1/4 cup (57 grams) unsalted butter, at room temperature
3/4 cups (150 grams) granulated white sugar
1 large egg
1/2 tsp pure vanilla extract
1/2 cup (120 ml) buttermilk
1 tbsp liquid red food coloring
1/2 tsp white distilled vinegar
1/2 tsp baking soda
 
For cream cheese frosting:
227 grams cream cheese, room temperature
1/2 tsp pure vanilla extract
1/2 cup (60 grams) confectioners (icing or powdered) sugar, sifted
2/3 cup (160 ml) cold heavy whipping cream (double cream) (35-40% butterfat)
 
Method:
  1. Preheat oven to 175 degC and line 12 muffin tins with paper cupcake liners
  2. Sift together the flour, baking powder, salt, and cocoa powder in a bowl 
  3. In the bowl of your electric mixer, or with a hand mixer, beat the butter until soft (about 1-2 minutes). Add the sugar and beat until light and fluffy (about 2-3 minutes). Add the egg and beat until incorporated. Scrape down the sides of the bowl. Add in vanilla extract, beat til combined 
  4. In a measuring cup whisk the buttermilk with the red food coloring. With the mixer on low speed, alternately add the flour mixture and buttermilk to the butter mixture, in three additions, beginning and ending with the flour
  5. In a small cup combine the vinegar and baking soda. Allow the mixture to fizz and then quickly fold into the cake batter
  6. Working quickly, divide the batter evenly among the 12  muffin cups and smooth the tops with an offset spatula or the back of a spoon. Bake in the preheated oven for approximately 20 minutes, or until a toothpick inserted in the center of the cupcakes comes out clean
  7. Cool the cakes in their pans on a wire rack for 10 minutes and them remove from pan. Let cool completely before frosting
  8. For cream cheese frosting: In the bowl of your electric mixer, or with a hand mixer, beat the cream cheese until smooth. Add the vanilla and confectioners sugar and beat until smooth. Using the whisk attachment, gradually add the heavy cream and whip until the frosting is thick enough to pipe. Add more sugar or cream as needed to get the right consistency


Decoration idea is from a picture from Kidlander SG Facebook page, which I shared in my Facebook account awhile back
I added color sprinkle for the heart after spreading the frosting :)
 
 
Okay, not to forget, today is also the last day of CNY!
So, here's the cake I baked to celebrate the 15th day of Lunar New Year- orange butter cake :)


I always love any cake with orange. This cake is very moist, buttery with fine texture. Delicious!

Recipe is from Gert from Kitchen Snippets
I ever baked orange pound cake with glaze using Gert's recipe too, you may view HERE
It's also real yummy :)


What you need:
 
227g butter – room temperature
200 g sugar
220 g flour
1 tsp baking powder
½ tsp salt
4 large eggs
Zest of an orange
5 tbsp orange juice
 
Method:
  1. Grease and line an 8” round baking pan. Preheat oven to 175degC. Sieve flour, baking powder and salt, set it aside
  2. Cream butter and sugar until light and creamy. Add eggs one at a time, beating well after each addition until mixture is light and fluffy. Add in the orange zest
  3. Slow down the mixer and slowly add in the flour alternating with orange juice. Mix until well combined 
  4. Pour batter into prepared pan. Bake for 50-55 minutes or until cooked through when tested with a skewer
 
 
So, which one would you like to try? :)

LinkWithin

Related Posts Plugin for WordPress, Blogger...