Pages

Showing posts with label My Treasured Recipes. Show all posts

Thursday, February 19, 2015

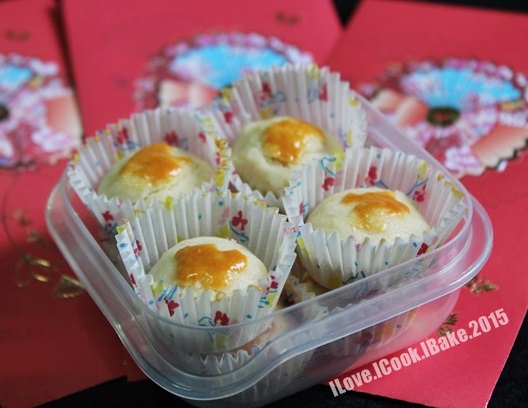
Melt In The Mouth Open Pineapple Tarts - Gong Xi Fa Cai!

Okay, done posting with my Valentine's Day indulgence, I'm back to Chinese New Year goodies LOL

 A must bake every year, this was some postion of my second batch :)


I used my mum's recipe I ever did back in 2011
I reckoned that her recipe is more suitable for closed pineapple tart. It turned to be too crumbly for open tart, hence I did a little modification to the ingredients and also the making process and it worked well for open tart :)

What you need:

For the pastry dough:
200g cold butter, cubed (original recipe used room temperature, I used SCS salted)
300g plain flour
25g corn flour (closed tart: 50g)
2 egg yolks
2 tbsp + 25g milk powder (closed tart: 2 tbsp)
50g icing sugar
1/2 tsp vanilla extract

For egg wash:
(whisk with fork)
1 egg yolk
1 tbsp fresh milk

Method:
  1. In a bowl, mix in both sifted icing sugar, plain and corn flour. Add in butter cubes and rub in with fingertips til resembles breadcrumbs
  2. Add in egg yolk, vanilla extract. Wet you hand (til really wet) and use to knead til forms soft dough (do not over knead). Wrap in cling wrap and keep in the fridge for about 30mins
  3. Remove from fridge and roll dough til about 5mm thick. Shape with cookie cutter as preferred and place in lined cookie sheets
  4. Egg wash them and place pineapple paste ball on each of the pastry
  5. Bake in preheated oven of 175degC for 25-30mins til pastry is slightly browned on the edge
  6. Remove from oven and transfer to cooling rack
  7. Make sure it's cooled completely before storing into containers
For the pineapple paste, I used the same recipe as what I used last year
I found it was too sweet, so this time I reduced the sugar
I made 4 big Morris pineapples and found 300g of sugar is sufficient

Yummy pineapple tarts. Such a torture, knowing that it's high in calories yet it's so addictive LOL


This post is linked to "My Treasured Recipes #5 - Chinese New Year Goodies (Jan/Feb 2015)" hosted by Miss B of Everybody Eats Well in Flanders and co-hosted by Charmaine of Mimi Bakery House

This post is also linked to the event, Cook & Celebrate: CNY organised by organised by Yen from Eat your heart out, Diana from Domestic Goddess Wannabe and Zoe from Bake for Happy Kids
 

Oh btw, jumping to another topic, but still Chinese New Year related, a couple of days ago, I received a surprise from SCS. It's the recipe book so highly on demand now, with a box of delicious pineapple tarts
Thank you SCS, I will definitely will give the recipes in the book a try :)


Lastly, just want to share my must have Chinese New Year's Eve dinner :)
Just a small portion as it's only for 4 of us - well, the pic below only showed half of it, though LOL


Fried taukee and fried golden ingot wanton :)


Last but not least, Happy Chinese New Year 2015, everybody! Gong Xi Fa Cai! :)


A Late Post - Valentine's Day Treat

Hi everyone! Been busy (read: lazy) I missed out blogging lately
Anyway, just want to share what I did for the just over Valentine's Day
I know today is first day of Chinese New Year but let me share this very late post first :P

I hope you all had a great time on this year's Valentine's Day
We do not really celebrate this day as like taking the effort to buy flowers and gifts, go for dinner, etc., but my kitchen will usually will be put to a good use, at least whipping up something simple for the family :)

Made this for breakfast.. Banana Nutella Cinnamon French Toast
Before drizzled by maple syrup


Slurp! Sugar overdose LOL


What you need:
 
2 slices of wholemeal bread (I used 50% wholemeal bread)
Nutella
1 very ripe medium banana, sliced
1 egg
2 tbsp fresh milk
a pinch of salt
1 tsp sugar
1/2 tsp cinnamon powder
a little butter
maple syrup
 
Method:
  1. Mix together in a dish that can fit the bread slice: egg, milk, salt, sugar, cinnamon and whisk with fork
  2. Spread Nutella on both slices of bread and arrange banana slices on one slice
  3. Cover the banana with the other slice
  4. Dip the bread on the egg mixture, leave it for 1 minute, flip to the other side and leave it for another minute
  5. Heat  pan with a little butter, fry the bread til golden brown. Flip to the other side and do the same thing
  6. Serve with maple syrup
 
And this is for snack on that day.. Chocolate Buttermilk Muffins


What you need:
 
100g unsalted butter
125g dark cooking chocolate, chopped
100ml buttermilk
2 eggs, lightly beaten
175g plain flour
15g cocoa powder
100g brown sugar (original recipe used 50g sugar and 50g coconut sugar)
1 tsp double acting baking powder
1 tsp baking soda
1/2 tsp salt
100g chocolate chips (I used semi sweet)
 
Method:
  1. Preheat oven to 200degC. Line muffin pan with muffin case
  2. In a small pot over low heat, melt butter. Add in chopped dark chocolate and stir just until half chocolate melts. Off heat. Stir til butter and chocolate mixed well. Add in buttermilk, mix well and keep aside til starts to cool. Add in beaten eggs and mix well
  3. In another bowl, sieve together plain flour, cocoa powder, baking powder and soda, salt. Add in sugar, mix well
  4. Pour chocolate mixture into the flour mixture, fold gently just until the flour is wet. Do not overmix!
  5. Add in chocolate chips, mix
  6. Divide equally into the muffin cases til 3/4 full. Bake for 15mins. Reduce temperature to 10mins and bake for another 10mins. Please check with test skewer to see doneness. It should come out with some moist crumbs
  7. Serve warm


This post is linked to the event Little Thumbs Up  organised by Zoe (Bake for Happy Kids) and Mui Mui (My Little Favourite DIY) and hosted by Grace of Life can be Simple.
 
This post is also linked to "My Treasured Recipes #5 - Chinese New Year Goodies (Jan/Feb 2015)" hosted by Miss B of Everybody Eats Well in Flanders and co-hosted by Charmaine of Mimi Bakery House
 

And lastly, this post is also linked to the event, Cook & Celebrate: CNY organised by organised by Yen from Eat your heart out, Diana from Domestic Goddess Wannabe and Zoe from Bake for Happy Kids


Friday, February 6, 2015

Easy Pandan Kueh Bangkit

Every time I read the word 'easy' I will surely be intrigued, hence my try on this recipe by Vivian Pang's Kitchen

It's indeed an easy recipe to prepare, but somehow I couldn't pipe the dough, it's not soft enough
So I just rolled into small balls about 10g each, flattened them slightly with fork, just like when I did German cookies


What you need:
 
100g butter
80g icing sugar - sifted
a pinch of salt
1 egg
50ml coconut milk
1 tbsp pandan juice (I used 3/4 tsp pandan paste)
2 cups corn flour
1 cup tapioca flour
 
Method:
  1. Sift both flours, set aside. In another bowl, mix together egg, coconut milk and pandan juice, set aside
  2. Cream butter, sugar and salt til light and creamy. Add in the egg mixture slowly and beat til well mixed
  3. Fold in all the sieved flour and mix til well combined (I folded it and give a quick whisk by mixer for about 30 secs)
  4. Pipe the dough or shape as preferred on lined baking tray
  5. Bake in preheated oven of 170degC for 10-12mins (mine was at 180degC about 15mins - check the bottom of the cookies, it's done when it's lightly browned


The texture is a combination of crunchy and melty at the same time, with a nice pandan aroma. It's lighter than the original kueh bangkit, slightly different.  But we still enjoy eating it. Ian even brought some to school to eat during recess and Abby who usually don't like anything with pandan, ate quite a bit, too :)


 Abby made the fish from hong bao paper and insisted me to take photo of the fish eating the cookies LOL


This post is linked to "My Treasured Recipes #5 - Chinese New Year Goodies (Jan/Feb 2015)" hosted by Miss B of Everybody Eats Well in Flanders and co-hosted by Charmaine of Mimi Bakery House

Also this post is for Best Recipes for Everyone Jan & Feb 2015 Event Theme: My Homemade Cookies by Fion of Fion of XuanHom's Mom and co-host by Victoria Bakes


And lastly, this post is also linked to the event, Cook & Celebrate: CNY organised by organised by Yen from Eat your heart out, Diana from Domestic Goddess Wannabe and Zoe from Bake for Happy Kids


Wednesday, February 4, 2015

Crunchy Melty Almond Cookies

I love almond cookies, both the traditional crunchy type and the modernized melt in the mouth
These cookies are more to the latter - melt in the mouth, but with some added crunch in it, thanks to the almond slivers in the dough


Recipe is from Jess Kitchen
 
What you need:
 
150g self raising flour
70g icing sugar (original recipe 80g)
80g ground almond
80g slivered almonds
100g corn oil (I used rice bran)
1/2 tsp vanilla essence (original recipe used almond essence)
egg yolk for brushing
 
Method:
  1. Sift together flour and icing sugar, add in ground almond and slivered almonds, mix well
  2. Mix essence into oil, stir well
  3. Mix both ingredients together to form a soft dough (the dough will come together when you roll them so don't worry about it being crumbly)
  4. Shape into small round balls (I used 1 heaped tsp) and place into small paper casing
  5. Brush with egg yolk and bake in a preheated oven at 170°C for 15-20mins or until slightly brown
  6. Cool completely on cooling rack and store into airtight containers


This post is linked to "My Treasured Recipes #5 - Chinese New Year Goodies (Jan/Feb 2015)" hosted by Miss B of Everybody Eats Well in Flanders and co-hosted by Charmaine of Mimi Bakery House


Also this post is for Best Recipes for Everyone Jan & Feb 2015 Event Theme: My Homemade Cookies by Fion of Fion of XuanHom's Mom and co-host by Victoria Bakes


And lastly, this post is also linked to the event, Cook & Celebrate: CNY organised by organised by Yen from Eat your heart out, Diana from Domestic Goddess Wannabe and Zoe from Bake for Happy Kids


Friday, January 23, 2015

Economical Lapis Surabaya (Less Eggs)

Lapis surabaya (Spiku) is an Indonesian origin delicious cake mostly popular during festive season, especially Chinese New Year, besides thousand layers cake (lapis legit). It's basically a 3 layered sponge cake with filling of your choice, either cream or jam. Aside from that, this cake is commonly used as cake base for decorated wedding or birthday cake, too
This cake is infamous for the use of high number of egg yolks, talking about cholesterol, my friends! :)
I usually make this yummy, soft, rich and moist cake only around Chinese New Year time, I think it's alright to indulge once a year, isn't it :)
My two favourite lapis surabaya recipes I always use can be viewed HERE and HERE
Both use 30 egg yolks in 1 recipe, giving me headache each time on what to do with the egg whites, especially when I have quite a number of friends ordering this cake, I think I can soak myself in the egg whites after that LOL

Now, this version of lapis Surabaya cake has been around for quite some time among Indonesian bakers. It's the economical version of the cake where less eggs are used, only 10 eggs to be exact, 1/3 of the original version
It's basically a 3 layered sponge cake with filling of your choice, either cream or jam
Taste wise, it's light, airy, soft and fluffy. Sweetness is just nice to my liking. Yum!
While the original version of lapis Surabaya gives a soft, rich and super moist cake, the economical version is light, airy, soft and fluffy, not as moist but it's not dry either, perfect. Sweetness is just nice to my liking. Yum!

I have 2 recipes I'd like to try and this is the first one, and I'm very happy with the result :)


In terms of being soft and fluffy, this cake gets 5 stars! It's so soft that I had to be extra careful when inverting and transferring it to the cooling rack. However I still got some dents on some parts. See the first picture below, there is a few dents at the top of the cake


What disturbed me a little was both recipes use emulsifier. Somehow I don't really fancy putting it in my bakes. After doing some googling and reading, I learnt that it can be substituted with letichin, and natural letichin can be found in egg yolks, and/or condensed milk, yoghurt or mayonnaise
So I just went with my gut, omitted the emulsifier and added plain low fat yoghurt in the batter. And hurray, I still got a really nice cake :)
 
Another thing was, the butter this recipe used. It uses 3 types of butter - Hollman butter, room butter and margarine
I never see Hollman butter here in Singapore, nor using it. Btw it looks like this:
 
 
Room butter, that's how Indonesians call it, is actually Dutch butter, creamier type of butter. I think I saw this butter before in Singapore, but I never use it in any of my bake. This is how it looks like:
 
 
Well, to simplify everything, I just used SCS butter to make this cake :)
 
 
Here's the recipe...
 
Original recipe is from a famous chef in Indonesia named Yongki Gunawan. I saw his recipe HERE
 
What you need:
 
10 egg yolks
5 egg whites
10g emulsifier (I omitted)
150g caster sugar
100g plain flour
1 tbsp full cream milk powder
1 tbsp corn flour
50g Hollman butter
50g room butter
50g margarine
(to replace the 3 butters, I used 150g SCS salted butter)
1 tbsp sweet condensed milk
1 tbsp plain low fat yoghurt
1 tbsp chocolate paste
 
Method:
  1. Preheat oven at 175degC. Grease and line 3pcs of  22x10x4cm pans (or you can use lapis surabay cake pan like what I did to save the trouble)
  2. Melt butter in microwave, add in condensed milk and mix well
  3. In a bowl, beat in high speed eggs and sugar til thick, fluffy and expand triple the size
  4. Lower the speed and add in yoghurt, sifted both flours and milk powder
  5. Add in about 1/4 of the batter to the melted butter and mix well
  6. Pour in the mixture into the remaining batter and fold in gently
  7. Take 1/3 of the batter and mix in chocolate paste
  8. Pour the chocolate batter in 1 of the pan while dividing the yellow batter in 2 pans evenly
  9. Tap all the pans gently before putting in the oven to release the trapped air bubbles
  10. Bake for 20-25mins or til skewer test comes out clean
  11. Remove from oven immediately invert to cooling rack. Invert back 1 of the yellow cake (this is for the top layer). Let cool
  12. Spread jam on the inverted yellow cake, top with chocolate cake, and spread jam on it, top with the yellow cake meant for the top part of this layered cake
  13. Ready to cut and serve. Keep in the airtight container


I will try the other recipe of this economical version of the cake, and do some comparison

Having tried the economical version, it will not stop me baking the cholesterol laden version, cos even though both are nice, but one can't replace the other, it's just different, even though they look the same. So yes, I will still make the 30 yolks cake for this coming Chinese New Year :)


This post is linked to "My Treasured Recipes #5 - Chinese New Year Goodies (Jan/Feb 2015)" hosted by Miss B of Everybody Eats Well in Flanders and co-hosted by Charmaine of Mimi Bakery House 


LinkWithin

Related Posts Plugin for WordPress, Blogger...