Pages

Monday, July 22, 2013

A Simple Bday Cake - Old Fashioned Marbled Cake With SCS Butter

Time flies. Really fast. My Ian turned 6 on Saturday. Feels like yesterday when he was born...


From a mere 2.85kg little baby, now he's a young boy going to Primary school next year!
Time indeed flies too fast!

Just like the previous years, he had his request for the birthday cake this year
Luckily, his request is considered "normal" :)
Inspired by Polar bakery, he requested for a cake with image on top and the sides coated with chocolate rice
And so predictable what he chose for the image. His love with vehicles, in particular cars. Among too many brands in the toys department, he's still in love with Tomica :)

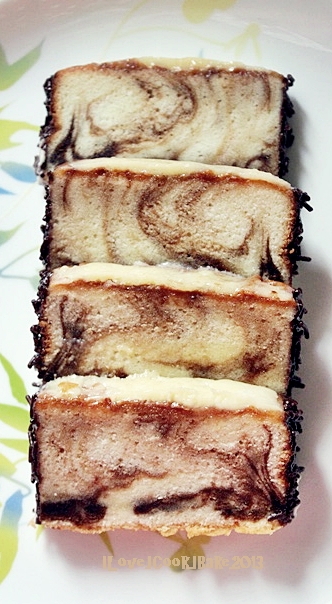
I chose a simple cake that has been requested by Abby a few weeks ago, marbled cake
So happened I wanted to try this simple recipe, real popular lately among Indonesian home bakers

For this cake this time, I used SCS butter, a creamery and fragrant butter which I always love. In fact most of my bakes are using this brand if butter required
So why the mention this time?
Because the butter I used this time was a gift I received from SCS
They're kind enough to deliver personally a gift hamper for me...


The butter cookies and butter cake were real nice. It's gone in the same day, mainly eaten by my kids :)
A big thank you to SCS!


Back to the birthday cake...here's what I ended up with :)


Pic below: A little bit challenging to do the frosting in between the cake :)


Recipe is from a quite well known chef in Indonesia, Pak Sahak Pribadi

What you need:

8 eggs
180g caster sugar
3/4 tsp ovalette
3/4 tsp vanilla extract
225g plain flour
23g cornflour
23g full cream milk powder
150g butter, melted
75g canola oil
2 tsp chocolate paste

Method:
  1. Preheat oven to 180degC. Grease and flour a rectangle pan (28x15cm) (original recipe used 28cm bundt pan)
  2. Sift together plain flour, cornflour, milk powder
  3. Mix together butter and oil
  4. Beat eggs, sugar, ovalette, vanilla, flour mixture til doubled in volume and thick (about 10 minutes high speed)
  5. Add in 1/4 of the batter into the butter mixture and mix well. Pour into the remaining batter and fold in gently
  6. Spoon 1/4 of the batter and mix with chocolate paste
  7. Pour yellow batter into the prepared pan and spoon chocolate batter all over it
  8. Make marble effect with skewer or chopstick
  9. Bake for 40 minutes or til skewer comes out clean
  10. Remove from oven and the pan immediately

I cut the cake into 4 same size rectangles, crumb coated them with buttercream, pasted the 4 edible images on top of each cake
Coated the sides with chocolate rice, and did some piping at the base, all over each cake
It's pretty simple, except for the piping in between the cakes, hence the not so pretty looking piping LOL

The cake is real tasty. Texture wise, it's like butter cake, pretty compact with real fine texture. The next day it somehow tasted better and turned softer, too
Overall, I was pretty pleased with the result, knowing the method is really straight forward


Ian was happy, as always full of praise, even though I know it's not as great as those he saw at Polar. That's all to make my day :)

Happy birthday my precious Ian. Many many many more cakes to make for u :)
Love love love u XOXO


Friday, July 19, 2013

THB#20 Cranberry-Cashew Orange Coffee Cake

It's better late than never. I thought I would miss this bake again, after I missed the 19th bake (which I will still make cos I love lemony cake)
Fortunately I had the time to bake yesterday :)
My kind of cake, not too sweet after I adjusted the sugar used, and bursting with juicy tart cranberries, at the same time enjoying the crunchiness of the nutty streusel on top
Perfect with a cuppa. Yum!


I followed the recipe, but for sugar reduction I followed Joyce from Kitchen Flavours
Somehow, I find her preference for sweetness is more or less same as mine :)

I used 1/3 sugar for the batter (I used caster sugar). Replaced vanilla extract with orange extract and omitted nuts inside the batter. Reduced cranberries used to 1 cup only
For the streusel, I used 2 tbsps. caster sugar, and replaced pecans with cashews

For full recipe, please view Maria from Box of Stolen Socks
She has chosen to bake this wonderful cake :)


Our 20th bake for The Home Bakers, a baking group where we bake recipes from the book  "Coffee Cakes" by Lou Seibert Pappas, hosted by Joyce from Kitchen Flavours


Now, I still have time to bake the 21st bake. I'd better make the time soon :)

Wednesday, July 17, 2013

Murtabak Mee

I cooked this yummy dish a while back....


I didn't use specific recipe, I just dumped a packet of instant noodle (cooked) and the seasoning in a mixing bowl, added in 3 beaten eggs, chopped spring onion
Mixed them well, and cooked like making omelette
It's yummy, sinfully yummy :)

Then I saw Mui Mui from My Little Favourite DIY made a very similar version, and I was like being reminded on how good this dish is
So I made again :)


I did just like the first time I made it, but this time I added chopped onion like Mui did, as well as reducing egg to 2 instead of 3
So if you see the pics, this time the noodle is more visible than the my first try
And yes, it's even more yummy :)
So this is the recipe I'll stick to....
 
What you need:
 
1 packet instant noodle (I used Nissin garlic chicken flavour)
1 medium onion - peel and chopped
2 large eggs - lightly beaten
some spring onion - chopped
 
Method:
  1. In a bowl add in lightly beaten eggs, noddle seasoning, chopped onion and spring onion. Set aside
  2. Cook instant noodles until soft. Drain and add into eggs mixture and mix well. Divide mixture into 2 portions evenly into two small bowls
  3. Add a little cooking oil into a non stick frying pan. Swirl around to coat the pan and heat the pan for a while
  4. Pour a bowl of the mixture into the pan to fry until both side are lightly brown and cooked
  5. Serve immediately

Sunday, July 14, 2013

Bake Along #47 Cinnamon Sugar Doughnut Muffins

Once you pop, you can't stop
It happened, and it scared me I had to pretend not to see some of these little addictive treats
So yummy, a challenge for weight watchers :P

I made the batter without any cinnamon, cardamom or nutmeg - for the sake of my kids
I added vanilla extract instead
I used mini muffin pan and mini donut pan, I got 12 each
Those little muffins, I added chocolate rice in the batter, and coated with caster sugar - to attract my kids' attention LOL
The mini donuts were coated with cinnamon sugar
For me, I prefer the latter, of course :)


The chocolate rice in the little muffins..


What you need: (my version - I made half recipe)
 
187g plain flour
1/8 tsp baking soda
1 1/4 tsp baking powder
1/4 tsp salt
1/2 tsp vanilla extract
110g fresh milk
1 tbsp plain low fat yoghurt
60g unsalted butter, room temperature
60g fine sugar
1 large egg (60g without shell)
 
For the coating:
100g unsalted butter, melted
1/2 cup sugar mixed with 2 tbsp. ground cinnamon
 
Method:
  1. Preheat oven to 180degC. Grease mini donut pan and line mini muffin pan with mini muffin case
  2. Sift together flour, baking soda, baking powder, salt. In another bowl, combine fresh milk and yoghurt
  3. In a bowl, cream butter for 3 minutes over medium speed
  4. Lower speed and add in sugar gradually. Continue to mix til lightens in color
  5. Add in egg, beating til just combined
  6. Add in the flour mixture in thirds, alternating with the milk mixture, mixing just until smooth, do not overmix
  7. Scoop batter into the pans, fill them about 2/3 full
  8. For the mini muffins, in each cup I scooped half batter, sprinkle chocolate rice on them, and covered with the other half batter
  9. Bake for 20 minutes, til the tops are firm to the touch and lightly golden
  10. While the muffins are in the oven, prepare a bowl of melted butter and another bowl of cinnamon sugar (I had one more bowl for caster sugar)
  11. Let the doughnuts cool completely on a wire rack. Dunk them in melted butter then coat them with cinnamon sugar. Do the same for mini muffins, coat them with caster sugar
  12. Store in airtight containers for up to 2 days
 
 
This post is for Bake Along, a baking event organised by  Joyce from Kitchen FlavoursLena from Frozen Wings and Zoe from Bake For Happy Kids
 

Friday, July 12, 2013

KL Hokkien Mee

First response from my family members.... so black! LOL
I personally, like the taste. Yes I did make it too dark, but aside from that, it's yummy
But my kids didn't really enjoy eating this dish. They had it for lunch then they requested for something else for dinner. Can we not having that black noodle again for dinner? they said hahaha...
My mum said, not bad. She never had KL hokkien mee before
DH said, nice, but yes it's too dark LOL


Recipe is from Wendy's site

What you need:

500gm thick yellow noodles
1/2 cup sliced pork, marinate with 1/3 tsp salt
1/2 cup peeled prawns
1/2 cup pork fat, raw
3 cloves garlic, finely minced
250gm cabbage, slliced
100gm indian mustard, stem and leaf separated
4 tbsp dark caramel sauce, or as dark as u like (I'd prefer 3 tbsp next time)
1 heaped tbsp dried sole powder (I grinded deep fried dried sole fish)
2 tbsp light soy sauce, or to taste
white pepper powder
2 cups water

Method:
  1. Put noodles in hot water for 10 seconds, drain
  2. Heat wok over medium heat and cook pork fat. Let it cook until oil starts to ooze out. Turn heat to low and slowly render the lard out and cook until the solid fat pieces turn golden and crispy. Drain and keep the crispy fat and lard separately
  3. Heat wok and put in 1 tbsp oil and cook pork, dish up
  4. Heat another 1 tbsp oil and cook prawns, dish up
  5. Heat another 1 tbsp oil and cook garlic til fragrant
  6. Add in cabbage, toss quickly and add in the indian mustard stems
  7. Put in noodles, seared pork and prawns, give a toss and add water
  8. Add seasonings and bring to boil
  9. Cover wok and let it cooked for 8 minutes til noodles softened
  10. Add in green mustard leaves and cook til it wilts and dish up


This post is for Malaysian Food Fest KL Selangor Month hosted by Shannon of Just as Delish

Thursday, July 4, 2013

Kong Low Noodles (Dried Sauce Noodles)

So simple to cook, and so yummy my whole family enjoys this dish so much :)


Recipe is from Sonia of Nasi Lemak Lover which I modified a little...
 
What you need:
 
a packet of Cintan non fried dried noodles, prepare as directed
2 large shallots, sliced thinly
250g minced pork
a packet of shitake mushroom, sliced
fish balls
bokchoy, cut
chicken bone
a pot of water
a little cooking oil, pepper, salt, vinegar, fish sauce, sesame oil, light soya sauce, a little dark sweet soya sauce (kecap manis)
 
Method:
  1. Marinade minced pork with salt, vinegar and fish sauce, set aside for 30 minutes
  2. Mix cooked noodles with sesame oil, light soya sauce
  3. Heat oil in a wok, sautee shallots til fragrant
  4. Add in marinated minced pork, stir til cooked. Add in mushroom, stir and cook well
  5. Adjust taste by adding a little more salt, pepper and dark sweet soya sauce. Remove from heat
  6. Bring a pot of water with chicken bone to a boil
  7. Lower heat, add in fishballs and wait til they're floating
  8. Adjust taste (fishballs will make the soup salty I didn't add anymore salt)
  9. Add in bokchoy, simmer for a minute and remove from heat
  10. Arrange cooked noodle in a bowl and add in minced pork, fish balls and bokchoy
  11. Pour some soup on top of noodles (not too much, just enough to wet the noodles)
  12. Sprinkle fried shallots on top
  13. Serve immediately
 

Wednesday, July 3, 2013

Bake Along #46 Lemon Cheddar Cheese Cake

Phew..... Finally I write again in my blog
It's close to a month since the last time I did wooaaa...

June has been a busy month for me, but this year was even busier
School holiday, the kids were bored that most of the days we were outside, ended up we had most of our meals outside, too
I had some family issues to resolve too which gave me quite a headache that whenever we're at home, I just lost my mood to cook so I just bought outside food
Some days my mum cooked for us, my saviour :P
Went for a short break then came back with a super smoky Singapore, I was so put off to even going into the kitchen, it was so hot!
So, there goes the whole month of June, my kitchen was also on holiday LOL

Luckily the weather is getting better now, as well as my mood, and since first day of school I have been on track, cooking for my family :)
And, today finally I used up my oven again LOL


 I baked this cake this morning, on the last day of submission for Bake Along event
This cake has been in my to do list for ages. The recipe is from Ricke's site
So many great reviews about this popular cake, the most talked about is how great is the soft cottony texture, it immediately melts in the mouth

When I browsed through other great bakers' cheese cakes, I saw Joyce from Kitchen Flavours did Cheddar Cheese Cake, too
When I read her post, I then realized that the recipe she used is the same as Ricke's
There are some slight modification, where Ricke used lemon juice instead of cream of tartar, and she added lemon zest too
And another thing I found out too that this recipe is originally from Alex Goh recipe book :)
In the end, I followed Ricke's recipe as I wanted to bake lemon version of this cake

Oh how I love this cake! It is so so so smooth, cottony soft and tastes delicious
It's indeed melting in my mouth that finishing a slice is so easy, really dangerous for my waistline LOL
I poured some lemon curd (I used store bought) mixed with warm water to make it less thick. Gosh, heaven!


What you need:

A
130gm milk
40gm butter
125gm cheddar cheese (finely grated)

B
20gm plain flour
15gm corn flour
 
C
3 egg yolk
zest of a lemon

D
3 egg whites
90gm sugar
1 tsp of lemon juice

Method:
  1. Grease and line 18cm round pan
  2. Preheat oven to 150degC
  3. Cook A over double boiler until cheese melts (stir with whisk), set aside til warm
  4. Add in sifted B, mix til well blended. Add in C, mix well and set aside the mixture
  5. In a mixing bowl, beat egg whites til foamy. Add in lemon juice and gradually add in sugar, beat til soft peak (not too dry and stiff, just til creamy and glossy)
  6. Take a little of the egg white mixture, mix in the cheese mixture
  7. Pour into the remaining of the egg white mixture and fold gently
  8. Pour batter into the pan, bake in water bath for 50 minutes (I added another 15 minutes, the last 20 minutes I tented the top of the cake with aluminium foil)
  9. Leave cake in the oven for 10 minutes and the sides of the cake moved away from the pan
  10. Take it out and gently take out the cake from the pan
  11. Decorate as you like


This post is for Bake Along , a baking event organised by  Joyce from Kitchen FlavoursLena from Frozen Wings and Zoe from Bake For Happy Kids


LinkWithin

Related Posts Plugin for WordPress, Blogger...