Pages

Showing posts with label layered cakes. Show all posts

Monday, June 29, 2020

African Gateau

Baked this long time ago using my mom's recipe HERE
This time I used another recipe


Source: Hesti's Kitchen with my own slight adjustment
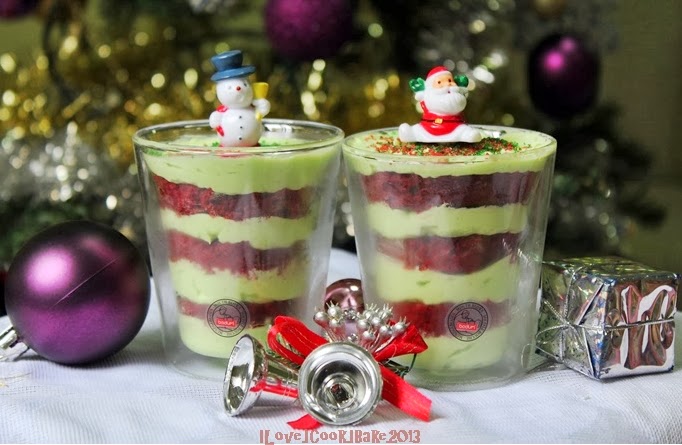
It's using the popular Indonesian steamed brownies recipe for the cake, and I like using her recipe as it doesn't use any emulsifier and it turns out as great

What you need:

For the cake:

A
6eggs
230g caster sugar
1/2tsp vanilla extract
1/4tsp salt

B (sift together)
125g plain flour
50g cocoa powder
1/2tsp baking powder

C
100g unflavoured cooking oil, I used rice bran
75g salted butter
100g dark cooking chocolate (I used semi sweet chocolate)

For the custard filling:

200g sweet condensed milk mixed with water to make it 700ml liquid mix
50g corn starch
20g plain flour
2 egg yolks
1/2tsp vanilla extract
a pinch of salt
15g salted butter

Ganache:
(for future reference, i skipped this time, and honestly, without this, the cake is already so yummy)

175g thickened cream
175g dark chocolate, chopped
50g salted butter

Method:
  1. Preheat steamer. If your steamer cover is not the triangular shape type, cover with clean cloth to prevent dripping
  2. Prepare 20cm square pan with 7cm height by greasing it with butter and line with baking paper
  3. In a pot over medium low fire, heat C until melted and mixed well. Don't let it boil. Set aside
  4. Using a mixer on high speed, cream A until pale and thick
  5. Add in B mix gently using low speed
  6. Add in C and fold gently using spatula
  7. Pour batter into the prepared pan, and put in the preheated steamer
  8. Steam for 45mins over medium fire (if the fire is too big, the surface of the cake will be uneven)
  9. Check using skewer and test if it's fully cooked
  10. Remove from steamer, and transfer from the pan to cooling rack. Let cool completely
  11. Meantime, make the custard filling: put in a heavy based pot liquid mix, corn starch, plain flour, egg yolks, vanilla, and salt. Cook while stirring constantly until thickened. Off fire and add in butter. Stir well until butter melts. Let cool, cover using clingwrap touching the surface of the custard, to prevent it from forming "skin"
  12. When the cake is cooled, cut horizontally into 2 or 3 parts (I only cut into 2parts)
  13. Spread the cooled custard on 1 part of the cake, and cover with another part
  14. If you cut into 3parts, do the same one more time on top of the first two layers to form total of 3layers cake
  15. If u use ganache, heat cream in a pot until hot and chocolate melted, don't let it boil. Add in chocolate and butter. Keep stirring until the mixture is glossy and smooth. Pour over the cake and let it set for about 15mins


Thursday, March 23, 2017

Fancy Lapis Roll

Shoo shoo away laziness. Now it's time to blog again! Two full months of hiatus! In fact, a little more than that LOL

Okay, let me start with the biggest challenge of the year, making this lapis roll
I did lapis roll before, twice. You may view HERE and HERE
This time is completely different. It's the time for lapis roll with a twist
It's my first challenge from a baking group in IG I recently joined, homemadelovers

For this challenge, recipe was provided and many tutorial pictures generously shared by other members. I must thank them cos it's a really great help to visualize easier
So many pretty pictures of fanciful lapis rolls shared too as inspiration, some I can't even figure out how it can be done haha..
Baking is science. But for this particular bake, it's not only science but also math. Need to do some calculation to get it right!

For first timer like me, it's better to choose the simplest design. After reading many advice and tips from other members, looking at the tutorial pictures, reading the recipe carefully, I was ready to take up the challenge. And here it is


Not so perfect yet, but being first timer, I am pretty pleased. I in fact, cannot believe I managed to complete this task LOL

As for the taste, this cannot go wrong. Just look at the amount of butter and egg yolks used!
It's so moist, rich, soft and delicious. Super yummy!
This cake is better to consume the next day and not to be consumed cold. Room temperature or warm is the best!


Recipe:
Source: IG @deasylo
(makes 2 rolls)

What you need:

A
350g butter (I used Golden Churn)
125g icing sugar

B
25 egg yolks
125g icing sugar
1 tsp vanilla extract

C
70g plain flour
50g milk powder
1 tsp all spice powder (I added)

For filling: strawberry jam OR sweet condensed milk (I used jam)

Method:

Grease 3 baking pans (2pcs of 22cm square pans and 1pc of 20cm square pan) with butter, line with baking paper and sprinkle flour over it

Making the batter:
In a bowl, beat A until white and fluffy
In a separate bowl, beat B until fluffy and stiff
Add in sifted C to mixture B, add in A too and fold in gently until well mixed

Baking the cake:
Scoop out some batter (16 tbsp) -> this is reserved for the 2pcs of the 22cm baking pans to make the outer skin, set aside

Making the inside lapis:
  • Preheat the oven together to 180degC with the 20cm square pan in it for about 15mins
  • Add 4tbsp of the batter to the pan and bake with top and bottom heat til brown (rotate if needed)
  • Take out the pan and gently press the cake with presser
  • Repeat that but using top heat only this time, until the batter finished (oven temp 180 to 200degC)
  • After that, final bake only using bottom heat for 7 to 10mins
  • Remove from the oven and transfer to a cooling rack. After cooled, cut into 12 equal long parts
Making the skin:
  • Heat the 2 pans using top and bottom heat for 15mins and start baking using top and bottom heat with temp of 180degC by adding 4tbsp of the batter reserved for the skin to each pan, bake til brown
  • Take out the pan and press gently
  • Continue with another 4tbsp of batter using only top heat til brown (each pan will have 2 layers). Try not to bake too long as it will be too dry to roll (can crack)
  • Remove from oven, transfer to cooling rack and let cool
How to assembly:
  • Thinly spread jam over the skin layer. Take cut layer cake (6pcs) and arrange in opposite direction
  • Grease the top and sides of the arranged cut layer cake with jam, also in between stacks
  • Slowly wrap it up as how you do with rolled cake
  • Wrap with clingwrap, gently press all sides and keep for a few hours before cutting into slices

This is not only nice looking lapis (I can boast a little right? haha), but very delicious too :)


Pretty? :)


This looks complicated cake, but it's seriously not that bad. Of course practice makes perfect, and another fact about lapis that you cannot deny, it's time consuming, I spent about 3hours to complete. It needs more patience and you must have a kind of heatproof body as you will need to stay in front of the oven most of the baking time :)
Other than that, when following the instruction closely, everybody can do it, nothing is impossible :)

Saturday, January 31, 2015

Bake Along #74 Hot Milk Cakes With Strawberries & Cream

Very interesting recipe where a mixture of hot milk & butter poured in the batter, I must try :)
It yielded a tasty cake but to me, the cake is too dense. Luckily it's meant to eat with cream and strawberries with its juices, helps a lot to moisten the cake. In the end, it's pretty enjoyable, and my family didn't mind either :)


Recipe is from Bon Appetit Dessert Cookbook by Barbara Fairchild

What you need:
(I followed the modification from Joyce from Kitchen Flavours)

2 large eggs
1/2 cup + 4 tbsp caster sugar
3/4 tsp vanilla extract, divided
1 cup + 2 tbsp self raising flour
2/3 cup fresh milk
5 tbsp unsalted butter
1 pound strawberries, hulled and thinly sliced lengthwise
I/2 cup whipping cream (I used 200g)
1 tbsp icing sugar (I used 2 tbsp)

Method:
  1. Preheat oven to 220degC and grease 6 ramekins. Place them on baking sheet
  2. Beat eggs on high speed til thick for about 3mins. Add in sugar (1/2 cup) gradually and beat til pale and yellow about 1min longer. Beat in vanilla (1/2 tsp)
  3. Add in flour (sifted) and beat for 30secs. Bring milk and butter just to boil in a small pot, stir til butter melts. Beat hot milk mixture into batter and continue to beat for 30secs
  4. Divide batter mixture into ramekins and bake til firm to touch and pale golden, tops form rounded peaks in the centre, about 16mins. Cool them in the ramekins for about 20mins at least
  5. Toss strawberries and 4tbsp sugar, let stand for about 20mins
  6. Beat cream, icing sugar and vanilla extract (1/4tsp) til peaks form
  7. Remove cakes from ramekins, cut off the rounded tops and spoon cream and strawberries. Cover with top part of the cake, garnish the top with more cream and strawberries and some of the juice
  8. Serve immediately


Friday, January 23, 2015

Economical Lapis Surabaya (Less Eggs)

Lapis surabaya (Spiku) is an Indonesian origin delicious cake mostly popular during festive season, especially Chinese New Year, besides thousand layers cake (lapis legit). It's basically a 3 layered sponge cake with filling of your choice, either cream or jam. Aside from that, this cake is commonly used as cake base for decorated wedding or birthday cake, too
This cake is infamous for the use of high number of egg yolks, talking about cholesterol, my friends! :)
I usually make this yummy, soft, rich and moist cake only around Chinese New Year time, I think it's alright to indulge once a year, isn't it :)
My two favourite lapis surabaya recipes I always use can be viewed HERE and HERE
Both use 30 egg yolks in 1 recipe, giving me headache each time on what to do with the egg whites, especially when I have quite a number of friends ordering this cake, I think I can soak myself in the egg whites after that LOL

Now, this version of lapis Surabaya cake has been around for quite some time among Indonesian bakers. It's the economical version of the cake where less eggs are used, only 10 eggs to be exact, 1/3 of the original version
It's basically a 3 layered sponge cake with filling of your choice, either cream or jam
Taste wise, it's light, airy, soft and fluffy. Sweetness is just nice to my liking. Yum!
While the original version of lapis Surabaya gives a soft, rich and super moist cake, the economical version is light, airy, soft and fluffy, not as moist but it's not dry either, perfect. Sweetness is just nice to my liking. Yum!

I have 2 recipes I'd like to try and this is the first one, and I'm very happy with the result :)


In terms of being soft and fluffy, this cake gets 5 stars! It's so soft that I had to be extra careful when inverting and transferring it to the cooling rack. However I still got some dents on some parts. See the first picture below, there is a few dents at the top of the cake


What disturbed me a little was both recipes use emulsifier. Somehow I don't really fancy putting it in my bakes. After doing some googling and reading, I learnt that it can be substituted with letichin, and natural letichin can be found in egg yolks, and/or condensed milk, yoghurt or mayonnaise
So I just went with my gut, omitted the emulsifier and added plain low fat yoghurt in the batter. And hurray, I still got a really nice cake :)
 
Another thing was, the butter this recipe used. It uses 3 types of butter - Hollman butter, room butter and margarine
I never see Hollman butter here in Singapore, nor using it. Btw it looks like this:
 
 
Room butter, that's how Indonesians call it, is actually Dutch butter, creamier type of butter. I think I saw this butter before in Singapore, but I never use it in any of my bake. This is how it looks like:
 
 
Well, to simplify everything, I just used SCS butter to make this cake :)
 
 
Here's the recipe...
 
Original recipe is from a famous chef in Indonesia named Yongki Gunawan. I saw his recipe HERE
 
What you need:
 
10 egg yolks
5 egg whites
10g emulsifier (I omitted)
150g caster sugar
100g plain flour
1 tbsp full cream milk powder
1 tbsp corn flour
50g Hollman butter
50g room butter
50g margarine
(to replace the 3 butters, I used 150g SCS salted butter)
1 tbsp sweet condensed milk
1 tbsp plain low fat yoghurt
1 tbsp chocolate paste
 
Method:
  1. Preheat oven at 175degC. Grease and line 3pcs of  22x10x4cm pans (or you can use lapis surabay cake pan like what I did to save the trouble)
  2. Melt butter in microwave, add in condensed milk and mix well
  3. In a bowl, beat in high speed eggs and sugar til thick, fluffy and expand triple the size
  4. Lower the speed and add in yoghurt, sifted both flours and milk powder
  5. Add in about 1/4 of the batter to the melted butter and mix well
  6. Pour in the mixture into the remaining batter and fold in gently
  7. Take 1/3 of the batter and mix in chocolate paste
  8. Pour the chocolate batter in 1 of the pan while dividing the yellow batter in 2 pans evenly
  9. Tap all the pans gently before putting in the oven to release the trapped air bubbles
  10. Bake for 20-25mins or til skewer test comes out clean
  11. Remove from oven immediately invert to cooling rack. Invert back 1 of the yellow cake (this is for the top layer). Let cool
  12. Spread jam on the inverted yellow cake, top with chocolate cake, and spread jam on it, top with the yellow cake meant for the top part of this layered cake
  13. Ready to cut and serve. Keep in the airtight container


I will try the other recipe of this economical version of the cake, and do some comparison

Having tried the economical version, it will not stop me baking the cholesterol laden version, cos even though both are nice, but one can't replace the other, it's just different, even though they look the same. So yes, I will still make the 30 yolks cake for this coming Chinese New Year :)


This post is linked to "My Treasured Recipes #5 - Chinese New Year Goodies (Jan/Feb 2015)" hosted by Miss B of Everybody Eats Well in Flanders and co-hosted by Charmaine of Mimi Bakery House 


Friday, December 20, 2013

Red Velvet Cake With Cream Cheese Frosting In Jars

This month's challenge for LBT event, Cake In A Jar
I have no mason jar. Most of my glass jars from store bought jam or pasta sauce were disposed. I have a few but it's already used for my homemade jams
So in the end these are the "jars" I used :)


Layers of red velvet cake and cream cheese frosting
To make it looks more Christmas-ey I added a little green food coloring on the frosting :)
Sprinkled with red and green sand sugar, poked little Santa and Snowman cupcake topping and that's it :)


Layering them one by one in the jar is not so simple. Let alone make it neatly arranged. So I am pretty satisfied with this outcome :)


Recipe for the cake is from Joy Of Baking and the frosting is from Eugenie's Kitchen
 
Red Velvet Cake
 
What you need:
(below is full recipe, I only made half)
 
250g cake flour
1/2 tsp salt
2 tbsp. cocoa powder
113g unsalted butter, room temperature
300g sugar
2 large eggs
1 tsp vanilla extract
240ml buttermilk
2 tbsp liquid red food color (I mixed 1:1 noel red and cochineal red)
1 tsp white distilled vinegar
1 tsp baking soda
 
Method:
  1. Preheat oven to 175degC. Put the rack in the middle of the oven
  2. Butter two 9" round cake pans, line the bottoms with parchment paper
  3. Sift flour, salt and cocoa together. Set aside
  4. Beat butter til soft (2 mins). Add in sugar, beat til light and fluffy (about 3-5 mins)
  5. Add in egg, one at a time, beat well after each addition, scrape down the sides
  6. Add in vanilla extract, beat til combined
  7. Whisk buttermilk with red color
  8. With mixer in low speed, alternatively add in flour mixture and buttermilk to the butter mixture in 3 additions (beginning and ending with the flour)
  9. Combine vinegar and baking soda in a small bowl. Let it fizz then quickly fold into the cake batter
  10. Pour on the pans, smooth the tops. Bake about 30 minutes til skewer comes out clean
  11. Cool on the wire rack in the pans for 10 mins and remove from pan
  12. Cool further on wire rack
 
Cream Cheese Frosting
 
What you need:
 
113g unsalted butter, room temperature
100g icing sugar (original recipe: 125g)
200g cream cheese (original recipe: 142g)
1/2 tsp vanilla extract (or zest of 1 lemon)
 
Method:
  1. In a bowl add cream cheese, butter and icing sugar, also vanilla or lemon zest
  2. Cream together til homogenous
 
To assemble:
  1. Spoon frosting to the bottom of the jar, smooth the top. Place rounded cut piece of cake (thickness about 1 inch). Spoon more frosting on top of the cake, smooth the top
  2. Continue til there are 3 layers of cake. Last layer on top should be the frosting
  3. Decorate as desired
  4. My "jar" is wider at the top so the size of each cake is different. The bottom layer is 5cm, middle layer is 5.5cm while the top layer is 6cm
 

Oh yum! Such a sinful indulgence!


I'm also submitting this post to Baby Sumo's Christmas Recipe Collection 2013 hosted by hosted by Baby Sumo of Eat Your Heart Out


Tuesday, February 19, 2013

Cream Cheese Lapis Legit & Surabaya Layered Cake

My last egg yolk laden yet delicious cake for this year's Chinese New Year :)


The lapis legit layer used cream cheese, while the lapis surabaya is the original version
It's a heavenly combination that's rarely seen, even in Indonesia

Recipe for cream cheese lapis legit is from Bisous A Toi

What you need:
(recipe below is what I made: 1/3 recipe)

A
70g butter
50g cream cheese
45g sugar
5 egg yolks
2 tbsp sweet condensed milk

B
45g sugar
75g egg whites (from 2.5 eggs)
a pinch of cream of tartar

C
60g hongkong flour
1/4 tsp baking powder

Method:
  1. Preheat oven to 18degC. Grease 20cm square pan and lightly floured
  2. Beat cream cheese and sugar til fluffy and light
  3. Add in egg yolks one by one til well combined. Add in sifted flour
  4. In another bowl, beat egg whites and cream of tartar til foamy. Gradually add in sugar til soft peak
  5. Add in egg whites mixture into the egg yolks mixture and mix til combined
  6. Divide batter into six
  7. Bake each layer using top heat only til browned. Brush the top layer for each layer after baked
  8. Bake the last layer using top+bottom heat for 10 minutes
  9. Remove from oven, let cool in the pan for 5 minutes before transferring to cooling rack

This lapis legit is more to drier type - due to the egg whites used
It goes well with lapis surabaya cake which is very moist, but I don't think I'll eat it on its own


Now, the recipe for lapis surabaya is from NCC (Natural Cooking Club)

What you need:
(for 2 layers)

20 egg yolks
200 g sugar
250g butter, beat til soft and white
100g plain flour

Method:
  1. Beat egg yolks and sugar til ribbon stage. Off mixer
  2. Add in beaten butter and fold in using rubber spatula
  3. Fold in sifted flour, also using rubber spatula
  4. Divide batter into two. Mix in one part of batter with 1 1/2 tbsp chocolate emulco
  5. Pour on two 20cm square pan and bake in preheated oven of 180degC for 25 minutes or til the tester skewer comes out clean
  6. Remove from oven, let cool for 5 minutes in the pan before transferring to cooling rack

Assembling:
  1. Place the yellow lapis surabaya layer cake at the bottom. Spread strawberry jam on top
  2. Top with lapis legit cake. Spread the top with straberry jam
  3. Top with the chocolate lapis surabaya layer cake on top
  4. Cut the sides for presentation

Such a rich cake, yet you can't stop at one! Yummy!
Super sinful indulgence, but it's so forgiven, it's once a year thingy!


I'm submitting this post to:

* Aspiring Bakers #27: Through Thick and Thin – Kue Lapis Classics hosted by Sam of Sweet Samsations
* Chinese New year Delights 2013 hosted by Sonia aka Nasi Lemak Lover


Thursday, January 31, 2013

Chocolate Cheese Lapis Legit Rolled Cake

I made lapis roll before, at that time I just did the original kind. You may view it HERE
This time I did it a little differently, a twist I made from this well known Indonesian kue lapis (we Indonesians call it "lapis legit")


These ugly looking rolled cake slices  can't be judged by their look
The chocolate taste and the crunch from the grated cheese are so perfectly blended together
It has a really soft, moist and really rich texture, just like how normally kue lapis is
As you know, kue lapis is notorious for the amount of egg yolks used, just like the lapis surabaya cake I made the other day


Recipe is from Rima's site
She made pandan and prune version while I did chocolate and cheese :)

What you need:

150g cold good quality butter
1 tbsp sweet condensed milk
12 egg yolks
100g caster sugar
10g hongkong flour
1 tbsp milk powder
1/2 tbsp spekoek powder (I used cocoa powder)
1 tsp pandan paste (I used 2 tsp chocolate paste)
enough finely grated cheddar cheese
enough chocolate rice

Method:
  1. Preheat oven to 170degC
  2. Grease a 20cm square pan and line with baking paper
  3. Beat butter til smooth and white, add in condensed milk and beat well. Set aside
  4. In another bowl, beat egg yolks and sugar til white and fluffy
  5. In low speed, add in sieved hongkong flour and milk powder, also cocoa powder
  6. Lastly, add in chocolate paste
  7. Fold in butter mixture into the egg mixture
  8. Divide batter into 5 parts
  9. Pour the first batter and bake for 7 mins using top and bottom heat
  10. Take out from oven, change the oven heat to top heat only
  11. Sprinkle chocolate rice and grated cheese
  12. Pour the second batter and bake (top heat only) til browned (around 3-5 minutes depending on the oven)
  13. Do the same for the remaining layers
  14. Before baking the last layer, switch back the oven to top and bottom heat
  15. Sprinkle only cheese on top of the last layer and bake top and bottom heat for 7 minutes or til cooked
  16. Take out from the oven and let cool in the pan for 5 minutes
  17. Take out the cake from the pan (with the baking paper) and transfer to another baking paper
  18. Let cool slightly and spread a thin layer of butter, and then roll like how you do when rolling a swissroll
  19. Keep it tightly wrapped in the baking paper for around 30 minutes before cutting it

Another delicious alternative to make this cake for Chinese New Year, especially for those don't really fancy spekoek taste

I'm submitting this post to:

* Aspiring Bakers #27: Through Thick and Thin – Kue Lapis Classics hosted by Sam of Sweet Samsations
* Chinese New year Delights 2013 hosted by Sonia aka Nasi Lemak Lover

Monday, January 28, 2013

Orange Lapis Surabaya Cake (Spiku)

Coming to Chinese New Year, the type of cake usually comes into the mind of those celebrating is the Indonesian thousand layers cake (Kue Lapis Legit)
In Singapore, Kue Lapis Legit is so easily spotted in many bakeries during Lunar New Year time
But do you know that there's another type of Indonesian layered cake? It's as famous and in fact is a must too in every household of Indonesian Chinese families during the fifteen days of celebration. It's readily available in most bakeries, too

It's called Lapis Surabaya (Spiku)
Unlike the uncountable thin layers Kue Lapis Legit, Lapis Surabaya has only three layers typically
Those who dislike the fragrant and/or taste of spekkoek which is very distinct in Kue Lapis Legit, Lapis Surabaya would be the better choice
I personally prefer the latter, if I can choose, even though basically I love both :P
Firstly, the procedure to make Lapis Surabaya isn't as tedious. Secondly, I LOVE the taste and texture!

Both cakes are so notorious in the amount of egg yolks used
The good quality of this cake needs great quality of butter, too
Those two ingredients explain how many slices you can take in a day, to maintain your waistline, and most importantly, your cholesterol level!
I restrict myself in making and eating these cakes only during this time of the year, Chinese New Year time :)
Strangely, as much as I love them, the craving hits me only when the time comes, thank God :)

Oh well, it's the time to make one now. The craving is here and it's even more after I saw Nina made one and posted in her blog
I knew I must try it!
So, here it is....


Such a fine cake, I must say
The texture is unbelievably soft and moist. It tasted so delicious, with a hint of orange and chocolate and additional touch of berries jam melted together in every bite. Heaven!


A closer look on the fabulous texture of this cake
It's not the same as those soft cottonny chiffon cakes, it's different, a good different :)

You can see the glossy strawberries jam I used to glue each layer. I used my homemade strawberries jam (recipe is the same as my homemade plum jam, just replace plum with strawberries and adjust the sugar used accordingly)


I don't really favor lapis Surabaya with buttercream filling, hence the choice of this sweet tangy jam
The original recipe used marmalade, but I didn't use that sice I didn't want to make the orange flavour in this cake to be too overpowering

 
A slice of pure bliss! :)


What you need:
(below is half recipe I made with a slight modification)

Orange layers (makes two):
10 egg yolks (I used medium size)
70g caster sugar
35g plain flour
8g corn flour
8g full cream milk powder
125g butter
1 tbsp freshly squeezed orange juice
1/2 tsp orange zest
1 tbsp sweet condensed milk
1/2 tsp orange essence (optional)

Chocolate layer (makes one):
5 egg yolks
50g caster sugar
15g plain flour
10g cocoa powder
65g butter
1/2 tbsp sweet condensed milk
1 tsp chocolate paste

Filling:
strawberries jam

Method:

Grease pan (10x20cm pan for chocolate layer, and 20x20cm pan for orange layer) , line and grease again. Set aside

To make the orange layers:
  1. Beat butter til smooth. Add in orange juice and sweet condensed milk, beat well. Add in orange zest, mix well
  2. Beat egg yolks and caster sugar til tibbon stage
  3. Fold in sieved plain flour, milk powder and corn flour
  4. Pour egg yolk mixture into the butter mixture, gently mix with spatula til well incorporated
  5. Pour into 20x20cm pan, and bake in preheated oven of 180degC for 18 minutes til cooked (when the skewer comes out clean)
Do the same for the chocolate layer using 10x20cm pan

To assembly:

When the cakes are cooled, slice orange cake into half, place one orange layer and spread the top with jam, top with chocolate layer
Spread the top of chocolate layer with jam, top with the other orange layer
Cut and serve


 So irresistable!


I'm submitting this post to:

* Aspiring Bakers #27: Through Thick and Thin – Kue Lapis Classics hosted by Sam of Sweet Samsations
* Chinese New year Delights 2013 hosted by Sonia aka Nasi Lemak Lover

Saturday, July 30, 2011

Lapis Roll

My last submission for this month's Aspiring Bakers event - at the same time to fulfill my craving of this Indonesian traditional cake :)

One of the most difficult cake to bake - time consuming and lots of patience required, but it's really worth to go thru all after you sink your teeth on this moist cake
Often called a thousand layer cake cos of the many thin layers - but this time I made a twist since I myself is busy packing my stuff
I made just four layers and roll it up :)


Recipe is from Rima's site
(a little modified by me)

140g creamery butter (I used Golden Churn)
1 tbsp condensed milk
12 large egg yolks
90g icing sugar - sifted
1/2 tsp vanillin powder
1/2 tsp mixed spice powder (spekoek powder)
10g cake flour - sifted
5g milk powder - sifted

Preheat oven to 160degC
Grease, lay with parchment paper and grease again a square pan (I used 24x24cm)
Beat butter til pale and light, add in condensed milk - beat well, set aside
In a separate bowl, beat eggs, icing sugar and vanillin & mixed spice powder til thick and pale
In low speed, add in flour and milk powder - mix well
Divide the batter into four
Spread the first layer, bake with top+bottom fire for 3 minutes, switch to top fire and bake til golden brown
Spread the second layer, and bake exactly like the first layer
Followed by the third and fourth layer
Final bake with top+bottom fire for 3 minutes
Take out from the oven, let cool on the cooling rack
Roll with parchment paper away from you while it's warm - tighten it
Let it set in the paper for approximately 10minutes
Take out the paper and cut

Such a sinful indulgence - every bite worth the effort :)

I'm submitting this roll to Aspiring Bakers #9 Swiss Roling Good Times hosted by Lynn from Obsessedly Involved With Food at this LINK

Now, back to packing business - tomorrow is my D-day for moving out
No internet connection from tomorrow and back to normal on Monday evening

LinkWithin

Related Posts Plugin for WordPress, Blogger...