Pages

Monday, October 31, 2011

Rice Flour Layered Kueh (Lapis Beras)

There are three types of flour used to make layered kueh with different texture
Sago flour gives a chewy lighter texture, rice flour for more dense and less chewy texture and plain flour for light and steamed cake kind of texture
Of course each type uses not only one type of flour but a mixture of two usually
Long time ago before I started this blog I have tried the plain flour version, this time is the rice flour
DH prefers the sago flour version apparently, so I will definitely try that too next time

Steamed layered kueh is indeed time consuming in the process but at least I still can depend on the timer and do other chores at the same time, unlike baked layered cake (kueh lapis) which requires your 100% continuous observation throughout the whole process, sitting (or standing) in front of the oven (even though I must admit kueh lapis is really worth the effort! ^_^)

Ok, why I decided to make this kueh? Not once I ever had the intention of making this kueh, but I changed my mind after I found out that Abby loves this
It's the first traditional kueh she likes and so far it's still the only one :)
She will slowly eat this kueh peeling layer by layer :)

Colors are chosen by Abby, aren't they the best match ever? :)


Recipe is from NCC

What you need:

100g sago flour
275g rice flour
300g sugar
1 tsp salt
1.5 l coconut milk (900ml Kara +600ml water)
3 pandan leaves, torn
pink food coloring, pandan paste, chocolate paste

Prepare 18x18x8cm square pan, brush lightly with cooking oil, lay a heatproof plastic and brush again with cooking oil
Wrap the steamer cover with clean cloth
Bring to boil coconut milk mixture and pandan leaves while stirring continuously, off heat, let cool
Mix together in a bowl sago flour, rice flour, salt and sugar
Pour in coconut milk gradually while kneading the mixture til forms runny batter (I use balloon whisk)
Divide the batter into three, one mixed with a few drops of pink coloring, another one mixed with a few drops of pandan paste, and the last one mixed with 2 tsp chocolate paste
Put the pan in the steamer, let the steamer hot and start with pouring 100ml of pink batter, steam for 10minutes, followed by 100ml of green batter, steam for 10minutes, the next one is 100ml chocolate batter, steam for 10minutes
Continue til batter finished, the last layer is to steam for 20minutes
I spent 2 hours for the steaming process

I'm submitting this traditional snack to Aspiring Bakers #12 Traditional Kueh hosted by Small Small Baker

Thursday, October 27, 2011

Tapioca Layered Kueh (Lapis Singkong)

Pretty colors, simply delicious in taste, prefect sweetness and chewiness - really a must try :)


Recipe is from Ricke's site

What you need:

1kg tapioca, finely grated
350ml coconut milk (200ml Kara + 150ml water)
200g sugar
1 pack agar agar powder (white)
1/4 tsp vanillin powder
red food coloring (or you may used cocopandan paste)
green food coloring (I used pandan paste)

100g grated coconut
1/4 tsp salt
1/4 tsp vanillin powder
a little oil
===> Mix grated coconut, salt and vanillin and steam on high heat for 15minutes, set aside

Grease with oil 18 x18cm square pan, lay heatproof plastic at the bottom, grease again on the plastic, set aside
Squeeze grated tapioca but not too dry, discard the water
In a mixing bowl, stir sugar, agar agar powder, coconut milk, mix well
Add in grated tapioca and vanillin, stir well
Divide batter into three parts, one mixed with 1/2 tsp red color, another one with 1/2 tsp pandan paste
Just leave the other one plain with no color
Pour the green batter into the pan, steam for 20minutes til cooked
Pour the plain batter, steam for another 20minutes til cooked
Pour the red batter, steam for another 30minutes til cooked
Off heat, let the kueh in the pan til completely cooled
Once cooled, take out from the pan and cut with plastic knife
Wrap each piece with the coconut mixture

Please note that colors are subjected to preference, I simply followed the original recipe for its pretty combination, I saw many sold here in Singapore with plain yellow or brown colors :)
I'm submitting this traditional snack to Aspiring Bakers #12 Traditional Kueh hosted by Small Small Baker

Wednesday, October 26, 2011

Chicken Lemper

Tasty savoury snack chicken wrapped in sticky glutinuous rice - very famous in Indonesia :)
Similar to pulut panggang (lemper udang), but different in filling and this one is steamed instead of grilled

Traditionally individually wrapped in banana leaf but too lazy to do that, so I just laid the leaf at the bottom and top part and just cut before serving

Yum yum...the sweetness from the chicken combined with the salty sticky rice...
Very addictive, one definitely is far from enough :)


What you need:

For the rice:
1kg glutinuous rice - soaked overnight
400ml coconut milk (Kara)
350ml water
3 bay leaves

For the filling:
600g chicken breasts
7 cloves of garlic
5 shallots
1 thumb size  kaemferia galanga (in Indonesian: kencur)
2 bay leaves
3tbsp chicken stock mixed with coconut milk (Kara) to make 100ml
salt, pepper, sugar, 1/2 tsp ground coriander
a little oil

To do the rice...

  1. Steam the soaked rice til half cooked (approx 45mins)
  2. Off heat, mix rice with mixture of coconut milk and water - stir till well incorporated
  3. Steam again for 1 hour with bay leaves embedded in the rice
  4. Let cool

To do the filling...

  1. Boil a pot of water with the chicken, bring to boil, discard the residue, simmer approximately 1 hour til chicken softened, after that scoop out the chicken from the stock and let cool
  2. After cooled, shred the chicken
  3. Chop garlic, shallots and kencur and then blend til forms smooth paste
  4. Heat a little oil in a pan, and sautee the paste until fragrant
  5. Add in shredded chicken, and the coconut milk mixture
  6. Add in salt, pepper, sugar and coriander, mix well
  7. If it's too dry, you may add a little oil and keep stirring. Test the taste. Add seasoning according to your preference. The taste for this filling is a little on the sweet side
To assemble:

  • Lay a square pan with banana leaf, spread a layer of rice, leave it to cool completely and then spread chicken filling over rice, and top with another layer of rice
  • Cover the top with banana leaf, let cool
  • Cut using plastic knife to avoid te rice sticking on the knife (or you may use steel knife wrapped in plastic)

I'm submitting this traditional snack to Aspiring Bakers #12 Traditional Kueh hosted by Small Small Baker

Monday, October 24, 2011

Japanese Strawberry Shortcake...Happy B'day To Me :)

My sis wanted to buy cake for my bday yesterday but I told her that I planned to bake one for myself
She scratched her head and said, you're the bday girl and you're the one who's going to bake your own bday cake? :)

This is one of my favorite cake, but this was my first attempt...it's also one of Abby's fave :)
Satisfied with the result, soft, light and fluffy sponge cake layered and covered with whipping cream with cut strawberries in between layers, yum!
Abby has to have two slices everytime, in fact as I'm writing this, she is now eating the last slice :)
I'm so happy I can bake another fave cake of hers, as usually I'd run to Four Leaves everytime her cravings for this cake kicked in hihi...

Before you view the pics below, please pardon the quality of the frosting, you know me...my weakness in cake deco hehe...


Recipe is from Dailydelicious, I don't have 7" round cake pan, so I used 8" and sliced the cake into two instead of three

What you need:

For the cake:
3 eggs
90g sugar
90g cake flour (sifted)
20g unsalted butter (melted)
20ml milk

For the syrup:
80g sugar
100ml water
2 tsp kirsch gel (or you may change to other liqueur or 1 tsp vanilla extract)
===> Bring to boil over low heat in small pot sugar and water, let cool, add in liqueur

For the whipped cream:
400ml whipped cream
40g icing sugar
===> Beat til forms medium stiff peak

Preheat oven to 180degC
Line pan with baking paper
Beat eggs in high speed til lighter in color, gradually add sugar into the eggs and beat til ribbon stage
Take 3/4 cup of the mixture, mix with melted butter
Add in sifted flour into the remaining of the eggs mixture, fold in gently til well combined
Pour the 3/4 cup of the eggs+butter mixture into the remaining eggs+flour mixture, fold gently and follow with milk, fold in gently til well combined
Pour mixture into pan, bake for 25minutes approx
Let cool, once cooled cut into layers (either two or three as you like), brush each top with kirsch mixture
Place one layer of the cake, place cut strawberries on top of the cake, pour whipped cream over strawberries, put another layer of cake over the cream, and frost the top and sides of the cake with the remaining cream
Decorate with whole strawberries
Refrigerate

Homemade cake on birthday - what can be better? :)

Friday, October 21, 2011

Kueh Potato Bingka

First time I made this kueh, it turned out to be cake like, cos I beat the batter for too long
Finally I did my second try, this time is a success :)
This time I did the original version, without pandan paste


Some sweet snacks can be addictive, and this is one of them
Within the same day, it's all gone! The next time I will definitely make 2 recipes hehe...

You may view the recipe here
I only omitted the pandan paste and this time I didn't use oven to bake, instead I used my snack maker (you may view the snack maker pic here)


Thursday, October 20, 2011

Bake Along #12 - Cherry Brownie Torte

This is what I baked for Bake Along #12 with chocolate and cherry theme
Cherry brownie torte - sinfully rich and chocolatey... yum! :)
Also, it's easy to make - no mixer involved, yes! :)

You see the pic below, I couldn't wait til it's frosted I cut a slice for me to try when it's still warm :)

The frosting is a layer of whipped cream (I used whipping cream and beat til stiff) and decorated with maraschino cherries

Look at the cherry bits as well as the whole cherries on top - such a georgeous color :)

Recipe is from Easy Baking by Hershey's (original recipe uses berries)

What you need:

1/2 cup all purpose flour
1/4 tsp baking soda
1/4 tsp salt
1 cup semi sweet chocolate chips (I found this is too much for me, the next time I make I'll reduce this to 2/3 cup instead)
1/2 cup butter
1 cup sugar
2 eggs
1 tsp vanilla extract
1/3 cup cocoa powder (preferably dark cocoa)
1/2 cup whipping cream
maraschino cherries - chopped, enough to sprinkle on top of the batter
maraschino cherries - whole, for decoration

Heat oven to 175degC
Line a 8" round baking pan with baking paper and then grease
Stir together flour, baking soda and salt, stir in chocolate chips - set aside
Melt butter in medium saucepan over low heat. Remove from heat
Stir in sugar, eggs and vanilla. Add in cocoa powder, mix well
Stir in flour mixture and then spread mixture in prepared pan
Sprinkle cherries bits on top
Bake for 25minutes or til wooden pick inserted in centre comes out slightly sticky
Cool in pan on wire rack for 15minutes
Invert onto wire rack, remove wax paper, turn right side up, cool completely
When it's completely cooled, spread whipped cream with spatula on the brownie and decorate with whole cherries
Refrigerate (I prefer to eat this at room temperature, it's more moist)

You may hop to Lena, Joyce and Zoe's sites to view their wonderful chocolate & cherries creations :)

Tuesday, October 18, 2011

Fried Kwayteow

This simple dish is really delicious! :)


What you need:
Recipe is from my dear LBT friend Melly, modified by me

400g kwayteow - prepare as directed
10pcs  prawns - peeled and deveined
150g fish fillet - sliced thinly
4 tbsp sweet thai chilli sauce
2 heaped tbsp oyster sauce
2 heaped tbsp worchestershire sauce
3 heaped tbsp tomato sauce
3 heaped tbsp dark sweet soya sauce (kecap manis)
xiao pak chye - cut
4 cloves of garlic - minced
2 eggs - scrambled
salt, pepper
a little oil

Heat oil in a pan, sautee garlic til fragrant
Add in prawns, fish fillet - cook til changed color
Add in chilli sauce, oyster sauce, tomato sauce - mix well
Add in kwayteow - mix well
Add in scrambled eggs, worchestershire sauce and dark sweet soya sauce, salt, pepper - mix well
Adjust the taste, after that add in cut veggies
Serve hot

Sunday, October 16, 2011

Fruity Sicilian Orange Cake

This recipe has been in my to do list for ages - finally I did it :)


It's indeed seriously yummy - moist buttery yet light texture with a hint of orange taste
Recipe is from Jess' site but I used the original flour measurement which is 250g and I used 100ml of freshly squeezed orange juice

I added 7 tbsp of mixed dried fruits which has been soaked in mixture of rum and hot water for approximately 1 hour, strained and squeezed dry and then sprinkle with a little plain flour
I sprinkled on top of the batter before putting in the oven

And I also brushed glaze too on top of the cake after it's cooled
It's 1/3 cup of freshly squeezed orange juice boiled together with 1/3 cup icing sugar til thickened

Definitely a keeper! :)

Saturday, October 15, 2011

Pandan Nagasari

This is not the first time I made nagasari, in fact it's my third time
The first one was HERE

Another unfortunate incident for this one - due to my ignorance
I have used a pan which was too big for my steamer
I could not put it in I had to trasnfer the nicely arranged batter and bananas into another smaller pan
It's impossible to do another nice arrangement after that
In the end I had a messy look nagasari, even though it still tasted as nice wew....


If you see the link above, you can see my previous nagasari was real neat compared with the pic above
Was quite upset since I planned to submit this posting to Aspiring Bakers event this month *sigh*
The recipe is exactly the same, only I added 1 tsp of pandan paste to the batter
Really yummy, with pandan is even better, for me - it's also perfect texture and sweetness'

Oh almost forgot, I couldn't find banana leaves this time, so this batch of pandan nagasari didn't use any
No effect on the taste but it did on the fragrance...


Thursday, October 13, 2011

Bite Size Japanese Choux Pastry

Submitted this last minute for LBT challenge for the month of October - choux pastry
This is one snack I love but never make, even though have helped and observed many times everytime my mum made this
Wanted to make something different, I chose to try Japanese choux pastry and wanted to make it bite size - WRONG!!!

Everything was fine til the time for me to shape the topping
Cos of the tiny size, it's so difficult to do swirl on top, after a few miserable tries, I gave up and just did a dollop at the centre
I was quite hesitant to do that - concerned that the puff wouldn't expand cos of the additional weight on top
True enough, they didn't - not to the maximum :(
Another problem was when I did the filling, I wanted to pipe the filling but cos of the tiny size, and it's not expanded well, I had problem doing that
I ended up have to cut the puffs and spoon the filling into them, and these actions made the topping cracked - wew!
Despite all the hiccups, one consolation I got: it's really really yummy! :)

So, this is the end result...


The recipe taken from HERE and what a nice choux pastry she has made!

What you need:

For the choux pastry:
250ml water
150g margarine
150g plain flour
1/2 tsp salt
4 eggs

For the topping:
50g plain flour
50g icing sugar
50g butter
1 tbsp water

For the custard filling:
600ml fresh milk
2 egg yolks
30g maizena
20g plain flour
5 tbsp sugar
1/4 tsp salt
1 tsp vanillin powder
1 tbsp butter

How to make the topping...
Beat all ingredients til well mixed and put in piping bag, cut the tip to make a small hole

How to make the choux pastry...
Bring to boil water, margarine and salt
Add in plain flour while stirring constantly til smooth, off heat and let cool
When it's already cooled, add in egg one at a time and stir continuously til well mixed
Put in the piping bag and cut the tip approx 2cm
Pipe on the lightly greased cookie pan (mini size would be approx 5cm in diameter - double the size for regular size)
Pipe the topping by making swirl on top of the choux pastry batter
Bake in preheated oven of 200degC for 10minutes (mini) or 20mins (regular), til golden color
Let cool and make a hole at the bottom or side with a chopstick

How to make the filling:
Mix all ingredients except butter, mix well til smooth (can strain if necessary)
Cook til boiling, off heat and let cool
After cooled, add in butter, mix well
Put in piping bag with tip

Lastly, pipe the filling into the choux pastry - yum!

Definitely will try again to master this
Lesson learnt: not a recipe for bite size - will stick to the regular size next time :)

Tuesday, October 11, 2011

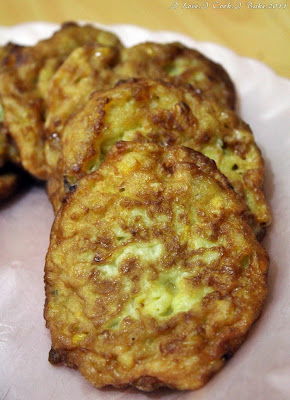
Corn Fritters

Love this savoury snack - unlike most people, I don't like to eat this with rice :)


What you need:
(sorry this recipe is from my mum whom never use exact measurement)

4 sweet corns - cut into kernels
7 shallots
3 cloves of garlic
3 eggs
salt, pepper, sugar
approx 250g plain flour
enough water
kaemferia galanga (in Indonesian: kencur)
1/4 tsp baking powder
spring onion - finely chopped
cooking oil

Pulse corn kernels
Blend shallots, garlic, kencur
Mix all the above and add in eggs, salt, pepper, sugar, plain flour, baking powder and water til form thick batter (if too runny you may add some more plain flour)
Add in spring onion, mix well
Heat oil on pan, spoon batter with small ladle and fry til golden brown
Best eaten when its still hot

LinkWithin

Related Posts Plugin for WordPress, Blogger...