Pages

Friday, June 29, 2012

Bake Along #27 - Gluten Free Cheese & Choco Chips Scones Cookies

For Bake Along this time, the theme is scones
I baked this morning and I wasn't pleased at all

I wasn't so sure whether I should post this or not, initially
This was not like what I expected to be, even though I knew the texture would not be the same, since I used gluten free mocaf flour
This was my second bake using this flour, you may view HERE for my first bake including the short description about the flour

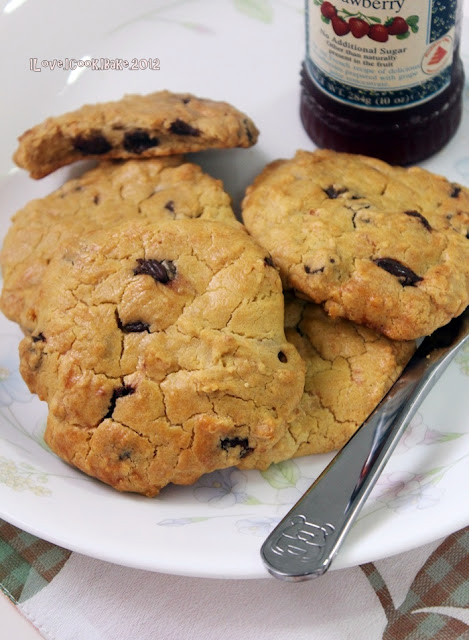
Gluten is one substance that makes cakes rise, and I expected my scones would be shorter, but I never expected they would be flat like cookies!
The dough was so sticky and soft, couldn't do any remedy action that I just spooned it on the pan and baked them
I think the culprit was not only the flour I used, but more on the quantity of eggs I used, I think it's a little too much...
Wew... pure intention to modify these scones to a healthier treat turned disastrous! So annoyed!

Until my kids said, wow...mummy baked chocolate chips cookies...yum!
Then I was like, oh yeah, why not, these are scones cookies
Indeed the texture was like cakey soft chewy cookies
One consolation - the taste was yummy :)


Original recipe was from Barefoot Contessa, modified by me

What you need:
(I made half of the original recipe and I had 12 large scones cookies)

2cups mocaf flour plus 1/2 tbsp mocaf flour, divided (original recipe: all purpose flour)
1 tbsp baking powder
1 tsp salt
170g cold unsalted butter, diced
2 1/2 eggs, beaten lightly
1/2 cup cold yoghurt (original recipe: heavy cream)
80g grated cheddar cheese (original recipe: 115g)
80g semi sweet chocolate chips (original recipe: 1/2 cup minced fresh dill)
1/2 egg beaten with 1/2 tbsp milk, for egg wash
  1. Preheat oven to 200degC
  2. Combine flour, baking powder and salt in a bowl
  3. Add butter, and rub til mixed and butter in pea sized pieces
  4. Mix eggs and yoghurt, quickly add to the flour & butter mixture
  5. Combine til just blended
  6. Toss together cheese, chocolate chips and 1/2 tbsp flour, add them to the dough. mix til almost incorporated
  7. On floured surface, knead the dough for 1 minute til cheddar and chocolate chips well mixed evenly
  8. Roll 3/4 inch thick. Cut 4 inches squares and half diagonally to make triangles
  9. Brush the top with egg wash
  10. Bake around 30 minutes til outside crusty and inside fully cooked

I was quite happy to know the scones cookies was liked by my family, moreover to know that it's rather a healthy treat - no gluten and no sugar used
But the next time I bake this again, since the recipe has many great reviews, I'll just stick to the original recipe to the dot, including using chopped dill instead of chocolate chips
I'm sure I will munch happier that way, I am a kind of missing the real scones texture :P


The event is hosted by Zoe, Joyce and Lena, please hop over to their fabulous blogs :)

Below is fellow bakers with their wonderful scones
I feel like one ugly duckling to put my scones among theirs!
Wednesday, June 27, 2012

Sweet Potatoes Soup

Everybody is now displaying their winderful scones in their blogs, makes me drooling, but I can only bake tomorrow

So for today my post will be a sweet Asian dessert I love
Such a hearty simple dessert


Inspiration was from Sonia's site, thanks Sonia :)

What you need:

sweet potatoes, peeled and cleaned, cut
a few pandan leaves, tie into knots
1 block palm sugar
brown sugar (as desired)
a thumb size of young ginger, lightly smashed
a pot of water
  1. Bring to boil a pot of water 
  2. Add in sweet poatoes, pandan leaves, palm sugar, ginger and let simmer for 20-30 minutes
  3. (check ocassionally to avoid sweet potatoes turn too soft)
  4. Add in brown sugar to the desired sweetness
  5. Off heat and serve warm

I'm submitting this post to  Aspiring Bakers #20: Asian dessert buffet! (June 2012) hosted by Moon of Food Playground
 

Monday, June 25, 2012

Fried Tilapia (Happy Call) With Mango Salsa

Nice combination, tasty fish with refreshing mango salsa
I love the salsa so much I can eat it on its own! it's sour, spicy, with a hint of sweetness too, and the shallot, vegetables plus the mango itself are so crunchy, so refreshing! Yum yum...


Recipe is from Fong's site

What you need:

1 large black tilapia
soya sauce
pepper
1 egg, lightly beaten
corn flour
oil to fry the fish

*For mango salsa, mix the ingredients below just before serving:
1 green mango, shredded
shredded carrot
shredded cucumber
red chillies, sliced
spring onion, cut
3 shallots, thinly sliced
lemon juice
approx 1 tbsp palm sugar, break into pieces
fish sauce
pepper
  1. Marinade fish with soya sauce and pepper
  2. Rub with beaten egg and then dust with corn flour, set aside
  3. Fry til golden brown on both sides, drain excess oil
Since I prefer the fish to remain crisp, I didn't pour the salsa over

Those sour and spicy food lovers, this is a must try! :)

Friday, June 22, 2012

Steamed Brownies

Recipe is from the book "Magic Steamed Cake" by Alex Goh


I like the taste, real delicious
Texture wise, it's quite crumbly, I wish it could be more moist
Original recipe uses walnuts, I will do so the next time I make this cake again, and perhaps some chocolate chips too
Overall, well loved by family :)

A
100g butter
85g cooking chocolate

B
180g sugar
3 eggs

C
20g cocoa powder
170g plain flour
1 1/4 tsp double acting baking powder
1/2 tsp baking soda

D
120g chopped walnuts (I didn't use but I will in the future)
100g chocolate chips (additional I'd like to use in the future)
  1. Double boil A over simmering water til chocolate melted
  2. Mix B til sugar dissolved. Add in cooled A, mix til well combined
  3. Fold in sieved C, mix til well blended. Add in D, mix til well incorporated
  4. Pour into 22x20cm shallow pan lined with alumunium foil (I used 20cm round, hence the taller cake)
  5. Steam for 30 minutes. Set aside to let cool
  6. Coat with chocolate ganache over the cooled cake

Monday, June 18, 2012

Green Bean Soup & Pulut Hitam

Yesterday was Father's Day
Hope everybody had a great time celebrating :)

Too bad I was not in the perfect state of mind to bake for DH, luckily he 's so understanding - as always :)
So he just enjoyed the remaining apple pear crumble I made on Saturday and this Asian dessert LOL


This dessert always sold separately, but it's great to be eaten together :)
Pulut hitam is the name I came to know here in Singapore, it's the name for black glutinuous rice dessert. Back in Indonesia, we name it differently

What you need:

100g green beans
100g black glutinuous rice
6 pandan leaves, torn
150ml coconut milk (I used Kara brand)
sugar, palm sugar, a thumb size of old ginger, a little salt, water
  1. In two separate pots, bring to boil water with green beans and black glutinuous rice, simmer til soft and water only a little bit left
  2. Add in pandan leaves, followed by sugar and palm sugar to both pots (ration 3:1 - only when they're already soft)
  3. In another pot, mix coconut milk with water (thickness adjusted according to preference, I don't like too thick, so I diluted the coconut milk quite a bit) and sprinkle a little salt, and add in pandan leaves, bring to boil over low heat, stir
  4. To serve, scoop green beans and pulut hitam into serving bowl and pour coconut milk over
  5. Serve warm


I’m submitting this post to Aspiring Bakers #20: Asian dessert buffet! (June 2012) hosted by Moon of Food Playground

Saturday, June 16, 2012

Bake Along #26 - Apple & Pear Maple Walnuts Crumble

I am allright now, thank God my gastric attack was not so serious, even though I still have to be extra careful on the amount of food I take each time, a little bit too much or too late will bring back the nightmare again wew...
Thanks for the concerns from everybody, I appreciate it so much :)

So, in the kitchen today...
I made this dessert this afternoon for Bake Along event
Recipe is from the book  "Bon Appetit Desserts" by Barbara Fairchild

It just happened that I had some NZ fuji apples, so I decided to use together with the pears
I used Australia packham pears this time, crunchy and sweet
Even though no ice cream supply at home - as you know, crumble is the best eaten with ice cream - I still enjoyed eating them..
This should be even better used as pie filling!

Unfortunately I totally forgot to reduce the amount of sugar and maple syrup, so it's a tad sweet to me, the sweetness from the apples and the pears I used did contribute to the sweetness definitely
The next time I bake this again, I will reduce both the sugar and also the syrup, also adding the amount of walnuts used

Also, I found crystalized ginger by luck in one supermarket, so I used in this bake
And no regret, really a good choice :)

To me, the star of this bake is the crunchy chopped walnuts
It's such a delicious thing to add in crumble. Munching on it and feeling the crunch in every bite is really heavenly! I wish I used more walnuts! :)

I only baked half recipe and it's more than enough to feed the whole house plus sharing with my mum, dad and sis


What you need:
(below is half recipe which I have modified for future use)

For the topping:
1/2 cup plain flour
1 cup walnuts
50g packed golden brown sugar
58g chilled unsalted butter, cut into cubes

For the filling:
750g apples & pears, firm and ripe - peeled and cut into cubes 1/2 inch
(I used 3 packham pears and 2 medium size NZ fuji apples)
60ml maple syrup
1/4 cup golden raisins
1 tbsp plain flour
2 tbsp fresh lemon juice
1/2 tbsp finely chopped crystalized ginger

Ice cream to serve

  1. Pulse walnuts in food processor til turned to pieces (not so small)
  2. Mix in with plain flour, sugar and butter and mix with fork / wooden spoon til small moist clumps formed
  3. Transfer to medium bowl and cover, chill for an hour
  4. Preheat oven to 175degC
  5. Place pears, apples, maple syrup, raisins, flour, lemon juice, ginger in large bowl, toss to coat
  6. Let stand 15 minutes and toss ocassionally
  7. Transfer pears apples mixture to baking dish, sprinkle topping over
  8. Bake til pears and apples tender, juices bubble thickly and topping golden and crisp, approximately 30 minutes
  9. Let stand for 10 minutes
  10. Serve warm with ice cream


Here's the links below to view other delicious crumbles :)


Friday, June 15, 2012

Glass Noodle Soup

I had gastric attack last night, giving me bad headache too
Today I feel better, but still feel a little unwell, uncomfortable feeling in the tummy and my head still feel heavy
Those have gastric problem will know that after effect from gastric attack can take quite awhile, as if it leaves scar inside

This dish I cooked today is simple to make - I don't feel like cooking something tedious
And most of all, it's really delicious
Recipe is from Sonia's site - I was literally drooling when I saw her posting in this soup dish


A yummy, hearty and healthy dish you must try!

What you need:

150g soya beans, soak for 4 hours
a handful of dried anchovies (ikan bilis)
3 litre of water
2 large onions, peeled and halved
2 tsp salt to taste

fried fishballs
chilli fishballs
fishcake, cut
tong choy (preserved vegetables)
spring onion, chopped
red chillis, cut

garlic oil
fish sauce

glass noodles, blanched in hot water
  1. Bring to boil soya beans, ikan bilis, onion and water
  2. Add salt and simmer for 2 hours
  3. Blanch fishballs and fishcakes in the soup
  4. To serve, mix glass noodles with garlic oil and fish sauce
  5. Add in soup with fishballs, fishcake
  6. And sprinkle with tong choy, spring onion and red chillis
  7. Serve hot
I gave my kids without the tong choy, spring onion and red chillis
I added a little rice and blanched brocolli

This soup really made me feel better :)

Monday, June 11, 2012

Kahlua Snaps W/ Chocolate Chips Cream (Happy Call)

LBT challenge this month, something I never know of, never eat either, brandy snaps
But since I replaced brandy with kahlua, I renamed this sweet treat accordingly :)


To be honest, none of my family members liked this when it's just cooked, hard and too sweet
But the next day after kept in the fridge overnight, it turned soft even though it's still sweet
When it's soft, I didn't mind eating it but not more than two bites, it's way too sweet for my liking
Abby quite liked it, too, but couldn't eat much either
DH and Ian didn't even want to eat after their first try
The biggest fan and kept munching on this was my mum, followed by my sis
The usage of kahlua altered the taste to coffee candies like and my mum is a big fan of coffee candy, in fact she is a candy eater
While DH and I, including my kids dislike any kind of candies, perhaps some soft chewable candies occasionally but definitely those hard candies

I made this using Happy Call Pan, original recipe used oven
It's quite a challenge initially, after at least five attempts, I finally managed to make a better shape
I used individual muffin mould, put it upside down and arrange the snaps on top
Original recipe rolled the flat snaps with wooden rolling pin

Here's the recipe, shared by my LBT friends...

What you need:

120g butter
3 tbsp maple syrup (or golden syrup / honey)
70g plain flour
100g sugar
1 tsp vanilla extract (original recipe used ginger powder)
2 tbsp kahlua (original recipe used brandy / rum)
  1. Heat butter and maple syrup in a small pot til butter melts, off heat
  2. Add in flour, sugar, vanilla extract, and kahlua, keep stirring til mixed well, set aside for 15 minutes (the batter became thick and sticky)
  3. Heat pan (low heat), brush lightly with butter, scoop 1 tbsp of batter at the centre of the pan and observe
  4. The batter will slowly get wider and holes formed, and color turns golden brown
  5. Off heat and leave it on the pan for 30 seconds, lift up using wide spatula and transfer to the muffin mould (upside down)
  6. Shape accordingly and let cool, then remove the mould
For the filling, original recipe used whipped cream
I whipped dairy whipping cream and mixed with chocolate chips. The cream somehow turned a little lumpy - perhaps I overbeat, but never mind, it still tastes good :)

Another challenge, great experience, but I don't think these snaps will be in my family favorite list...well, perhaps it will in my mum's favorite list instead :)

Saturday, June 9, 2012

THB #4 Pear Almond Cake

Baked this cake this afternoon, and really, it's a great dessert if only I changed the suggested almond extract to vanilla instead
I poured almond extract to the batter when I realized that I and also the whole family do not fancy the fragrance of almond extract, even though we love almond
But aside from that, I love this short and moist cake
I love the use of cinnamon and nutmeg on the pears, they gave great additional aroma

The 4th cake from the book Coffee Cakes by Lou Seibert Pappas, for The Home Bakers event :)

The original recipe is to arrange the pears in pinwheel shape but since I chose to use rectangle pan, I didn't do so, hence the title of this posting - pear almond cake
Instead of hazelnut, I used ground almond which toasted in the oven during preheating for less than 5 minutes
The pan I used is 20x10x4 cm, the cake was around 2 cm height
For the pear, I couldn't find anjou nor bosc pear, so in the end I used Taylor Gold pears from New Zealand
This pear is so sweet and juicy, but it's soft, not crunchy
I also reduced the light brown sugar to 1/4 cup + 1/8 cup

This cake is not for my kids, they didn't even want to give it a try, but their mummy and daddy love it, but definitely if I bake this cake again, I will use vanilla extract :)


Please visit The Home Bakers, you'll see other members' bakes and really hope you can join in the fun too!
Recipe can be found in Zoe's site


Wednesday, June 6, 2012

Baked Chicken Fries & Cabbage With Mung Bean Noodles

My kids love nuggets in all kinds (who doesn't?)
It's indeed delicious but it involves deep frying which I have been trying to cut down
So, this recipe from Little Corner Of Mine did excite me :)
It's not only healthier but it's also delicious my kids love it so much they still munched on this even after they're done with their meal :)


What you need:
(quantity depends on how much chicken breast used)

Skinless boneless chicken breast, slice into long thin strips
Cooking oil (I used canola)
Salt and pepper
All purpose seasonings
Eggs
Breadcrumbs
  1. In a bowl, mix together chicken breast, salt, pepper, all purpose seasonings
  2. Lightly beat eggs in a bowl, and spread breadcrumbs in a plate
  3. Preheat oven to 200degC
  4. Dip each chicken strip in the beaten eggs, and coat with breadcrumbs evenly
  5. Arrange the strips on baking sheet lined with non stick baking paper
  6. Bake for 15-20 minutes, followed by broiling it for a few minutes each side to brown
To accompany the chicken dish, I cooked this vegetable dish - yummy!


Recipe is from WokkingMum

What you need:

Small cabbage, cut
1 small handful dried shrimp, soak to soften
40g mungbean noodles, soak to soften
100ml chicken stock
salt, a little sugar
3 cloves of garlic, minced
a little oil
  1. Heat oil and sautee garlic and dried shrimp til fragrant
  2. Add in cabbage, cover and cook for 8 minutes, medium high fire
  3. Add in noodles, stir well
  4. Add in chicken stock and cover, cook for further 4 minutes
  5. Add in salt and sugar, adjust taste and off heat
Simple and really yummy :)

Sunday, June 3, 2012

Deep Fried Coated Banana Spring Rolls

A twist for banana fritters :)
Bananas with chocolate and cheese, wrapped in springroll wrapper, coated with eggs and breadcrumbs and then deep fried

Sinful? Yes. Delicious? Of course :)

What you need:
10 king bananas (pisang raja), steamed, halved
20 spring roll wrappers
75g grated cheddar cheese
75g grated dark chocolate
4 tbsp milk powder
3 tbsp caster sugar
1/2 tsp vanilla essence

a little egg white
enough breadcrumbs
1 large egg, lightly beaten
1 tbsp margarine
enough cooking oil
  1. Mix together cheese, chocolate, milk powder, sugar and vanilla
  2. Put 1 halved banana at the centre of the spring roll wrapper, add 1 tbsp cheese chocolate mixture, fold in the edge close to you covering up the banana, fold in thetwo edges on your left and right, then roll away from you, glue the end with egg white
  3. Dip into beaten egg, roll on breadcrumbs til evenly coated, keep in the fridge minimum of 3 hours
  4. In a large wok, heat up margarine with cooking oil, deep fry til golden brown both sides
Crisp outside, sweet and juicy inside...yum!

Friday, June 1, 2012

ABC June 2012 - Overnight Brioche Braid

Brioche, one of my favorite bread, hence my excitement in making this month's ABC project, an event organized by Hanaa
This is the second brioche I made, recipe is from the book The Weekend Baker by Abigail Johnson Dodge

This is the first time I braided bread! I never even braid my girl's hair LOL
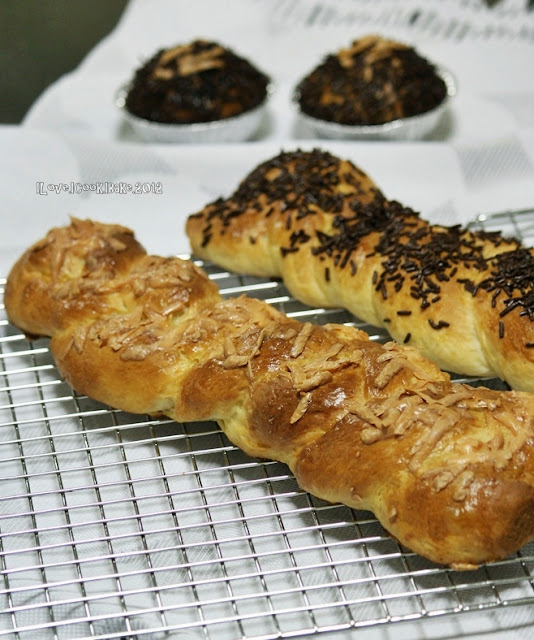
I am lousy in shaping bread, so pardon my skinny brioche braid :)

I didn't leave the dough overnight, I started making in the afternoon, by dinner time everybody could enjoy it :)

I wanted to make just 1 braid but unfortunately it couldn't fit in my pan, so I divided into 2 braids and I had some balance of the dough, I split into 2 and put them into bread cups
Looking at the result, I guess it would have been nicer if I made just 1 thick braid instead of 2 skinny ones. Thick braid would feel fluffier :)

I sprinkled one braid with grated cheddar cheese, and  the other one with chocolate rice
Also chocolate rice sprinkled on the 2 cupbreads :)


Look at the texture, so soft!


I followed the recipe to the dot, except that I used bread flour instead
And I don't own water thermometer, so I didn't measure the milk temperature, I only assumed it's ready to use when it's lukewarm

I used breadmaker to do the kneading job
The dough is not so difficult to handle, only in the first one minute it's a little sticky but after that it's allright. Just like what the book described - it's soft but not sticky, but I still needed to use a little flour

This bread is already good on its own, mixing it with chocolate chips, raisins or other dried fruits would be even better
Replacing a little of the milk with some orange juice will be a pleasant bonus, I guess


Please view this link for other ABC members baking their brioche too :)

LinkWithin

Related Posts Plugin for WordPress, Blogger...