Pages

Tuesday, November 15, 2016

Old Skool Vanilla Cake

This recipe has been going viral in Instagram with many Indonesian home bakers. They call it 'Bolu Jadul' (old skool cake)
All gave good reviews, so I had to give it a try too. And it's true that this recipe yields a nice and soft cake which also loved by my family
The texture is something like in between of sponge and butter cake. Yummy! :)


The recipe below...
 
What you need:
 
4 eggs (room temperature)
120g sugar
100g plain flour
20g milk powder
1/2 tsp baking powder
1 tsp vanilla extract
75g butter (melted)
 
some buttercream, chocolate spread, chocolate rice and grated cheese for topping
(I sprinkled 2/3 of the cake with chocolate rice and the remaining with cheese)
 
Method:
  1. Lightly grease 20cm square baking pan. Preheat oven to 150degC
  2. Sift together plain flour, milk powder and baking powder
  3. In another bowl, mix melted butter with vanilla extract
  4. Beat eggs and sugar til light and fluffy (ribbon stage - about 10mins on highest speed)
  5. Fold in flour mixture gently
  6. Scoop 1/4 of the batter and add into the butter mixture, stir til combined
  7. Pour back into the remaining batter and fold in gently
  8. Pour batter into the baking pan and bake for 30mins until skewer test comes out clean
  9. Remove from oven and transfer onto a cooling rack
  10. When cooled completely, add in topping by spreading buttercream and sprinkle with grated cheese, and spreading chocolate spread and sprinkle with chocolate rice
 
In this recipe, I used vanilla extract from Bake The Natural Way
They're kind enough to send me a set of their vanilla products for me to try out
 
The vanilla extract is quite subtle and nice, with some sweetness in it. For those prefer stronger vanilla flavor, some adjustment to the quantity is required
I had previously used it for making vanilla ice cream and I like it too :)


A set of Madagascan vanilla extract, vanilla powder and vanilla pods


My kids' choice


My choice


Nice cake with relatively easy preparation. A keeper :)


Friday, November 11, 2016

Rice Vermicelli Soup with Shrimp Balls

A nice comforting easy meal especially during rainy days


Recipe adapted from Seasaltwithfood

What you need:

For the shrimp balls:
8 large shrimps, peeled and deveined
2 spring onions, chopped
1 small carrot, chopped
1 small egg white
1/4 tsp salt
1/2 tsp sugar
dashes of white pepper

For the soup:
8 cups chicken stock
fried shallots
sesame oil
salt and pepper to taste

a packet of rice vermicelli, soak in warm water until soft
chyesim, cut as desired
cut red chilies (optional)

Method:

Shrimp balls:
  1. Put shrimps in a chopper and process til smooth paste and transfer to a mixing bowl
  2. Add salt, sugar, pepper and egg white into the shrimp paste and stir in one direction, gather the paste and hit against the bowl. Add in spring onion and carrot, continue stirring in one direction and hit it against the bowl until the paste sticky and well mixed
Soup:
  1. Bring chicken stock to a boil. Add in salt and pepper
Scoop shrimp paste and shape to balls according to your preference. Drop it into the boiling soup and let it cooked til floating. Add in chyesim and bring to boil just before serving

To serve:
Place softened rice vermicelli into a serving bowl. Scoop some soup with shrimp balls and pour over it. Top with a dash of sesame oil, fried shallots, more spring onion and cut red chili if desired


Thursday, October 27, 2016

Whole Wheat Banana Muffins

I seldom to find anybody says no to banana muffin, even at the simplest form
I will definitely say yes! Especially when it's less guilty!
These muffins use healthier ingredients yet not compromising on the texture and taste. Yum!


Recipe is from Two Peas & Their Pod

What you need:

2 cups white whole wheat flour (I used whole wheat pastry flour)
1 tsp baking powder
1 tsp baking soda
1/2 tsp salt
1/4 tsp ground cinnamon
1 3/4 cup mashed ripe bananas
3/4 cup packed brown sugar
1/4 cup melted and cooled coconut oil
1 large egg
1/2 cup plain yoghurt
2 tsp vanilla extract
turbinado sugar for sprinkling (I skipped, which I regretted LOL)

Method:
  1. Preheat oven to 180degC. Line muffin pan with paper liners, set aside
  2. In a bowl, whisk together flour, baking powder and soda, salt and cinnamon
  3. In another large bowl, mix together mashed banana, brown sugar, coconut oil, egg, yoghurt and vanilla extract
  4. Fold in dry ingredients into the wet ingredients just til combined (do not overmix otherwise the muffin might be tough)
  5. Fill muffin liners 3/4 full. Sprinkle with turbinado sugar. Bake until skewer comes out clean, about 25minutes
  6. Remove from oven and transfer onto cooling rack. Let cool completely and store in an airtight container

Tuesday, October 25, 2016

Ontbijtkoek

Originated from Netherlands, this well known Dutch spice bread/cake, with rye as one of the main ingredients and uses many kind of spices, mainly cinnamon, nutmeg, and cloves. It's known that it's a breakfast menu and people have it with a spread of butter. It's stated too that different parts of Netherlands have their own version
Being under Dutch for the longest time, this treat is quite popular in Indonesia
I have never tried the original version from Netherlands, but back in Indonesia, what mostly sold is the moist sponge cake type with the usage of butter nowadays. During my parent's generation and older, the recipe is not using butter, hence the drier texture, even though it's still soft

This cake brings memories about my mom, as this is one of her favorite. She always baked this cake from time to time. I myself like it but never made an attempt to bake it myself. What I remember is her version is using butter resulting in soft spongy cake

I was browsing through many recipes and I was overwhelmed with so many different kinds I didn't know which one to choose. Some use rye flour, some don't. Some use honey, molasses, oil, milk, etc etc

Since this is my first trial, I decided to try the first recipe I found, which is the Indonesian version, the older time recipe with no butter (well, the truth is, I had no butter in the fridge on the day I baked this cake, hence the choice of recipe haha..)
Very easy and fast to prepare, but true enough, as expected, the cake is rather dry, but still soft, and it's pretty tall. Taste delicious and really fragrant. I still enjoy having it with a cup of tea and it turned slightly more moist the next day


Here's the recipe... Source from Yasa Boga
 
What you need:
 
125g palm sugar (I used the powder kind)
5 egg yolks
3 egg whites
125g plain flour
1 tsp cinnamon powder
1/2 tsp ground nutmeg
1/4 tsp ground clove (I skipped)
50g chopped almond / walnut for topping (I skipped)
 
Method:
  1. Preheat oven to 170degC. Butter a loaf pan, line and spread another layer of butter
  2. In a bowl, mix plain flour with cinnamon and nutmeg, sieve and set aside
  3. In another mixing bowl, beat eggs and sugar til thick and fluffy
  4. Reduce speed to the lowest and add in sifted flour mixture until just combined
  5. Pour batter into the prepared pan, sprinkle chopped nuts if using and bake for about 35-40mins til skewer test comes out clean
  6. Remove from oven and transfer to cooling rack


After sorting out, I have two more versions of recipe waiting to try out. One is the Indonesian version with butter, and the other one is the one using rye flour, supposedly to be the original kind since I found it in one of Dutch food blog LOL
When I have the craving for this cake, I will give them a try and will let you know which one is my favorite :)

Tuesday, October 18, 2016

Choipan

Choipan, or some call it Chaipau, or Chaikue, is one famous Indonesian snack which is similar to soon kueh here in Singapore
The difference is more to the dipping sauce used. Choipan used chili vinaigrette sauce while we eat soon kueh with either or both of dark soya sauce and chili sauce
Been awhile since the last time I had choipan. So good I had the chance to make it myself :)

Must still practice more to get thinner skin. Mine is still too thick, even though it's yummy! LOL


Recipe is from IG eliz_willyam
 
What you need:
 
For the skin:
100g rice flour
5g tapioca starch
225g water
1.5 tbsp vegetable oil
about 1/2 tsp salt
 
For the filling:
1/2 large turnip, peeled and coarsely grated into long thin stripes
1 big carrot, peeled and coarsely grated into long thin stripes
1 big handful of dried shrimp, soak in hot water, rinse when it's soften and mince finely
3 cloves of garlic, finely minced
salt, pepper, sugar cooking oil
 
For the chili vinaigrette dipping sauce:
3 large red chilies. deseed and cut (or you may used red bird's eye chilies to make it spicier)
1 large clove of garlic
white vinegar, salt, sugar
cooled boiled water
 
Method:
 
For the skin:
  1. Mix both flours with water til combined and sieve into a non stick pan
  2. Add in salt and oil. Cook over low fire while continuously stirring til cooked and not stick to the pan
  3. Remove from pan and transfer to a ziplock bag. Knead while it's still hot until smooth and elastic
  4. Shape into balls (mine is 25g each)
For the filling:
  1. Heat a pan with oil. Sauté garlic and dried shrimp til fragrant. Add in turnip and carrot, followed by salt, sugar and pepper. Stir and cook til soft. Adjust the taste and then off the fire
For the sauce:
  1. Blend together chilies, garlic, vinegar, salt and sugar til smooth. Add in water enough just to dilute the mixture
To assemble:
Take the skin dough that has been shaped into balls. Make a dent at the center and spoon filling (about 1tbsp). Seal while at the same time shaping it into half circle
Another way is you may flatten the ball and place the filling at one side of the circle. Fold the other side of the circle over the filling and seal
 
To steam:
Place the shaped choipan on a stainless steel plate with a banana leaf on it. Sprinkle with some cooking oil and steam in a preheated steamer for about 15 to 20 mins
Serve with the dipping sauce
 
Yum!
 

Thursday, October 13, 2016

Baked Fish In Banana Leaves & Sambal Long Beans

Fish is one dish that best served simple. Like this one. Easy and simple. Satisfying and yummy :)
I had this fish with light soya sauce mixed with cut chili padi as a dip (not in the picture)


Recipe is from Nob Cook
 
What you need:
 
1 whole fish (I used seabass, you can use red snapper as per original recipe)
1 large banana leaf, divide into 2
1 1/2 tbsp ginger juice (peel, grate and squeeze old ginger)
2 tbsp light soya sauce
1 tsp lime juice
dash of white pepper
 
Method:
  1. Rinse clean fish including the inner side. Make a few slits on each side. Pat dry with kitchen towel
  2. In a small bowl, combine ginger juice, light soya sauce and lime juice also white pepper. Stir well
  3. Brush the mixture all over the fish. Marinate for about 1hour at least
  4. Place banana leaf over stove (low fire) to make it soft. Another way is to rinse with hot boiling water
  5. Place the leaf on the baking tray (I used Happy Call pan which has been preheated). Place the fish at the centre and pour the remaining marinade mixture. Cover it with another piece of banana leaf and secure all sides with toothpick
  6. Lock the pan and cook over very low fire til fully cooked, about 20mins (you may bake it in the preheated oven of 170degC for about 15mins
  7. Once cooked, transfer to a serving plate including the banana leaf (discard the top part)


Side dish is sambal long beans. I find they compliment each other really well :)


I cooked this dish simply by sautéing garlic and mixed in my Indonesian white condiment paste and some deseeded and coarsely blended large red chilies. Stir til fragrant and add in cut long beans and a little bit of water. Cook til long beans softened. So simple :)

Tuesday, October 4, 2016

Nasi Liwet Sunda (Rice Cooker)

This is one Indonesian rice dish that's pretty popular too
I have ever posted a similar rice dish with the same name, you may view it HERE, but that was from Central Java whereas this is from West Java

This version from West Java is basically much simpler than what I cooked previously, and it's even simpler as I cooked the rice cooker version
Delicious and tasty rice, my family loves it. It goes well with any side dish, most commonly is fried chicken. This time I didn't want to complicate things, I paired up the rice with all simple side dishes :)


Accompanying the rice are simple scrambled eggs, fried silver fish, beef floss, fried onion, and sambal belachan. Yum!


Recipe is from IG doyancooking by @dewinincy

What you need:

2 cups rice, washed and drained
1 lemongrass, lightly bruised
5 Indonesian bay leaves
5 shallots, thinly sliced
3 cloves of garlic, thinly sliced
salt, sugar, pepper
enough vegetable oil to sauté
enough chicken stock to cook the rice
2 large chilies, sliced (optional, I skipped)

Method:
  1. Heat oil in a pan and sauté garlic and shallots until fragrant. Add in bay leaves, lemongrass, stir
  2. Transfer to rice cooker, add in water and seasonings. Test the taste, and make adjustment accordingly
  3. Add in rice, stir gently and press cook. Fluff up the rice when it's ready
  4. Serve with side dishes of your choice

Perfection often means simplicity :)

Thursday, September 29, 2016

Browned Butter Banana Bread

This is actually the 'homework' for ABC May 2015 which I did a few months back
Yeah, my blog consists lots of late posts LOL

This is another great recipe of many banana cake recipe I have tried. The browned butter really gives a wonderful aroma and somehow enhances the taste too. Soft and delicious! Yum!


Recipe is from Scientifically Sweet
 
What you need:
 
1/2 cup unsalted butter
1 cup mashed banana (I used about 2 large bananas)
1 large egg, room temperature
1/2 cup sugar
1 tbsp lemon juice
235g plain flour
3/4 tsp baking soda
1/4 tsp salt
1/2 tsp ground cinnamon
3/4 cup chocolate chips (I omitted, I was didn't feel like eating something chocolaty)
 
Method:
  1. Preheat oven to 165degC. Grease and line a 20x10cm loaf pan
  2. Brown butter by cooking it over medium low heat. Stir frequently until it's fragrant and golden brown with little brown bits. Pour into a clean bowl and set aside to cool
  3. In a medium bowl, add in mashed banana followed by the cooled browned butter, egg, sugar and lemon juice. Whisk until blended
  4. Sift in plain flour, baking soda, salt and ground cinnamon. Fold gently into the banana mixture until just combined (do not overmix). If you're using chocolate chips, add in the last
  5. Pour batter into the pan and bake until the skewer test comes out clean, about 45minutes
  6. Remove from oven and transfer to a cooling rack. Cool completely and slice


Sunday, September 25, 2016

Sweet Potato Loaf (& Donuts)


Okay, after all those Korean food posts, let's move on LOL
This time I'm sharing one of the bread I recently made. I had some sweet potatoes, those with orange flesh so I decided to use some for this bread
I made half of the dough into donuts and the rest I shaped into loaf
Nice and sweet taste and aroma, soft and fluffy with slight chewiness, and little bits of sweet potatoes here and there


Recipe is from My Mind Patch
(she used purple sweet potato)
 
What you need:
 
115g fresh milk (you may add up to additional of 25g depending on the water content of the sweet potato)
25g beaten egg
30g caster sugar
1/4 tsp salt
20g coconut oil
100g mashed steamed sweet potato
225g bread flour
3/4 tsp instant yeast
some beaten egg
 
Method:
  1. Using bread maker to knead the dough: Pour in the wet ingredients first into the pan: milk, egg, sweet potato and oil. Followed by the dry ingredients: sugar, salt, flour and lastly yeast (make sure salt and yeast are separated). Press 'dough' function and let the machine start the kneading. After 5mins, check whether the dough is too dry. If it is, add more milk up to 25g)
  2. Let the machine does continue its work (about 1hour 30mins with the first proofing)
  3. After its done, remove the dough from the pan and transfer to a lightly floured surface. Flatten it to release some trapped air bubble
  4. Divide the dough into 2 equal portions. Roll up each dough and pull down the sides a few times to stretch it out and seal at the bottom
  5. Place them in a covered container and let it rest for 10mins
  6. Roll out each dough using rolling pin, flip it over so the smoother side will face outside after rolling up
  7. You may place small bits of sweet potatoes if you have (optional, I skipped)
  8. Roll up the dough from one of the shorter end, pinch to seal
  9. Place the dough into pan of your choice (I used loaf pan), spray some water and cover with damp cloth, let it proof til doubled in size (about 1hour in a warm oven/microwave)
  10. Preheat oven to 180degC 15mins before proofing time ends. Brush the top of the dough with beaten egg and bake for about 25 to 30mins (when you knock the top there's a hollow sound and it's nicely browned)
  11. Remove from oven and brush the top with melted butter, transfer to a cooling rack and let cool before you cut it into slices
  12. Keep in an airtight container


I used about a third of the dough to make donuts, it turned out well, too
  1. Flatten the dough using a rolling pin. Use donut cutter to shape
  2. Prepare a wok with some cooking oil and preheat. Once oil is hot, reduce the fire to low. Wait for about a minute and start frying the donut, not too many at one time, til browned on both sides
  3. Remove from heat and put them on a strainer
  4. When it's slightly cooled, transfer to a cooling rack and let it cool completely
  5. Decorate as you prefer. I used Nutella to 'glue' the chocolate sprinkles
 

Obviously, the kids prefers the donuts LOL

Wednesday, September 21, 2016

Stir Fry Korean Ramyun Noodles

I am back again, first post of the month, still Korean food LOL
I guess after this post I shall take a break from anything Korean before people start to think this is a Korean food blog haha..
Anyway, you will not regret trying this dish. Beware, it's in fact so addictive that as of now, I have made this dish three times!
It's basically instant noodles - the improved version. Oh so yummy! Thanks Sharon of Delishar for the wonderful idea! So simple but so delicious!


What you need:
 
1 packet instant Korean noodles (I used Nongshim spicy shin ramyun) with the seasoning and dehydrate toppings
1 tbsp ketchup
1/3 cup kimchi with the juices, chopped (I used my homemade emergency kimchi)
1 chicken fillet, cut into small pieces (I skipped)
1 clove of garlic
a little cooking oil
some water to boil the noodle
salt and pepper to taste
 
Garnish:
1 egg, make sunny side up or poached
roasted sesame seeds
chopped spring onion (I skipped)
 
Method:
  1. If using chicken, season it with salt and pepper
  2. Bring a pot of water to boil and cook noodle and the dehydrate topping slightly undercooked, drain and set aside (you wouldn't want to eat this dish with soggy overcooked noodles LOL)
  3. In a pan, heat oil and add in chicken, stir til cooked and add in garlic followed by kimchi, stir for awhile
  4. Add in noodles and also ketchup and the seasoning pack, stir well
  5. If it's too dry, add in a little water (I added very little water)
  6. Mix well, remove from heat and transfer to a serving plate
  7. Top with sunny side up and sprinkle with sesame seeds
 
I love the texture of the noodles, springy with a slight chewiness


Taste heavenly!
 

Friday, August 19, 2016

Budae Jigae

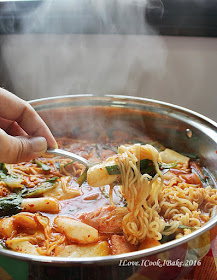
My third dish I cooked to satisfy my craving for Korean food this time was Budae Jigae, another famous Korean army base stew where the typical Korean stew comprises of stuff influenced by Americans when US military came to Korea
It's something like Korean style steamboat where you prepare the soup base and dumping in all ingredients of your choice and eat immediately
Love love this dish! :)


Piping hot! Yummy! 


Again, I followed recipe from Seonkyoung Longest

What you need:
(I made half recipe as written below)

For the sauce:
3 tbsp gochugaru (Korean red chili pepper powder)
1.5 tbsp soya sauce
1 tbsp fish sauce
1 tbsp rice wine (soju)
1/2 tbsp sugar
1/2 tsp doenjang (Korean fermented soya bean paste -> can be replaced with miso)
1/2 tsp salt
1/4 tsp ground black pepper
30ml water
5 cloves of garlic, chopped finely

For the stew:
1/2 cup kimchi (I used my homemade emergency kimchi)
30g rice cake slices, soaked in warm water for 20mins if frozen
1/4 can spam, slice thinly about 5mm thick
2 hotdogs, slice as preferred
1/4 block of firm tofu, slice thinly about 5mm thick
3 spring onion, cut about 5cm long
50g dangmyeon (Korean sweet potato noodles, soaked in warm water for 20mins)
30g enoki mushroom, discard the root
2.5cups chicken stock
60g dried ramen noodles
a bunch of baby romaine lettuce (I added this)
Method:

1. In a bowl, mix all ingredients for the sauce and set aside
 
 
2. Just before serving, in a shallow and thick bottom pot, arrange kimchi, rice cake, spam, hotdogs, and tofu 
 

3. Place dangmyeon, enoki mushroom, romaine lettuce and spring onion on top in the middle
 

4. Pour over sauce and stock and over high fire for 5mins. Reduce to medium fire and stir everything til well mixed
 

5. Add ramen noodles, stir til cooked and it's ready to eat!


NOTE:
 
Original recipe used other ingredients such as breakfast sausage, baked beans and sliced cheese
I didn't use breakfast sausage and baked beans I do not fancy these two. And I found cheese is not meant to be inside this dish, but then again on the second thought I will try to add sliced cheese the next time I make this dish again, I think should be good :)
 

Thursday, August 18, 2016

Homemade Yangbaechu-Kimchi (Emergency Kimchi)

My second Korean dish to fill up my Korean food craving, kimchi!

This is the second time I made kimchi
The first one was also the easier way to make kimchi which is really good. You may view the recipe HERE
Now it's another type of fast making kimchi. It's really good when you are craving for kimchi but do not have the time to make the traditional way. And this tastes really good, too. How amazing it can taste that good without any fermentation needed! Love this! :)


Recipe is from Maangchi

What you need:

1 kg of napa cabbage, cut into half, quarter them then slice into chunks
1 cup water
1/4 cup sea salt

Kimchi paste:
1/4 cup hot chili pepper flakes
1 tbsp sugar
1/4 cup fish sauce
1/4 cup minced garlic
4 stalks of spring onion, chopped (about 1/3 cup)
1/4 cup julienned carrot

Method:
  1. Mix water and salt. Rinse cabbage and then soak them in the salted water. Let it soak for 10mins (I left it soaked for 1hour)
  2. Mix all ingredients for kimchi paste in a bowl, set aside
  3. Rinse the soaked cabbage at least 3 times and drain the water, leave it for about 15mins
  4. Mix in cabbage into the kimchi paste and stir well til fully incorporated
  5. Store in a container and keep in the fridge, press down the kimchi stack with your fingers to protect them from being exposed to too much air
  6. You may consume immediately like salad (it's really good!) or the next day (faster fermentation in room temperature but I kept immediately in the fridge)

I should have doubled up the recipe to fill this container up to the brim!


Can't wait any longer to eat this crunchy sour spicy delicious salad! Nom nom nom...


Tuesday, August 9, 2016

Japchae

I have been craving badly for Korean food lately, so please bear with me if you always see Korean dishes for the next few posts :)

This time I share with you  a famous Korean stir fry noodles called Japchae
I used recipe from Seonkyoung Longest this time. It's really yummy but a little too sweet to my liking. The next time I cook this dish again I will make it less sweet
Too bad DH and the kids don't fancy this dish, so it's all mine! :)


I forgot to sprinkle sesame seeds!


This is a simple recipe but quite a lot of steps in the preparation

Here is the recipe
(I made half recipe as written below)

What you need:

For beef:
250g beef - thin slices (sirloin or chuck tender)
1/2 tbsp sugar
1/2 tbsp soya sauce
1/4 tbsp sesame oil
1/4 tbsp mirin
1 clove garlic, finely chopped

some vegetable oils
2 eggs, lightly beaten
1/4 medium size onion, thinly sliced
1/4 red bell pepper, julienned
1/4 large carrot, julienned
3 large shitake mushroom, thinly sliced

For spinach:
a bunch of fresh spinach
1 clove garlic, finely chopped
1/8tsp salt (a large pinch)
1/2 tsp sesame oil
1/4 tsp sesame seeds
small pinch of ground black pepper
200g Korean sweet potato noodles

For sauce:
40ml soya sauce
20ml honey (I followed the original recipe 40ml and found it too sweet hence the change here)
1 tbsp sesame oil
1/2 tbsp sesame seeds
small pinch of ground black pepper
more salt, black pepper and sesame oil when adjusting the taste


Method:

***Marinate the beef:
Mix beef, sugar, soya sauce, sesame oil, mirin and garlic, toss evenly and keep aside for at least 10mins - I did for an hour)

***Stir fry the vegetables and beef:
Heat a cooking pan, add in 1 tsp of vegetable oil. Add in onion, add a pinch of salt and stir fry for 5mins. Remove from heat, transfer to a small bowl and keep warm
Add in 1 tsp of vegetable oil in the pan. Add in bell pepper, add a pinch of salt and stir fry for a minute. Remove from heat, transfer to a small bowl and keep warm
Add in 1 tsp of vegetable oil in the pan. Add in carrot, add a pinch of salt and stir fry for 3mins. Remove from heat, transfer to a small bowl and keep warm
Add in 1 tsp of vegetable oil in the pan. Add in mushroom, add a pinch of salt and stir fry for 2mins. Remove from heat, transfer to a small bowl and keep warm
Add in 1 tsp of vegetable oil in the pan. Add in marinated beef and stir fry for 7mins until cooked through and all moisture has evaporated. Remove from pan, transfer to a small bowl and keep warm

***Blanch the spinach:
Bring a pot of salted water to a boil. Add in spinach and blanch for a max of 10secs. Remove from hot water (don't throw away the water!) and immediately transfer to a bowl of ice water and drain. Squeeze out excess water and then mix spinach with garlic, salt, sesame oil, sesame seeds and black pepper. Set aside

***Make the omelette:
Heat a pan with 1 tsp oil and pour the beaten eggs and make thin omelette. Slice into thin ribbons when cooled

***Cook the noodles:
In the water used to blanch the spinach, add in Korean sweet potato noodles and 1 tbsp vegetable oil. Cook for about 7-10mins according to the instructions. Drain and set aside. Cut if the noodles is too long (I didn't do this)

***Prepare the sauce:
Mix together soya sauce, honey, sesame oil and sesame seeds also black pepper. Set aside

***Assemble the japchae:
In a big bowl, add in noodles and the sauce, mix together until sauce is well absorbed by the noodles. Add in all vegetables and beef, toss gently to combine. Garnish with egg ribbons and sesame seeds if desired (I only garnished with egg ribbons). Serve hot or at room temperature