Pages

Friday, July 29, 2016

Berry Nutty Gluten Free Tarts

These tarts are really yummy and refreshing, there are a lot of things going on in every bite
It's tangy, sweet, nutty, crunchy, light, smooth, creamy and chocolaty. Everything happens at once. In particular Abby and I enjoy eating this delightful treat. Yum!


They look pretty, aren't they?


What you need:

For the crust:
80g almond flour
1 egg white
2 tbsp brown sugar
2 tbsp butter
  • Preheat oven to 165degC. Line muffin tin with cupcake liners
  • Mix almond flour, egg white, brown sugar and butter til thoroughly combined
  • Spoon about 2tbsp to each muffin cups and press evenly to the bottom and sides
  • Bake about 15mins until the crusts start to brown
  • Let cool and remove the liners

some Nutella or melted dark chocolate

For the filling:
1 cup whipping cream
2 tbsp icing sugar
1/2 tsp vanilla extract
some cacao nibs
some chopped berries
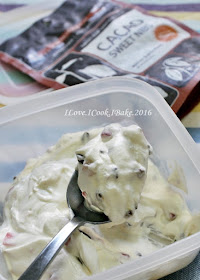
  • Pour cold whipping cream in a chilled bowl, add in icing sugar and vanilla extract
  • Beat til stiff peak. Fold in gently cacao nibs and chopped berries


some crushed pistachios to sprinkle
some strawberry chia seed jam to drizzle

For the strawberry chia seed jam:
150g strawberries, sliced
juice of a quarter of a lemon
1/4 tsp vanilla extract
3/4 tbsp chia seeds
2 tbsp honey (depending on the sweetness of the strawberries, mine was pretty sour)
  • In a small sauce pan over medium low fire heat 150g sliced strawberries til soft and juicy
  • Add in juice of a quarter of a lemon and 1/4 tsp vanilla extract, stir well
  • Blend the mixture using hand blender til smooth (I left a little of strawberries chunks for texture)
  • Add in 3/4 tbsp chia seeds and cook for about 5mins, stirring frequently til thickened
  • Remove from fire and let cool before storing it into a glass jar. Keep refrigerated


How to assemble:
  • Scoop about 1/2 tbsp of Nutella or melted dark chocolate onto the cooled crusts and spread evenly
  • Spoon a dollop of sweetened whipped cream mixture over Nutella. Sprinkle with crushed pistachio and drizzle with strawberry jam. Best serve chilled

These tart is a great alternative for healthier choice of sweet treats with the usage of great stuff with many health benefits

I couldn't stop taking pics of these pretty little treats! :)


A must try refreshing, considerably healthier choice snack! :)


Thursday, July 28, 2016

Eclairs - Fool Proof Recipe

Ian is basically not a cake person, he doesn't really have sweet tooth - unlike his sis. Having said that, there are some sweet treats which he consistently enjoys having. One of them is éclairs
So, for his 9th birthday last week, when I asked him what he wanted me to bake for him, he said no cake. I asked, éclairs? He nodded in full excitement LOL

My family and I love it too, actually, but I do not really bake it often. As far as I remember, this was only my third time and in fact my first time using different recipe. Previously I always used this recipe


This time I attempted another recipe, from Kenneth of Guai Shu Shu
Ingredients are more or less the same, the only difference is his method is using electric mixer while my usual recipe is not. Result is very similar taste and texture. Love it :)

This recipe is more fool proof as the mixing is done by the machine, which I like
I was forgotten to take pics of the pretty hollow inside of the puff as well as how it looked inside with the filling, hope I remember the next time I bake this again :P

What you need:

For the choux pastry:
4 eggs
125g butter
125g plain flour
250g water

For the filling:
I used the same recipe as I did previously. Click the link I wrote above

For the chocolate coating;
I used the easy way, I melted 200g dark chocolate over double boiler. After melting while it's still hot, add in about 1 heaped tbsp of butter. Stir well

Method:
  1. Preheat oven to 200degC. Grease and line 2 cookie sheets
  2. In a sauce pan over medium low heat, bring to boil water and butter. Add in flour while stirring vigorously until well mixed. Keep stirring til the dough doesn't stick to the pan and start to form a ball like shape. Let cool briefly about 5mins or so
  3. Transfer the dough into a mixing bowl. Beat for 30 seconds. Add in eggs, one at a time and make sure to add the next one after it's really well mixed (to be safe, add the next egg after at least 30 seconds of beating) Dough will be smooth and glossy but not runny
  4. Transfer dough into a large piping bag. Snip the tip to make about 1.5cm hole (or you can use piping nozzle with round tip) Pipe dough to your preferred length, about 10cm, onto lined cookie sheet
  5. Bake for 15mins and then reduce the temperature to 180degC and bake for another 20mins or so til it's golden and firm to the touch (Do not open oven door during baking especially the first 20mins to avoid puffs to deflate)
  6. When it's done, remove from oven and transfer to a cooling rack. Poke each puff at both ends with a toothpick to release trapped moisture inside
  7. When the puffs are completely cooled, you can either slit lengthwise at one side to slather the filling in it, or you also may use piping bag with small tip to poke into one end of the puff and pipe the filling
  8. Last step is to dip the top of each puff with melted chocolate topping. Store in an airtight container. If need to stack, layer with plastic or parchment paper in between. Keep refrigerated

For the special birthday boy, I presented the éclairs a little differently. I stacked them to make it like a pyramid and drizzled with homemade easy chocolate sauce


The birthday boy was delighted to see the éclairs pyramid! :)


Easy Peasy Homemade Chocolate Sauce

My kids love to eat desserts with chocolate sauce. Ice cream, waffles, pancakes.. they love it with chocolate sauce. I normally buy bottled one from supermarket. With many added unnecessary ingredients in it, I am contemplating to make homemade kind. And when I found this easy peasy recipe, I did make a batch and it's as good, if not better, and so well received by the kids they didn't know that it's not what they used to have haha.. From here I know I will not buy the commercial bottled chocolate sauce anymore in the future :)


Here is  the recipe (from Foodie Baker)

What you need:

1/4 cup cocoa powder (I used Varlhona)
1/4 cup + 2tbsp caster sugar (original recipe only used 1/4 cup)
50ml water
50ml fresh milk (original recipe doesn't use milk, only 100ml water. You may use 100% milk for creamier texture)
10g unsalted butter, diced

Method:
  1. Combine cocoa powder, sugar, water and milk in a small sauce pan. Bring to boil over medium high heat and whisk constantly til sugar and cocoa powder dissolved
  2. Remove from heat and stir in butter. Stir well and let cool. The sauce will thicken slightly when cooled
  3. Store in a glass jar and keep refrigerated

My personal opinion, it tastes even better than store bought ones :)


Love the texture too, smooth creamy and glossy :)
 

Saturday, July 16, 2016

40 Minutes Buns

This is my second time baking it and well, for my case, it takes longer than 40mins as I used my bread maker to do the kneading, but still this is a genius way to cut short bread baking process. Love it :)
First time, I just baked normal plain dinner rolls. This time, I added Nutella and cheese filling. As predicted, the Nutella filling were a hit with the kids, while I and DH enjoyed the cheese filling


Recipe is from Diana from The Domestic Goddess Wannabe

What you need:

280ml warm water (or milk)
1/3 cup or 83ml oil
2 tbsp instant yeast
1/4 cup sugar
1 1/2 tsp salt
1 egg
476g bread flour

Method:
  1. Heat oven to 220degC
  2. In a bowl, combine water, oil, yeast and sugar and leave it for 15mins. Using dough hook, mix in salt, egg and flour. Knead for a few mins til dough is soft and smooth and continue with hand kneading for awhile. Hand knead is possible too for about 5mins (I used bread maker and let it do the kneading job for 30mins)
  3. If the dough is still too sticky add in a little more flour (not too much), knead a few times and oil your hands too while kneading (After kneading in bread maker I still got sticky dough so I kneaded a while more with oiled hands and a bit more additional bread flour)
  4. Form dough into 12 balls and place in greased pan, rest for 10mins (For my buns with filling, I flattened the ball, spoon a heaped tsp of filling of choice - mine were Nutella and grated cheddar cheese)
  5. Glaze with egg wash, add the top of each bun with sprinkle of your choice, and bake for 10-12mins til golden brown

Note:
Wrap each cooled bun in cling wrap and store in airtight container. If keeping them in the fridge, warm it up in microwave for about 15secs


Cheese filling


Nutella filling


Something that I definitely will bake again and again :)


Sunday, July 10, 2016

Milo Muffins

Very easy to make. Very delicious yummy mushroom looking muffins. I love it. My whole family too :)


Thanks to Victoria for the great recipe. It's indeed irresistible :)

What you need:

120g fresh milk
80g Milo powder
75g butter, melted and cooled
1 large egg
10g cocoa powder
180g cake flour
2 tsp baking powder
60g sugar
some mini marshmallows

Method:
  1. Preheat oven to 200degC. Prepare 6 cupcake liner in a muffin pan
  2. Warm milk just til lukewarm, add in Milo powder and stir til dissolved
  3. Sift cocoa powder, cake flour and baking powder into a bowl and add in sugar. Mix well
  4. Make a hole at the centre and add in egg and milk mixture, mix well but do not overmix. Batter should be sticky
  5. Scoop 1 heaped tbsp of batter , add in a few mini marshmallows and top it up with more batter
  6. Sprinkle more mini marshmallow on top
  7. Bake for 20mins til skewer comes out clean
  8. Remove from muffin pan and let cool in cooling rack

Looks like a bunch of mushroom with surface looking like planet Mars LOL


Yummy yummy :)


DH, who dislikes overly sweet cakes, was full of praise after finishing one of these big muffins within seconds haha..