Pages

Monday, May 23, 2016

The Killer Toast (1 Proofing)

Finally I am blogging about this bread. This recipe has been so so popular especially in Instagram
I have been baking this bread many times,  most of the time in loaf and pull apart buns shapes, but every time I had no chance to take pictures as it always finished out in an instant LOL

Yes, it's that good. This bread is really soft and fluffy with a milky taste, we love it a lot!
Besides the taste and texture, the winning point about this recipe is it only needs one time of proofing, which cut the preparation timing as compared to the traditional way of preparing bread by about an hour


Recipe is from Victoria Bakes

What you need:
(for 450g loaf)

260g bread flour
3g instant yeast
1 large egg + full cream milk = 180g
30g sugar
2g salt
30g butter

Method:
  1. Pour milk and egg in the bread maker pan, followed by bread flour, salt in one corner and sugar in another corner
  2. Make an indentation in the centre and pour in instant yeast
  3. Set the machine to Dough and press start
  4. After 5mins, add in butter and let the machine do the rest of the kneading, about 30mins depending on the type of bread maker
  5. Take out the dough from the pan and place it on the lightly floured surface
  6. Knead slightly for a few mins til dough is smooth and window pane is achieved
  7. Divide the dough into three, flatten each using rolling pin to oblong shape and roll the dough away from you like when you're making swiss roll
  8. Place the three shaped dough into a greased and line loaf pan, cover with damp kitchen towel and let it proof til it almost reaches the rim of the pan (mine was taller than that!)
  9. Bake in the preheated oven of 170degC about 45mins til the top is browned evenly and sounds hollow when tapped
  10. Remove from oven and transfer to a cooling rack. Brush the top with melted butter for extra shine
  11. Cool completely before slicing it

Fresh from the oven (yes, it's a night baking LOL)


 And the next morning after breakfast, I took more pictures with the remaining 1/3 of the loaf haha...


Saturday, May 7, 2016

Eggs In A Cup

Another treat I enjoy eating that you may consider to surprise your mom on Mother's Day
If she doesn't prefer something sweet in the morning while you plan to make her breakfast, this is one good choice. It's in fact also good for lunch or snack :)


Okay, this one needs more chopping and stuff you need to do in the kitchen, but trust me, it's worth it :)

What you need:
(6 cups)

Mission Original Wrap
chopped red peppers
chopped green peppers
sliced Swiss brown mushroom
halved cherry tomatoes
sliced breakfast ham
6 eggs
3 tbsp grated Parmesan cheese
3 tbsp grated Mozzarella cheese
salt and black pepper to taste


1. First, preheat your oven to 180degC. Grease 6 holes muffin pan. In a bowl, mix in eggs, Parmesan cheese, salt and black pepper
 
 
2. Cut wraps into circles that can fit nicely into each hole in the muffin pan. Place them into the pan. prepare the ham, and vegetables
 
 
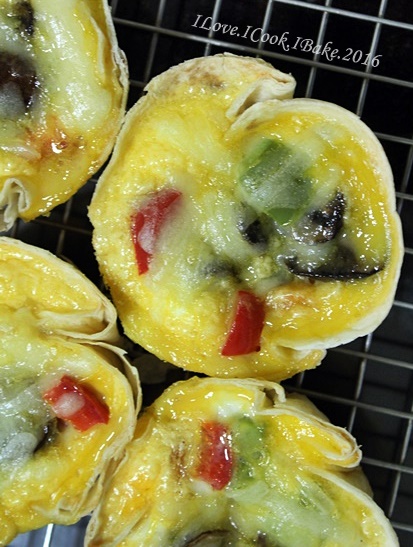
3. Place the ham and vegetables equally into each cup followed by pouring the egg mixture over it, close to the rim of the cups
 
 
4. Carefully place the pan into the preheat oven and bake for about 15mins. Remove from oven and add in mozzarella cheese into each cup and bake again for about 5mins til the cheese melted and the cup is crispy, Serve warm


This is a very versatile dish as you may use whatever ingredients you prefer. What I made was what my family and I love. You can replace ham with bacon, sausage while you can use whatever vegetables you love :)
 
 
Crispy cup with delicious juicy filling. Yum!


This is another post is in conjunction with invitation from Mission Foods Singapore to contribute some menu ideas for this coming Mother's Day tomorrow
 
At the same time, a special guest, Adam Liaw,  Australia Master Chef Season 2 winner, came up with a book of menu ideas "Quick and Easy" Dinners created in collaboration with Mission Foods
 
 
One more recipe in this book that caught my eyes was Beef Bulgogi and Kimchi Wraps. I must try this! :)


Meantime, I'd like to wish all the wonderful mommies out there.. HAPPY MOTHER'S DAY!
 

Banana Chocolate Cheese Wrap Roll

Finally I am well. Got flu bug from Ian, a pretty bad one it took almost 2 weeks for me to finally function normally. Well, I felt better last weekend but somehow got worse again. Health is wealth. It's not fun to fall sick. So relieved now, phew...

Anyway, this post is in conjunction with invitation from Mission Foods Singapore to contribute some menu ideas for this coming Mother's Day tomorrow

So here is the first one, banana chocolate cheese wrap roll - a delicious sweet treat
I always love these three combination. Easy peasy to make and so yummy. You can prepare this for breakfast, or brunch or even as snack


What you need:
(1 serving)

1 Mission Original Wrap
1 sliced cheddar cheese, tear into small pieces (or grated cheddar cheese)
about 1 heaped tbsp chocolate rice
1 medium ripe banana
chocolate sauce for garnish


1. Heat a non stick cooking pan over low heat. Place one Mission Original Wrap on the pan followed by grated cheddar cheese on one side of the wrap (I found out on that morning that I had no grated cheddar left, so I used one sliced cheddar and tore it apart)


2. Add chocolate rice over the cheese
 
 
3. Add one peeled banana (I mistakenly sliced the banana into two LOL)

 
4. When cheese and chocolate rice start to melt, you will feel that the wrap starts to crisp too, slowly roll the wrap from one side to the other side
 
 
 5. And it's done :)
 

6. Transfer to a serving plate and drizzle some chocolate sauce and serve

 
Sweet creamy  chocolaty with a hint of saltiness. Delish!


Mission Foods with a special guest, Adam Liaw,  Australia Master Chef Season 2 winner, came up with a book of menu ideas "Quick and Easy" Dinners

 
There's some recipes I'm so intrigued to try. This is one of them, Smoked Salmon and Egg Wraps with Mustard-Dill Mayonnaise. Sounds so good!


Lastly, hope you like the roll as much as I do and if you prepare this for your mom, hope she will enjoy it too. HAPPY MOTHER'S DAY :)

Sunday, May 1, 2016

Easy Healthier Chocolate Mousse


This dessert came out smooth, chocolaty, rich and delicious
Secret ingredient? Silken tofu! Slashed more than half of the calorie compared with the common chocolate mousse dessert made using thickened cream
A serving of this is only a fraction of close to 100 calories, while the traditional recipe can be as high as 300 calories! You can eat this dessert in peace LOL


I decorated with kiwi slices just because I had nomore strawberries left LOL And see the red specks? My hands was itchy I sprinkled some red sanding sugar haha..


Recipe credit to Joanna Soh

What you need:

300g silken tofu
1/4 cup unsweetened cocoa powder
2 tbsp maple syrup
1.5 tsp vanilla extract
a little stevia (optional, if you find it's not sweet enough)

Method:
  1. Put all ingredients (except stevia) in a food processor and blend til smooth
  2. Taste and add stevia to sweeten
  3. Scoop in 3 serving bowls and chill in the fridge for a few hours to set
  4. Before serving, decorate with sliced fruits and/or nuts as preferred

Let's dig in! :)