Pages

Tuesday, September 30, 2014

Healthy Pumpkin Apple Creamy Soup

I love this soup. So creamy and yummy. And the best part is this is a healthier with no cream used, a great alternative to those typical creamy soup which using heavy cream
A choice for those weight watcher food lovers :)


I'm playing around with whatever ingredients I had in the fridge and very satisfied with the result. Definitely will use this recipe again in the future :)

What you need:

1/2 onion, diced
1 apple, peeled, cored and diced
750ml chicken stock
200g sweet potatoes (orange flesh), peeled and cut into chunks
200g Japanese pumpkin, cut into chunks with skin on
1 medium carrot, peeled and diced
1 tbsp brown sugar
salt, pepper, coconut oil

Method:
  1. Rub sweet potatoes and pumpkin chunks with salt, pepper and coconut oil. Spread in one layer on a baking sheet and roast for about 20mins til soft
  2. Meantime, heat coconut oil in a heavy based pot and sautee onion til soft and fragrant
  3. Add in chicken stock, apple, carrot and bring to boil, cook til soft
  4. Add in roasted pumpkin (discard the skin) and sweet potatoes, cook for further 5mins
  5. Blend using hand blender til smooth
  6. Add in salt, brown sugar and pepper til you get the taste preferred. Simmer for about 5 mins over low heat
  7. Adjust the consistency of the soup. Add more water if too thick, or simmer a little longer if it's too watery
  8. Serve with crispy bacon or ham and sprinkle with fresh or dried parsley

I managed to get some pictures using my mobile phone camera while I was doing the cooking. Pardon the quality, though :)


I used Bosch MaxoMixx Hand Blender model MSM87180 to blend this soup, it's a heaven sent that made my job so much easier! It's so easy to use, and so fast!
I wrote review about this great, multi function product HERE


Such a hearty soup! Dipping a baguette in it tastes wonderful, too :)


This post is for Little Thumbs up organised by Doreen from my little favourite DIY and Zoe from Bake for Happy Kids, hosted by Kit from I-Lost in Austen at this post


AFF Singapore - Economic Fried Bee Hoon (Fried Rice Vermicelli)

Nice and yummy dish my family always love. I usually buy it from outside, this time I tried cooking it myself and so pleased with the result. Yummy and one great thing that outside food is usually lacking of - not oily! :)


What you need:
 
300g beehoon (rice vermicelli), soaked in water til soft, drained
150g beansprouts, washed and drained
4 shallots, peeled and sliced
2 cloves of garlic, peeled and chopped
1 cup of water (original recipe is 2 cups, but mine was good enough with 1)
4 tbsp oil
 
Seasonings:
1 tbsp light soya sauce
1 tbsp dark caramel sauce
1 tsp sugar
1 1/4 tsp salt
 
Method:
  1. Heat oil, sautee garlic and shallots til golden brown. Add in water, light soya sauce, sugar, salt and bring to boil
  2. Add in beehoon, dark caramel sauce, and quickly stir fry, toss well. Cover with lid, cook for 2minutes
  3. Add in beansprouts, stir fry and toss well. If beehoon is too dry, add in hot water
  4. Dish out and serve
 
Serve the beehoon with stir fry cabbage, fried egg and fried luncheon meat
 
Stir fry cabbage:
 
What you need:
 
200g cabbage, tear into small pieces
1 carrot, julienned
3 cloves of garlic, chopped
salt, light soya sauce, pepper, oil, some water
 
Method:
  1. Heat oil, sautee garlic til fragrant. Add in carrot, cook for a minute
  2. Add in cabbage, stir fry. Add in seasonings, water, bring to boil and cook til cabbage softened
  3. Dish out and serve
 
Fried luncheon meat: slice canned luncheon meat, dip in beaten egg and deep fry


I am submitting this post to Asian Food Fest - Singapore, hosted by Grace from Life can be Simple

Wednesday, September 24, 2014

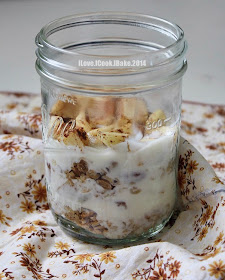
Apple Pie Parfait

Parfait is one of my favourite breakfast menu, or even as my snack
Yummy and refreshing when served cold. Love it!

I saw this apple pie parfait in Super Healthy Kids. Tried it and no regret, it's delicious :)


I'm so lousy in making layers LOL


Recipe is so simple...

What you need:

granola
low fat plain yoghurt
apple
cinnamon powder

Method:
  1. Dice apple and mix with cinnamon powder, microwave for a minute
  2. Take out and stir. Microwave for another 1 min. Take out and let cool
  3. Start the layer in a glass jar with granola, followed by yoghurt, apple
  4. Repeat the sequence one more time, or even two more times depending on how much ingredients you have! :)
  5. Breakfast is ready!


This post is for Little Thumbs up organised by Doreen from my little favourite DIY and Zoe from Bake for Happy Kids, hosted by Kit from I-Lost in Austen at this post


Tuesday, September 23, 2014

AFF Singapore - Mee Hoon Kueh (Hand Pulled Noodles)

The last part of Asian Food Fest, Singapore :)

Let's start with this heart noodle dish loved by me and family
This China origin dish is easily found island wide. You definitely see it in any food court you patronize
They typically sell different kind of shapes for the noodle, with the same soup base and a variety of topping. There are fried version, too

I personally love mee hoon kueh more than others, not sure why, just love the texture
Hence my experiment on making it :)


I love the rather thick chewy mee hoon kueh like this :)


The kids prefer the meat to be shaped into balls :)


Recipe is from Sonia from Nasi Lemak Lover with some modification

What you need:

Dough:
500g plain flour
200ml water
1 egg, lightly beaten
1 tsp salt

Method:
  1. Mix flour, egg and salt in a mixing bowl. Slowly add in water, knead til smooth about 5 mins
  2. Shape dough into ball, keep aside covered with clingwrap for 1 hour or more

Soup base:
70g ikan bilis (anchovy), washed and cleaned
150g pork ribs, washed
a pot of water
2 tsp salt to taste

Method:
  1. Blanch pork ribs in hot boiling water for a minute, and drain
  2. Boil pork ribs in a pot of water and simmer for an hour. Add in ikan bilis and continue to simmer for another 45 mins. Taste with salt, set aside
200g prawns (skin on, head and tail intact), stir fry with chopped garlic
200g minced pork, marinate with sesame oil, salt, pepper and tapioca flour, shape into balls
ikan bilis (anchovy), fry til crispy
fried onion
some green vegetables (I used xiao bai cai)
tong choy (preserved vegetables)
eggs

To serve:
  1. Transfer a single serving of soup base into a small pot, bring to boil
  2. Pull and tear mee hoon kueh dough into thin pieces and drop them into boiling soup
  3. Add in meatballs, tong choy and vegetables, crack an egg and cook for 1 min and pour into a serving bowl
  4. Add in garlic prawns, fried ikan bilis and fried onion
  5. Serve with chilli soya sauce


I am submitting this post to Asian Food Fest - Singapore, hosted by Grace from Life can be Simple


Monday, September 22, 2014

Bake Along #68 Popovers

Finally I can blog! :) So glad my PC is now okay *phew*

Here is my first ever popovers LOL
Love this puffy munch, even on its own - I need nothing else :)
I made 6 of them, somehow the other 3 deflated much faster, and those 3 were at the outer side of the oven during baking. Uneven heat, probably?


Look at them while still in the oven...
(yeah, I know, it's time for me to clean my oven LOL)


This was about 10 mins after out from the oven


Looks like a giant opened mouth, huh? LOL
I love to see the hollow part :)


I followed the recipe from King Arthur Flour which I happened to see at Lena's blog, Frozen Wing

Here is the recipe...

What you need:

2 large eggs, room temperature
170g lukewarm milk
1/4 tsp salt
90g plain flour
22g melted butter

Method:
  1. Preheat oven to 230degC. Put the rack at the lower level
  2. Grease 6 cups muffin pan, each cup is 6.25cm wide and 2.25cm deep
  3. Whisk milk, egg and salt til well combined, no streaks of yolks visible
  4. Add in all flour, beat with electric mixer on high speed for 20 secs (small lumps are fine)
  5. Stop, scrape sides, beat another 30 secs on high speed til frothy. Stir in melted butter, combine quickly
  6. Pour batter into the cup, 3/4 full. Make sure oven is at 230degC
  7. Place pan in the oven, bake for 20mins without opening the oven door
  8. Reduce to 175degC and bake for 15mins til golden brown
  9. If browning too quickly, position rack at the top and put cookie sheet to shield the popovers
  10. If you want the popovers to hold their shape longer, bake 5 mins more (total 40 mins)
  11. If you are to serve immediately, remove from oven straight away and stick the tip of the popovers with knife to release steam to prevent sogginess


This post is for Bake Along, an event organised by Joyce from Kitchen FlavoursLena from Frozen Wings and Zoe from Bake For Happy Kids

Saturday, September 13, 2014

A Late Announcement: Lee Kum Kee Giveaway Winners!

First of all, I have to apologize big time for the late announcement. I know it should have been done on last Monday
Ian was down with stomach flu last week, a week without appetite, followed by Abby - such a bad and contagious virus!
Plus, my PC had a serious issue and needed to be sent for repair. Tried to access to the blog using my super aged laptop and I was beaten with my impatience, it's so super slow I couldn't take it I gave up!

Okay, enough of my ramblings. Ian is totally okay now and started to gain back the kilos he lost. Abby is recovering now and more cheerful. My PC is still under repair now, I am now using my sis' laptop. As old as mine, but it's faster. I'm happy enough :)

Back to the business
My big thank you for those participating in the Lee Kum Kee giveaway. Here are the winners:


1. Vinturesome Joy
True Random Number GeneratorMin:Max:Result:9Powered by RANDOM.ORG

 
2. Kathy Woon-Tan
True Random Number GeneratorMin:Max:Result:5Powered by RANDOM.ORG

 
3. Esther Chng
True Random Number GeneratorMin:Max:Result:19Powered by RANDOM.ORG


Congratulations to the winners and I will contact you via email soon! :)

Saturday, September 6, 2014

Baked Custard Mooncakes

My last batch of mooncakes this year, even though I actually have a few more in mind :P

This is one of my all time favourite I always got whenever I was in Hong Kong during Mid-Autumn Festival, baked custard mooncakes from Peninsula Hotel
And when they started participating in mooncakes fair in Singapore, I was so happy I could buy it without having to travel all the way to Hong Kong
Now, I am even happier, because I can just travel to my kitchen to get it, and without having to spend a bomb, I can get even more LOL


Big thank you to Zoe from Bake for Happy Kids for sharing such a great recipe. It's indeed so similar to the original one! And the great news is, it's not as sweet!
The only downside and concern of those yummy festive treats sold for Mid-Autumn Festival is the sugar level consumed in each bite, and this one definitely makes me feeling less guilty :)

Okay, not so good news was again, it's my carelessness and laziness..
Zoe has mentioned about weighing the dough using the mould, but I skipped that, and jumped into my own conclusion that it should be the same weight as how I did my double chocolate snowskin mooncakes as I used the same mould. I was wrong big time!

After I shaped them, I found out that the balls were too big for the mould. I was like, oh no! But of course I couldn't unwrap the balls, so I just went ahead pushing the poor giant balls into the too tight mould and look at my moonies, they have something in common with macaron, they have feet! LOL

Anyway, inner beauty plays a big role here. What it shows outside doesn't matter anymore once you sink your teeth in it. Oh so yummy! :)


I was not sure why the pockets on both sides of the custard filling. Perhaps I didn't wrap the filling tight enough there's space in between?


Here's the recipe for this super duper yummy total indulgence...

What you need:

For the custard filling:
(about 300g)

25g softened butter
60g caster sugar
3 yolks from large eggs, roughly beaten
1 tbsp condensed milk
40ml cream with 35% fat content
60ml coconut milk
20g plain flour
15g custard powder
10g tapioca flour

Method:
  1. Combine plain flour, custard powder and tapioca flour in a bowl
  2. Beat butter and sugar until light and combined with electric mixer. While beating, add in yolks one at a time until combined. Add in condensed milk, cream and coconut milk. Sift flour mixture into the yolks mixture and mix til combined
  3. Pour the mixture into a heat resistant container and steam over medium heat for 25mins, stir every 5mins. Set aside to cool
  4. Knead dough til smooth. Wrap in the cling wrap and chill in the fridge for a maximum of a week

For the skin:
(about 24 mini mooncakes while I had 9 giant balls)

100g softened butter
30g Crisco shortening
90g icing sugar
1 egg, roughly beaten
220g plain flour
35g custard powder
1/4 tsp baking powder

Method:
  1. Beat butter, shortening and sugar til light and fluffy with electric mixer. While beating, add in beaten eggs gradually til combined
  2. Sift plain flour, custard powder and baking powder into the butter mixture and mix til incorporated. Mix together by hand to form a dough
  3. Wrap with cling wrap and let it rest in the fridge for an hour at least

Egg wash:
Whisk together with fork:
1 egg yolk
1 tbsp milk

To assemble:
  1. Please do not follow me, don't skip this step -> test the amount of dough and filling required to fill in each mould by fill the mould with the maximum amount of skin dough that you can fill and weigh the piece. Use 60% for the skin and 40% for the filling like how I usually do for mooncakes. Want to challenge yourself with 60% filling and 40% skin? It's all up to your choice, but it's definitely tougher to wrap
  2. After you're done with weighing the balls for filling and skin, start wrapping them into balls
  3. Place each ball into a lightly floured mooncake mould, press gently until all sides of the mould are fully filled. Release from the mould and place them onto a lined baking sheet
  4. Preheat oven to 170degC. Brush with a thin layer of egg wash and bake for 25mins (mine was 30mins and I chilled them in the fridge for a mere 15mins prior to baking to minimize cracks. Mine cracked a little but it shrank back after cooled)
  5. Allow the baked mooncakes to cool for 10mins on the baking sheet and then transfer them on the cooling rack to cool completely
  6. Allow them to rest in the room temperature before serving. Freshly baked, they were like cookies with filling. Mine turned moist and tender after 24 hours


I'm joining Best Recipes for Everyone August 2014 Event Theme: Dim Sum hosted by Fion XuanHom's Mom


TO ALL, HAPPY MID AUTUMN FESTIVAL 2014!

Cappucino Cheese Jelly MooncakeS

This is the first time I made jelly mooncakes
It's easy and since I love coffee and cheese, I definitely think this is one yummy dessert :)

One hiccup, I forgot that the mould is the regular mooncake size, not those mini sizeI usually use. I prepared the filling using mini muffin moulds!
So, I ended up stacked 2 pieces of filling together, hence the hexagon shape hahahah...
Luckily it's just for my own consumption LOL


For filling:
 
What you need:
 
3 1/2 tbsp water
2/3 cup fresh milk
50g sugar
1 tsp agar-agar-powder
50g cream cheese, beat with mixer to soften
 
Method:
  1. Bring water, milk, sugar and agar powder to the boil in a pot
  2. Add softened cream cheese and whisk continuously to prevent lumps from forming
  3. Turn off heat and pour into muffin pans
  4. Leave to cool until set, then chill in the fridge
For skin:

What you need:

1 3/4 cups water
70g sugar
2 1/2 tsp agar-agar powder
1 1/2 tsp instant coffee ( mixed with 3 1/2 tbsp hot water)

Method:
  1. Bring water, sugar and agar powder in a pot to boil
  2. Turn off heat and add instant coffee mixture
  3. Stir continuously
To assemble:
  1. Rinse the mould with water, let the drops of water stay there (this helps in easier unmoulding)
  2. Pour jelly skin, about 3/4 cm. When it almost sets, place filling on it and immediately pour the remaining jelly skin til the mould is full
  3. Leave to set and chill in the refrigerator. Once chilled, unmould and serve

I love the sensation of coffee and cheese mixed together in my mouth, so yummy!
It's not overly sweet, too. One thing you won't be able to get with any other mooncake LOL
I am thinking to mix in some Kahlua in the coffee jelly, yum yum yum... Next time!
And of course I will remember to use regular size muffin tray for the filling hahaha...


I'm joining Best Recipes for Everyone August 2014 Event Theme: Mooncakes hosted by Fion XuanHom's Mom


Thursday, September 4, 2014

Double Chocolate Snowskin Mooncakes

Sharing with you all my first mooncake of the year. There are two more lining up LOL

This was Abby's request, my chocolate addict lil girl :)
She wanted a pure chocolate filling without any lotus paste added
So I searched for the recipe and I found one. So I gave a try


I was pretty pleased with the result. The skin was the recipe I all along used and the filling was super chocolaty and yummy. It's really sticky though. It's better after keeping them in the fridge but once out, it turned sticky pretty fast
 
What you need:
 
For the snowskin you may view HERE
 
For the chocolate filling:
(source: Abbiecooking)
 
What you need:
 
A
2 tbsp fresh milk + 1 tbsp Baileys
50g icing sugar
200g semi sweet chocolate chips (you may use dark chocolate, too according to your preference)
 
B
2 egg yolks + 1 tbsp fresh milk + 1 tbsp custard powder, lightly whisk
 
Method:
  1. In a double boiler, heat milk, baileys and icing sugar. Remove from heat once hot and melted then add in chocolate, melt completely
  2. Pour B slowly and stir. Put back in double boiler and stir til thickened
  3. Cool down and keep in the fridge for a minimum of 2 hours
  4. Once firm, weigh according to the mould used and shape into balls
  5. Keep it in the fridge til ready to assemble
 
Note:
***I weighed 35g for the skin and 30g for the filling
***After I shaped the filling into balls, I kept them in the freezer instead for 30mins before assembling (Singapore is just too hot and humid the balls got sticky real fast!)


To those chocolate fanatics, this is a must try. It's so chocolaty I felt like eating chocolate bar, the softer version :)
 
I'm joining Best Recipes for Everyone August 2014 Event Theme: Mooncakes hosted by Fion XuanHom's Mom