Pages

Sunday, August 31, 2014

AFF Taiwan: Stuffed Tofu Soup, Blog 4th Anniversary & Giveaway

My last submission for this month Asian Food Fest - Taiwan
Saw this at Peng's Kitchen and immediately I gave it a try. Very satisfied with the result, tasty hearty dish eaten with rice or on its own :)


What you need:
 
4 blocks of small firm tofu
200g fish paste
200g squid paste
200g minced pork
4 shitake mushroom, finely diced (I grinded)
1 tsp grated ginger
1 tsp sugar
1 tsp pepper (I used 1/2)
1 tsp sesame oil
1 tsp salt
1 tsp light soya sauce
2 stalks spring onion - chopped
2 tsp Chinese parsley - chopped (I skipped)
2 tsp potato starch
 
Broth:
4 cups stock
2 tbsp. fried shallot
1 tsp pepper (I used 1/2)
1/2 tsp salt
1 tsp sesame oil
 
Method:
  1. For the broth, mix everything in a pot and bring to boil
  2. Marinate minced pork with grated ginger, pepper, sugar, sesame oil, salt and soya sauce
  3. Stir in potato starch, spring onion and parsley, stir til sticky. Stir in chopped mushroom. Set aside for at least 30mins
  4. Combine fish and squid paste, set aside
  5. Cut tofu in quarters. Deep fry til golden brown. Drain and cool completely
  6. Slit at the cut side and scoop out some of the tofu to make a pocket
  7. Fill in pocket with marinated meat. Put a thick layer of fish paste mixture to seal the cut side completely. Do the same for all the fried tofu
  8. Cook the stuffed tofu into the boiling broth for 10mins over medium heat til well cooked
  9. Scoop out tofu and place onto serving bowl. Pour over the broth. Sprinkle some spring onion and fried onion. Enjoy! :)


I am submitting this post to Asian Food Fest – Taiwan hosted by Alan from Travelling Foodies
 
 
Okay, now an announcement... This month of August is my 4th year of blogging, to be exact is 14 August :)
I was in my deepest stage of blogging blue on that very day I didn't post anything about it. I didn't even bake anything special LOL
Since today is the last day in August, and I am now in the mood of typing, today is the day to share with you all :)
 
Just like the previous years, I feel grateful and blessed to be able to reach another year of sharing and learning my passion and meeting many wonderful bakers and cooks
My initial intention of creating this blog was just to have an e-recipe book. And it has been surprisingly leading me to many wonderful unexpected surprises!
 
For all my readers, thank you so much for the support all along!
My hope is that this blog is not only useful to me, but also others :)
 
If I can mention things I need to improve in the future...
First, I will try to be more consistent in the participation for whatever events I have decided to join in - I have been lacking, not in all, but some of them - yes. And deep inside my heart, I really wish I could join in even more events! Ah, if only one day has 48 hours instead LOL
Second, my apology for those diligently visit my blog, leave comment. I really genuinely appreciate it. I will try hard to blog hopping more often in regular basis! :)
 
 
Now, to welcome the beginning of the journey of my fifth year, I have just created my Facebook page. The link is HERE 
Don't laugh, I know I'm very late. But late is always better than never, right? LOL
For those who have liked the page, thank you very much! :)
 
 
Okay, to share my excitement, I have giveaway courtesy of Lee Kum Kee!
Who doesn't know Lee Kum Kee? With so many products - sauces, premixes, etc., the name is well known island wide and even other countries
 
Lee Kum Kee has been so generous by sending me a hamper of their products. Really love the pair of bottled tomato ketchups. Cute, isn't it? :)
The teriyaki marinade and the ketchup are the latest products released in the month of June this year
 
They claim that the teriyaki marinade filled with white toasted sesame seeds and no preservatives added. And with just a spoonful, you can get a restaurant quality dish with the sweet and savoury teriyaki flavour
 
As for the bottled tomato ketchup, it is made with red ripe tomatoes, has no added preservatives and no artificial flavouring. And it's halal too
The design is eye catching and appeal to children. Its easy squeeze bottles allow parents and children to create instant food art by making cartoon characters, adding final touches with the ketchup


So glad to announce that I have 3 sets of this hamper to give away :)
My apology though, that it's only for Singaporean readers
 
How you can join:
  1. Like my Facebook page HERE
  2. Leave a comment below: "I want to win Lee Kum Kee hamper!" with your name & email address
The giveaway will open for one week. Closing date will be on 7 September and the winners will be announced on the following day,  Monday 8 September and I will email each winner for the mailing address. The hampers will be delivered to your doorstep
Please note that the hamper doesn't come with the red bamboo box, but it'll be inside a gold paper bag instead
 
 
So, what are you waiting for? Come join the giveaway! :)
 

Saturday, August 30, 2014

Product Review: Bosch MaxoMixx Hand Blender & Tionk Butter Cake

I'm so excited and honoured to get the opportunity to have Bosch sent me one of their latest kitchen gadget, MaxoMixx Hand Blender model MSM87180, delivered right to my doorstep!

I never expect it comes in such a big box :)
 
 
When I opened it up, I was like - whoaaaa! LOL
 
 
This multi tasking set comes with different attachments with different functions, such as chopping, blending, whisking, grinding, and even crushing ice!
I really love the base unit. Shiny silver metallic colour, very classy!
 
Before I decided which one I would use first, I took out the whole set and explored each and every part of it. It looks complicated but believe me, it's very easy to use!
I am one gadget idiot, and it took minutes for me to understand how it works
 
 
The hand blender is so sturdy and nice looking too. Love it!


This release button has another one at the other side and to press together to operate. It works so easily!


On button. It has turbo speed function too


Adjustable speed control


Universal cutter L and XL


The ice crush blade


Blender jug and whisk, and look at the hand blender blade just behind the jug
 
 
Okay. Now time to decide what to make. I had quite a few in mind, but I finally baked the popular tionk butter cake by Fiona Lau
 
What is tionk? It actually is typical butter cake - with a softer and fluffier in texture
It bounces back whenever pressed, hence the name. Cute, isn't it? :)
I was really curious because of the rave reviews. After I had my first bite, I understand why it's so popular. It's soft, fluffy, buttery, so delicious, so addictive!
 
My all time favourite butter cake I always use is HERE
It's actually very similar to this butter cake, if I can't say exactly the same LOL
The only difference is the dairy used. It uses milk instead of whipping cream
Anyway, both are equally fabulous. The usage of whipping cream here is a great idea to finish up whatever balance of whipping cream you have in the fridge
 
Why I didn't have the picture of the whole cake? Because half of it was gone in minutes - thanks to my family. Even my fussy boy loves it! He messily cut the cake himself without asking me to get another slice after he had one big slice. Look at the picture below, the bigger portion of the cake on the right had a weird shape. yes, it's his work LOL


Here's the recipe...
 
What you need:
 
240g cold unsalted butter, cut into cubes
5 large eggs
200g sugar
220g self raising flour
50ml whipping cream
1 tsp vanilla extract
 
Method:
  1. Preheat oven to 160degC. Separate the egg yolk from the whites
  2. With electric mixer, beat egg whites til frothy, add in sugar gradually, and beat til stiff peak
  3. In another bowl, beat butter til creamy and pale, add in vanilla extract and mix well
  4. Add in egg yolk one at a time and mix well
  5. Add in 1/2 of the flour, mix well. Add in whipping cream, mix and add in the remaining flour, mix
  6. Mix in 1/3 of the egg whites and stir til evenly mixed. Add in the remaining egg whites and fold gently til just incorporated
  7. Pour batter into lined 8" round pan. Tap hard the pan before putting it in the oven - at the sides and the bottom part
  8. Bake for 60-70mins til skewer comes out clean
 
So, I decided to use the whisk to beat the egg yolk mixture, while my other mixer did the egg whites. I adjusted the speed to the lowest and I pressed the on button and I was shocked. I never expect it's so powerful. I didn't need to increase the speed for this. Super like! :)
I took the picture below with my mobile phone using my other hand. Apology for the quality :)


Such a temptation - guilty pleasure! LOL
 
 
Anyone want to try?
 
 
Back to the gadget. Overall, I'm very pleased with it. And it seems that they all will work pretty hard assisting me in the kitchen LOL
Stay tuned for more recipes using the hand blender set in the coming months :)
 
 
This post is linked to the event Little Thumbs Up (August 2014 Event: Flour) - organised by Zoe (Bake for Happy Kids) and Mui Mui (My Little Favourite DIY) and hosted by Diana from Domestic Goddess Wannabe


You see the tionk tionk cake? :)
 

Friday, August 29, 2014

Bake Along #67 Plum Tartlets (Back In The Day Bakery)

Cakey tart? How is the texture? I have to try this! - my thought about the 67th bake for Bake Along
So I did today, and let me tell you, my diet was gone into the deepest drain today!
It was really good I ate THREE in a day! I felt so guilty I just had my evening exercise LOL

It looks just like cupcakes, but once you sink your teeth in it, you will have crumbly buttery moist sweet yummy tart. Not the usual tart, this has a cake like texture
And with the tang from the plum, it's perfect! Yum yum yum...


I followed the recipe posted by Zoe from Bake for Happy Kids. Thanks Zoe, you have made my life so much easier! :)

What you need:

150g plain flour
1/2 tsp baking powder
1/4 tsp ground cardamom (I used cinnamon)
1/8 tsp fine sea salt (I skipped as I used salted butter)
125g unsalted butter, room temperature (I used salted)
1 large egg yolk
40g caster sugar
1/2 tsp vanilla extract
lemon zest from 1 lemon
2 plums, pitted and sliced (I used red plum)
2 tbsp brown sugar (I used Demerara sugar)
icing sugar for dusting

Method:
  1. Preheat oven to 180degC. Line 6 cups of a muffin tray
  2. Cream butter until pale and fluffy (about 2mins on medium high speed)
  3. Add in egg yolk, sugar, vanilla, lemon zest and beat til mixture is light in color
  4. In a separate bowl, mix flour, baking powder, cardamom (for me it's cinnamon) and salt (for those using unsalted butter)
  5. Reduce speed to low and add sifted flour mixture in thirds, mixing til just incorporated, do not overmix
  6. Divide the batter evenly among the 6 muffin cups. Place plum slices in each cup, pressing lightly into the batter. Sprinkle the tops with brown sugar (for me it's Demerara sugar)
  7. Bake for 25mins (mine was 30mins) until the tartlets look set and the tops are bubbly and caramelized to a golden brown. Dust with icing sugar just before serving


My weekend indulgence started early this week :)


Also this post is linked to the event Little Thumbs Up (August 2014 Event: Flour) - organised by Zoe (Bake for Happy Kids) and Mui Mui (My Little Favourite DIY) and hosted by Diana from Domestic Goddess Wannabe


Thursday, August 28, 2014

AFF Taiwan: Taiwanese Chicken Rolls

I love all kinds of bean curd rolls. A must order every time I go for dimsum
So, when I saw this chicken rolls, I was drooling and determined to give a try
Thanks Kimmy for the wonderful recipe, it's delicious!
My family and I enjoyed this so much. I made half recipe and it's gone after dinner. The next time I will definitely make full recipe, or more! :)

She mentioned that the original version in Taiwan is usually much longer in shape, and has no chicken in it, even though it's called chicken roll. It uses pork instead. But since I have a lot of chicken breast in my freezer, I used chicken instead :)


Here's the recipe (adapted from Kimmy from Cooking Pleasure)
 
What you need:
 
300g fish paste, blend with 2 tbsp water to make sticky paste
300g lean pork (I used chicken breast), cut into strips
1 yellow onion, cut into fine shreds
2 tbsp tapioca flour
1 pc beancurd skin, cut into 8"x 5"rectangle pcs
Marinade for meat:
2 tsp light soya sauce
2 tsp cooking wine
2 tsp sugar
1/2 tsp salt
1/2 tsp pepper
1/2 tsp five spice powder
1/2 tsp sesame oil
 
Method:
  1. Marinate pork strips with seasonings. Set aside for about 15mins
  2. Add in fish paste and onion. Mix all with hands
  3. Cover and keep in the fridge for about half an hour
  4. Place about a handful of mixture at the centre of the beancurd skin. Fold both sides and roll up like spring roll
  5. Heat oil in a wok and deep fry til golden and crispy at both sides over medium heat


I guess I should have put more filling, mine were not round enough. It's flattened after cooled. It didn't affect the taste, though :)
Look at Kimmy's. It's so round and full of filling in it, so nice!

This is one of the recipes I definitely will be making again (especially since I still have some leftover beancurd skin LOL)
I will for sure put more filling so I can get fat rolls :)


I am submitting this post to Asian Food Fest – Taiwan hosted by Alan from Travelling Foodies

Wednesday, August 27, 2014

Sticky Lemon Chicken (Gordon Ramsay)

Finger licking good chicken is one dish my family and I love
So when I see Gordon Ramsay has his own version, I gave it a go and everyone enjoyed it :)

Recipe is from HERE inspired by Karen from some flour, sugar n butter
Hers look so appetizing!


I just realized when I saw this picture I have put the lemon slice at the wrong side LOL


What you need:
(with slight modification from the original recipe)
 
600g chicken (I used 1 free range chicken and cut into parts)
salt and pepper
5 tbsp olive oil
10 cloves of garlic (or 1 head), cut into half for each clove
1 tbsp fresh thyme leaves (I skipped cos I didn't have it)
3 tbsp dark soya sauce (I used kecap manis)
4 1/2 tbsp honey
1/2 lemon, sliced
200ml water
2 tbsp dried parsley (I used 1 tsp)
 
Method:
 
Heat heavy base pan with oil. Season chicken with salt and pepper
Cook chicken in the pan for 5 mins, turning once for each piece
Add in garlic, soya sauce, honey. Stir well and make sure the chicken is thoroughly coated. Cook for 5 mins
Add in water, cover and cook for 20 mins. Open up the lid and lay lemon slices on top of the chicken. Cover and cook for another 10mins
Season chicken with parsley, cook for another 5 mins. Serve with rice, lots of it :)
 
Note:
***The modification I made mainly was to meet my family preference. They dislike any dish which is too lemony, hence the short cooking time of the lemon
***I used a lot more water and cook it longer in order to have more sticky sauce. We like slathering it over rice. Yum! :P


This post is linked to Cook like a Star organised by Zoe from Bake for Happy Kids, Yen from Eat Your Heart Out and Mich from Piece of Cake


Tuesday, August 26, 2014

AFF Taiwan - Taiwanese Chicken Rice

I saw this at Violet's Kitchen and I know this dish will be loved by my family
Never had this before, so I gave this a try and I am glad I did, it's yummy!
Such a simple meal can be so satisfying :)


I decided to use the recipe from An Acquired Taste
It said that the original recipe uses turkey meat, and it's called Turkey Rice (火雞肉飯 huo ji rou fan) but chicken breast is the alternative when turkey is not available

What you need:

2 chicken breasts, blanch in boiling water for 3 mins and drain
1 tbsp oil
3 shallots, slice thinly
2 spring onions, cut 3 inch pieces
6 slices of ginger
2 star anise (I skipped)
1 tsp salt
1 tbsp light soya sauce
3 cups chicken broth
cooked white rice
pickled daikon and cilantro for garnish

Method:
  1. Heat oil in a heavy based pot, and sautee shallots til golden brown. Add in spring onion and ginger, fry for 1min
  2. Add in chicken and just enough broth to cover. Add in salt and soya sauce
  3. Bring to boil and reduce to low, cover and let simmer for an hour
  4. Take out chicken breast and shred
  5. Prepare rice in a plate or bowl, arrange shredded chicken on top and pour gravy
  6. Serve with pickled daikon and cilantro (I had my blanched greens instead)

Easy to prepare and delicious! I like :)


I am submitting this post to Asian Food Fest – Taiwan hosted by Alan from Travelling Foodies

Friday, August 22, 2014

AFF Taiwan - Braised Pork On Rice (滷肉飯 Lor Bak Png)

One Taiwanese dish I ate ages ago whenever I was in Taipei during my singlehood
Now is the time for me to experience cooking it myself :)


My family enjoyed this dish. Since we do not fancy fatty meat, I mixed pork belly with lean meat. In fact, 75% of the meat was lean meat
Since lean meat takes longer time to soften, I braised for longer period of time
Even though I diced them real small, it still took a little longer than an hour to get the softness I want. This was in fact a good step in giving maximum flavour to the dish
Very tasty, fragrant, juicy and full of flavour. Yum! :)


Source: Doris from Sumptuous Flavours
(with slight modification)

What you need:

400g lean pork
100g pork belly
2 tbsp dried shrimp, soak til soft and coarsely chopped
20g brown rock sugar
1 star anise
1/4 tsp five spice powder
3 tbsp light soya sauce
2 tbsp dark soya sauce
5 cloves of garlic, minced
4 shallots, minced
6 eggs, hard boiled - shells removed
3 tbsp Shaoxing cooking wine
some cooked rice

Garnish: blanched xiaobai chai, Japanese pickled radish (too bad I couldn't find this on the day I cooked this dish, so I skipped this)

Method:
  1. Heat wok with a little oil (since mainly was lean meat). Add the pork cubes and fry until water has evaporated
  2. Add in the minced garlic and minced shallots. Continue to stir-fry until fragrant
  3. Add in dried shrimp. Stir. Add in water to cover the pork pieces. Add in shaoxing wine
  4. Add in rock sugar, soy sauce and dark soya sauce. Stir well
  5. Add in hard boiled eggs to the pork and gravy. Turn the eggs occasionally so they're browned evenly
  6. Simmer for about 20 mins. Add in star anise and five spice powder and continue simmer for another 45 mins (add water whenever necessary)
  7. Adjust taste, give a good stir, let it boil and off the heat
  8. Serve with hot cooked rice, blanched vegetables and pickled radish


I am submitting this post to Asian Food Fest – Taiwan hosted by Alan from Travelling Foodies

Thursday, August 21, 2014

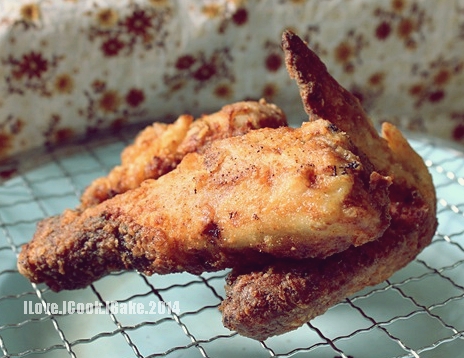
Buttermilk Fried Chicken (Gordon Ramsay)

A very simple and delicious chicken dish, fried chicken. One of the most loved by kids kind of food. Of course, adult too :)


This fried chicken is so tasty. So crispy on the outside and succulent on the inside, the meat is so yummy and soft & juicy. No need to worry that you will get hard and tasteless meat in it, thanks to the overnight marinade. Finger licking good!


What you need:
 
4 pieces each of free range chicken drumsticks and thighs (I used 1 whole free range chicken, cut in parts)
500ml buttermilk
flavourless oil for deep frying (I used canola)
300g plain flour (I used whole wheat flour)
1-2 tsp smoked paprika (I used two good pinch of paprika powder)
1/2 tsp garlic powder (I used 1 1/2 tsp)
1-2 tsp cayenne pepper (I skipped)
salt and black pepper
 
Method:
  1. In a container, pour buttermilk and add a good pinch of salt, stir
  2. Add in chicken pieces and cover. Let sit in the fridge overnight
  3. The next day, take out the marinated chicken from the fridge and bring back to room temperature before cooking
  4. Heat oil for deep frying
  5. Combine flour, paprika, garlic powder, salt and pepper. Stir well. Remove the chicken pieces from the buttermilk, shaking off any excess, then dip in the flour, making sure all sides are coated
  6. Deep fry coated chicken til golden brown both sides. Drain on kitchen paper and serve warm
 
I cooked baked buttermilk fried chicken before and it was just as good. You may view it HERE. I guess this Gordon Ramsay's version is also possible to bake. Should try next time, since it's healthier option :)


This post is linked to Cook like a Star organised by Zoe from Bake for Happy Kids, Yen from Eat Your Heart Out and Mich from Piece of Cake
 
 
Also this post is linked to the event Little Thumbs Up (August 2014 Event: Flour) - organised by Zoe (Bake for Happy Kids) and Mui Mui (My Little Favourite DIY) and hosted by Diana from Domestic Goddess Wannabe


Friday, August 15, 2014

Bake Along #66 Affordable Lasagna (Kerryann Dunlop)

Kerryann Dunlop is one of Jamie Oliver's student and has been helping out at the Ministry of Food. I love her videos in You Tube. Mostly are commonly known food but she successfully made them special in a simple way. Not to mention they all look so appetizing :)

I have a few to try, starting from this simple to make and yummy lasagna
The simple ingredients used explain the name of this dish, and it's easy to make, too


Yummy, tasty, cheesy lasagne. You see the cut at the other end? It's me so eager to try I forgot that I haven't taken a picture LOL


Come eat me now! :)


Recipe is from HERE but I added parmesan and mozzarella cheese :)

What you need:

500g minced beef (I used chicken)
6 dried lasagna sheets (I didn't count how many I used but I think it's 8)
about 10g butter
2 tbsp plain flour
500ml semi skimmed milk (I used fresh regular milk)
one whole nutmeg (I used a big pinch of ground nutmeg)
fresh basil (I used dried)
homemade pasta sauce (I used store bought bottled pasta sauce)
20g grated cheddar cheese (I didn't measure the quantity of cheddar cheese I used)
grated parmesan cheese (same quantity as cheddar) (I added)
grated mozzarella cheese (I added)
salt, sugar and pepper

Method:
  1. Preheat oven to 180degC
  2. To make the ragu sauce: Place pasta sauce in a saucepan over low heat. On a hot large frying pan, pour in minced chicken, breaking lumps with a spoon. Let it cook over medium high heat for about 5 mins. Transfer to the pasta sauce using slotted spoon. Mix together and let cook over low heat for 10mins, stirring occasionally (here I added some dried basil and grated cheddar cheese, season with a little salt and sugar). Set aside
  3. To make the béchamel (white sauce), melt butter over medium heat. Add in flour and cook for 1-2mins to make a paste (roux) This will ensure the sauce is smooth and won't taste flourish. Whisk in milk gradually and cook for about 5mins til the sauce is smooth. Whisk in more milk if the sauce is too thick. Remove from heat and season with salt and pepper, also nutmeg, stir well
  4. Place lasagna dish (I used 9"x1'3" baking dish). Start layering with the ragu sauce, then drizzle a good spoonful of béchamel, top with lasagna sheets (2 sheets laid next to each other). Repeat for another 2 times, finish with lots of béchamel sauce on top. Top with grated cheddar, parmesan and lastly, mozzarella cheese (I didn't put fresh basil on top)
  5. Place in the oven and bake for 30-40mins until golden brown on top and slightly bubbling. Remove from heat and let it stand for 10mins before serving
  6. Serve with grated parmesan cheese and tabasco sauce


This post is for Bake Along, an event organised by Joyce from Kitchen FlavoursLena from Frozen Wings and Zoe from Bake For Happy Kids

Wednesday, August 13, 2014

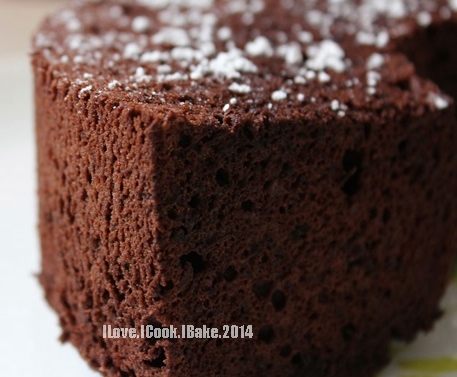
THB #38 Chocolate Angel Cake

When a cake name starts with the word "Chocolate", I don't really bother to read the rest of the name. I am already convinced that I have to give it a try. Sometimes it can be as soon as the next day, sometimes can wait for pretty long since my chocolate to do list is the longest among all LOL

So, need to say no more, I immediately baked this cake, especially knowing this has a deadline :)
This is the 38th bake for The Home Bakers, a baking event initiated by Joyce from Kitchen Flavours

Angel cake, a typically soft and fluffy cake tend to have dry texture using only egg whites. Like many others, I do not really fancy dry cake, but this recipe is different. The texture of this cake is moist, chocolaty and at the same time is soft and fluffy. I really enjoyed eating this cake, so was my family :)


Ah, look at the holes. I did tapped the pan before putting it into the oven, yet I still saw many holes


Recipe was chosen by Zoe from Bake for Happy Kids - great choice! :)
I made full recipe, used 420g of egg whites (I calculated 30g egg white for an egg), Valrhona cocoa powder
Unlike others who reduced the quantity of sugar, I didn't, but I used all brown sugar, and I found the sweetness was just right to my liking, not too sweet
Used ungreased 25cm chiffon tin and baked for 40minutes


My bake for The Home Bakers - bake no. 38
 
 
This post is linked to the event Little Thumbs Up (August 2014 Event: Flour) - organised by Zoe (Bake for Happy Kids) and Mui Mui (My Little Favourite DIY) and hosted by Diana from Domestic Goddess Wannabe


Thursday, August 7, 2014

Fudgy Nutella Cheese Chocolate Cake 4 My Sis Bday

I'm drooling just by reading the name of the cake. Who can resist a combination of chocolate, nutella and cream cheese? This is the chosen cake I made for my sis' bday last June - one Nutella big fan :)
Sorry sis, such a super late post, more than 2 months late LOL

Recipe is from Tidy Mom - Nutella Gooey Butter Cake
She used Duncan Hines Dark Chocolate Fudge Cake Mix for the chocolate cake base
I wanted to bake my own chocolate cake but due to me being lazy time limit (I only had time to bake on Saturday evening), I opted for Betty Crockers Super Moist Chocolate Fudge Cake Mix instead


This cake is delicious! Moist, soft, and I like how the sweetness from the cake blends with the cheesiness from the topping Very dangerous, because you just can not stop at one huge slice. You will want to have the second slice - also huge LOL
 
Well, actually mine was not so fudgy, let alone gooey
If you see the picture in Tidy Mom, it looks so different from mine. Hers is shorter, definitely looks more moist, fudgy and gooey. Looks very much like brownies. I am not sure why she named it butter cake :)
Why my cake is different? Reason being, I didn't do the cake as per instructed. I blindly followed the instruction in the cake mix box. When I was done, then I realized that the original recipe of this cake didn't do so, in purpose!
Anyway, what's done is done. I still ended up with yummy cake :)
We enjoyed it so much and so reluctantly stopped eating it LOL
 
 
Okay, here is the recipe...
 
What you need:
 
1 box (15.25 oz) Betty Crockers Super Moist Chocolate Fudge Cake Mix (this is smaller in size than Duncan Hines Dark Chocolate Fudge (18.25 oz))
1 egg
100g butter, melted (original recipe: 1/2 cup. I would need to reduce the butter amount because of the smaller size of the cake mix)
(Note: if you use Duncan Hines, please use extra large egg and 1/2 cup butter)
 
For topping:
8 oz cream cheese, softened
2 large eggs, beaten
1 cup Nutella
1 tsp vanilla
2 cups icing sugar (I reduced A LOT to 1/4 cup)
 
Method:
  1. Preheat oven to 160degC. Grease 13x9" pan
  2. Using an electric mixer, combine cake mix, 1 egg and melted butter until well incorporated. Press into bottom of greased pan with fingers
  3. Topping: Using an electric mixer, blend cream cheese, eggs, nutella and vanilla. Then slowly add icing sugar and beat until smooth
  4. Spread filling over cake batter, and bake for 40-45 minutes, or until edges are brown. (Do not overbake, the center should be a little gooey)
  5. Remove from oven and let cool completely. Spread the top with Nutella (original recipe dusted with icing sugar - you may adjust according to your liking. I don't want the sweetness to be too overwhelming I can't taste the cheese at all)


I still want to bake this cake again in the future following the correct instruction (as written above). Just to satisfy my curiosity and also my need of indulging myself sinking my teeth in the oh so gooey cake :)

Saturday, August 2, 2014

Bake Along #65 Chocolate Zucchini Bundt Cake

Good to know that there's some goodness in this chocolate cake, zucchini! And it's even better that nobody can trace that. Chocolate can be less fattening! :)


This cake is soft and moist, the sweetness is just how I like it, chocolaty and very yummy, but I found it's really crumbly. I wasn't too sure if it's supposed to be crumbly or I did something wrong. Anyway, we all enjoyed it still :)
 
I made 2/3 recipe and I still got a pretty huge bundt cake
Ah, talking about bundt. I used my bundt pan but it's a disaster when I unmoulded it
I didn't know why since I followed exactly while I prepared the pan
Look at this:


It's a big turn off, especially when it's so unexpected. Anyhow, I just forgot about this, sliced them as soon as it's cool and enjoyed it :)
 
Recipe is from HERE
 
Below is 2/3 of the full recipe:
 
31g unsweetened cocoa powder
75g sour cream (I used low fat plain yoghurt)
2 large eggs
1 1/2 tsp vanilla extract
250g plain flour (I used whole wheat pastry flour)
1 2/3 tsp baking powder
1 tsp baking soda
2/3 tsp salt
1 1/2 tsp instant espresso powder
113g butter, softened
2/3 cup sugar (I omitted)
175g light brown sugar
1 1/3 cup coarse shredded zucchini, squeeze out excess liquid
2/3 cup semi sweet chocolate chips
2/3 cup sliced almonds (I omitted)
 
Method:
  1. Preheat oven to 180degC. Grease bundt pan and dust with unsweetened cocoa powder
  2. Whisk together plain yoghurt, eggs and vanilla in a large cup. Whisk together flour, cocoa powder, baking powder, baking soda, salt, espresso powder in a medium bowl
  3. Combine butter and sugar in a large mixing bowl and cream with electric mixer on medium high speed til fluffy
  4. Reduce speed to low, and add in 1/3 of the flour mixture and beat til well mixed. Add 1/2 of the yoghurt mixture. Repeat, alternating flour and yoghurt mixtures and ending with the flour mixture. Stir in zucchini and chocolate chips
  5. Pour batter into the prepared pan and bake til about 45mins, til skewer comes out clean
  6. Let cool in the pan for 10mins, and invert it onto a wire rack to cool completely (this is where my disaster was)


This post is linked to the event Little Thumbs Up (August 2014 Event: Flour) - organised by Zoe (Bake for Happy Kids) and Mui Mui (My Little Favourite DIY) and hosted by Diana from Domestic Goddess Wannabe