Pages

Thursday, July 31, 2014

Homemade Hash Browns (Laura Vitale)

These hash browns don't look like the typical type we usually find in frozen section at the supermarkets or in Mac Donalds
But taste wise, this is just as good! And it's even better - it's homemade! No unknown ingredients in it :)
It's tasty and crispy. Very addictive!
This is so good not only for breakfast, but also as a snack :)

Recipe is from Laura Vitale. I always love watching her cooking videos. She always makes me hungry LOL


What you need:
 
1 large potato, peeled and grated
1 tbsp plain flour
2 tbsp grated onion (I sliced and grinded it)
1 egg white
a small pinch of salt, a dash of black pepper, vegetable oil
 
Method:
  1. Fill a bowl with cold water. Place potatoes immediately in it after grating, let sit in the water for 10 mins
  2. Remove potatoes from water using potato ricer. Add a little bit of potatoes at a time and squeeze all the excess liquid. Place them on a kitchen towel to dry them a bit more
  3. Add the potatoes into a large bowl and add in flour, onion, egg, salt and pepper - mix together till well combined
  4. Heat oil on a non stick pan over medium high heat (just a few tbsp - just enough to cover the bottom)
  5. Scoop about 1/3 of the mixture onto the hot pan, flatten as much as possible (to maximise crispiness)
  6. Cook about 5mins until it's really browned and crispy
  7. If the potatoes get dark sooner, reduce the heat


This post is linked to the event Little Thumbs Up (July 2014 Event: Potato) - organised by Zoe (Bake for Happy Kids) and Mui Mui (My Little Favourite DIY) and hosted by Jasline (Foodie Baker)

AFF Philippines - Chicken Adobo with Garlic Fried Rice (Singanag)

This chicken dish is one of the ever famous dish from Philippines I often heard. So this time, I give it a try
And I'm glad that it's very well received by the family :)
The chicken is so tasty, tangy, garlicky, sweet at the same time. Finger licking good!
I served the dish with garlic fried rice. The recipe mentioned that it's cooked Pinoy style but I found it just like any other garlic fried rice. It's nice, fragrant and tasty :)
These 2 dishes are great together :)


Recipe is adapted from Peng's Kitchen & Kelly Siew Cooks

What you need:

900g chicken drumlettes
100ml vinegar
120ml water
120ml light soya sauce
2 tbsp sweet dark soya sauce (kecap manis)
8 cloves of garlic, unpeeled and lightly pounded
1 tsp whole peppercorn
4 bay leaves
cooking oil

Method:
  1. Clean and discard any skin and fat from the chicken
  2. Mix vinegar, water, soya sauce, dark sweet soya sauce, garlic, peppercorn and bay leaves
  3. Add in chicken and marinate the mixture overnight
  4. Just before serving, pan fry chicken and serve immediately

For the garlic fried rice...

Recipe is adapted from Bakericious

What you need:

3 cups cooked rice
10 cloves of garlic, finely minced
4 shallots, thinly sliced
salt, light soya sauce, fish sauce, pepper, cooking oil

Method:
  1. Heat oil in a wok. Sautee garlic and shallots til fragrant (I didn't cook til garlic browned and crisp because it usually will give a little bitter after taste and my kids dislike that)
  2. Add in rice, followed by seasonings and stir to all ingredients are evenly mixed


I am submitting this post to Asian Food Fest – Philippines hosted by The Sweet Spot

Wednesday, July 30, 2014

AFF Philippines - Abokado At Condensada

This dessert is apparently loved by Pinoy
It uses the same ingredients as Indonesian's avocado juice - avocado and sweet condensed milk, it's only that Indonesians use chocolate sweet condensed milk (which I can never find in Singapore)
The difference here is that for this dessert, the avocado is in chunks

Inspiration is from Hi Cookery & Overseas Pinoy Cooking


This is the basic typical avocado with condensed milk dessert:


No recipe for this. It's only cut avocado drizzled with sweet condensed milk. Original recipe uses so much of the sweet milk that it's like soaking the avocado. I just couldn't do it, it's just way too sweet for me, so I just drizzled a little bit over the cut avocado
 
After making banana-que and kamote-que, and then this dessert, I find that Pinoy really has sweet tooth! :)
 
Now, there are some variations in serving this dessert. Some add chocolate cream. Others serve this as a smoothie by blending it with ice cubes and fresh milk
So, I had mine too! :)
 
Cut avocado


Pour a little sweet condensed milk


Pour fresh milk (I used reduced sugar soya milk)


Stir stir stir...


Pour a little chocolate sauce


Stir again and voila!


This is yummy but then again, as I mentioned before, it's really too sweet! :)
 
I am submitting this post to Asian Food Fest – Philippines hosted by The Sweet Spot

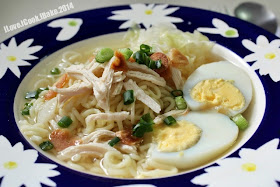
AFF Philippines - Mami Chicken Noodle Soup

For the past two days, Singapore weather has been better with showers
I think it's about time after it's been super hot and humid for many days

It's the best to have something soupy during rainy days, isn't it?
Hence, this soup I cooked. It's simple, tasty and delicious. We all love it :)


Recipe is from HERE

What you need:
(with some modification)

For the soup base:
chicken carcass and 300g skinless chicken breast
7 cloves of garlic, peeled & lightly pounded
1 yellow onion, quartered
a bunch of spring onion, halved
water, salt, pepper, chicken stock powder

500g fresh egg noodles - cook as directed
some shredded cabbage
salt, pepper
fish sauce (patis)

For the garnish:
a bunch of spring onion, chopped
fried garlic
4 hard boiled eggs

Method:
  1. Prepare the broth by boiling the chicken in a large pot along with the onion, garlic, pepper and spring onion. Add water til it covers the chicken. Bring it to a boil, cover and simmer for an hour. Discard the floating froth
  2. Remove the chicken and shred after it's cool. Keep the broth warm in the pot until it is ready to be served
  3. Blanch the shredded cabbage in the soup just before serving
  4. In a wide single serving bowl, put the cooked noodles, blanched cabbage, and shredded chicken. Pour the hot broth in the bowl. Add salt and pepper to taste. Top it with the chopped spring onions, fried garlic and sliced boiled eggs. Drizzle with fish sauce if desired
Note:
  • I coated my cooked noodle with fish sauce & some garlic oil, so I didn't drizzle any fish sauce anymore into the soup
  • My kids love eating this soup with fried luncheon meat. I found it's a great idea :)


I am submitting this post to Asian Food Fest – Philippines hosted by The Sweet Spot

Tuesday, July 29, 2014

AFF Philippines - Banana-que & Kamote-que

Are you surprised when I tell you that I NEVER eat Philippines food AT ALL? Not even the snack, let alone the dishes! That is despite many remarks I got that I look like Philippino hahahaha...

So, I was pretty surprised when I saw many of their food is actually similar to Chinese or even Indonesian!
Now, I have a new category in my ever long to do list - Pinoy food! :)

Okay, let me start with the easiest street snacks
I first saw it in a site called Overseas Pinoy Cooking and I was eager to try
It's actually a simple deep fry banana and sweet potato cuts, coated with brown sugar
What makes it interesting is, the sugar coating was done during the frying instead of rolling the fried banana and/or sweet potato cuts in brown sugar

Sounds calorific? Well, most snacks do. But giving a try is always harmless, agree? We do not eat this everyday, anyway
It's in fact good to broaden our knowledge - in this case, food. And to know is not complete if we have not tried it ourselves, IMHO :)

So, here they are... banana-que & kamote-que (I discovered that some wrote it as 'que', some 'cue' - I'm not sure which one is correct, anybody can help?)


Recipe is from HERE (for banana-que) and HERE (for kamote-que)

What you need:
(half recipe below)

8 pcs ripe saba bananas / 250g sweet potato (kamote)
1/4 cup brown sugar, divided into two (one part for banana, the other is for sweet potato)
vegetable oil for deep frying
bamboo skewer

For banana-que:
  • Trim both ends of each banana and peel off skin
  • In a large wok at high flame heat cooking oil put all the bananas in the wok and deep fry for 3-5 mins or until colour change to golden brown
  • Sprinkle brown sugar over the bananas and continue to fry and stirring occasionally for 2-3 mins or until sugar has melted and have infused to the bananas
  • Do not overcook, remove bananas from wok and drain excess oil
  • Push bamboo skewer into each fried banana
For kamote-que:
  • Using a small knife remove skin of each sweet potato and slice crosswise about 1/2 inch thick
  • In a large wok at high flame heat cooking oil. Put the sliced sweet potato in the wok and deep fry for 8-10 mins or until color change to light brown (mine was less than 5 mins cos I sliced thinner)
  • Sprinkle brown sugar over the sweet potato and continue to fry and stirring occasionally for 3-5 mins or until sugar has melted and have infused to the sweet potato
  • Remove sweet potato from wok and drain excess oil
  • Using large bamboo skewer string 3 slices of sweet potato together (I didn't do this step)

If you notice, mine were not fully coated by brown sugar
Well, I just could not bear to add sugar that much I sprinkled less than half the amount stated. And actually, I found the sweetness was just right - suitable to my liking
It still gave me a crisp exterior from the brown sugar, but it couldn't last long. It turned soggy pretty fast, and when it's soggy, it's real oily! So the best is to consume right after frying

All in all, this is a yummy snack :)

I am submitting this post to Asian Food Fest – Philippines hosted by The Sweet Spot

Saturday, July 26, 2014

Super Fudge Brownies for Ian's 7th Birthday

This is a late post. Ian's birthday was last Sunday, 20th July
It's unfortunate that he fell sick on that very day. The plan to fulfil his birthday request (aside from presents!) had to be postponed

To share his cute requests: Ian - the car maniac, has asked to ride on London cab on his birthday. And to have lunch at Watami Japanese restaurant. Yes, he's one Japanese food lover
I found the first request is really cute I can't say no LOL
Now that he's much better, we'll do the belated plan on this coming weekend - which happens to be long weekend. Yeay! :)

One thing still done was to celebrate at home with his birthday cake - as usual, design requested by the birthday boy
This year, it was Minecraft! Gosh, this ever popular game, everything square
Until now I still can't see the fun of doing all that. Whenever he commented how cute the pig is, how nice the house is - I saw the screen and I saw nothing but colourful squares jumbled up together LOL

Anyway, request for birthday boy - who can say no?
So, I searched for Minecraft design and I found one which seemed like it's not so complicated. It's by Yoyomax

She had her own cake recipe to make which she claimed to be dense, not crumbly and yet yummy. Original recipe is from HERE She said it's perfect for cake sculpting. It's a simple recipe using cake mix
I was thinking to make the cake from the scratch. So I decided not to use her recipe but making super fudgy brownies. I assume it'd be sturdy enough for sculpting, too

Somehow, this brownies turned out not so fudgy, a little too dense - even though undoubtedly delicious and chocolaty. I'm pretty sure I have over baked it. Another downside was, it's really crumbly!
At the point when I did the sculpting, I regretted I didn't use Yoyomax's recipe
But I couldn't turn back the clock, so I just went ahead. Luckily, it's still doable :)


This cake design is not so difficult to follow. The only problem is to make sure every square is the same size. I had to do a lot of 'trimming' during the process :)


For the grass blocks, recipe for super fudge brownies, originally from Martha Stewart and seen at Doris' blog from Tested & Tasted as well as Ricke from Just Ordinary Kitchen

What you need:

120g unsalted butter
225g semi sweet chocolate chips / melt (I used 70% dark chocolate)
200g castor sugar (original recipe: 280g)
3 large eggs
1 tsp vanilla extract
130g plain flour
30g cocoa powder
1/2 tsp baking powder
1/2 tsp salt
50g semi sweet chocolate chips

Method:
  1. Using double boil method, melt butter and chocolate, stir til melted and well mixed
  2. Add in sugar, stir for awhile and remove from fire. Set aside
  3. Preheat oven to 180degC
  4. Add eggs and vanilla, stir to mix
  5. Add in sifted flour, cocoa powder, baking powder, salt, and chocolate chips, mix until just moistened (do not overmix)
  6. Transfer batter to greased or lined 20cm square pan, smooth the top
  7. Bake til cooked when there are moist crumbs on the skewer (mine was baked for 45mins and I think it's still overbaked - there were only little dry crumbs on the skewer, original recipe is 50mins)
  8. Let cool in the pan for 30mins before unmoulding

Just to share the recipe recommended by yoyomax for cake sculpting (this will be my reference also if the next time I decide to bake this cake)

What you need:

1 chocolate cake mix (I used Betty Crocker Super Food Devil's food chocolate cake mix)
1 package Jell-o chocolate pudding mix (113g - 4 serving size)
4 egg whites
1/2 cup water
1/3 cup plus two tablespoons vegetable oil
1 cup sour cream

Method:
  1. Put all the ingredients in a large bowl and mix using electric mixer on low until combined and then on medium/high for two minutes more.  Scrape the sides and the bottom of the bowl to make sure all ingredients get incorporated. Batter will be very thick
  2. Pour batter into a well greased 9x13 inch pan (or whatever size pan you need to get the thickness of blocks you need)
  3. Bake in a preheated oven at 180degC for 25-30 minutes until a toothpick inserted in the center comes out clean (or with only a few moist crumbs and the center springs back slightly when pressed)
  4. Let cool in pan for a few minutes and then turn out onto cooling rack


The recipe for water blocks:
(I made only 1/4 recipe)

4 85g packages of jell-o (blue) and that made enough for about 8- 2x2" blocks of "water"
Don't follow package directions, only mix one cup of boiling water for each package of jell-o (instead of 2). Better to put the jell-o into a deep container (like a loaf pan) to make sure that your block are big enough


For the sand blocks, below is the recipe. Make sure you make it thick enough to get the size block you need
 
What you need:
  1. 6 cups rice krispies cereal
  2. 40 large marshmallows
  3. 3 tbsp butter
Method:
  1. Melt butter and marshmallows in a large pot on low heat
  2. Once melted, add the cereal and stir until coated
  3. Press mixture into a greased pan

For buttercream, I just followed her recipe but I reduced the sugar used

What you need:
(1 batch frosts a 2-layer, 13 x 9-inch cake or about 2 doz cupcakes)
  1. 2/3 cup butter -- softened
  2. 4 cups powdered sugar (mine was 2 cups and it's still a tad too sweet for me)
  3. 1 tsp vanilla
  4. 4 tbsp cream or milk
Method:
  1. In a bowl, beat butter until light and fluffy. Gradually add powdered sugar, beating well
  2. Beat in vanilla and enough cream or milk until desired spreading consistency. Beat the mixture for at least 5mins and it should lighten in colour and get very light and fluffy
  3. Tint the frosting using green paste food colour

For the cake arrangement, I followed how yoyomax did
I 'glued' the grass blocks using buttercream instead of skewer
Paper figurine was done by DH, it's not easy to fold and glue those tiny papercuts
The characters chosen by Ian. It took us more than 2 hours to finish!
(and it's only put to use for less than 15 minutes LOL)


As usual, efforts is nothing but worth it when it comes to make birthday cake. The happy smile and thrilled scream heard, and it's paid off :)
 
 
HAPPY 7TH BIRTHDAY TO MY IAN *LOTS OF LOVE, HUGS & KISSES*
(so difficult to make him smile whenever taking picture, he always likes to act cool LOL)


Friday, July 18, 2014

Bake Along #64 Pandan Chiffon Cake (Cooked Dough / Tang Mian Method)

Can you believe it, this is only my third time baking chiffon cake? It's true
The first one was a total disaster I didn't even bother to take a picture. The second one was a success, you may view it HERE
And this time, I baked the same kind of cake, pandan chiffon cake, but using different method

I heard about this, but somehow forgotten about it until Zoe from Bake for Happy Kids posted hers. Reading her very positive feedback, I knew I must try!
And boy, what a decision! This cake is really really good!
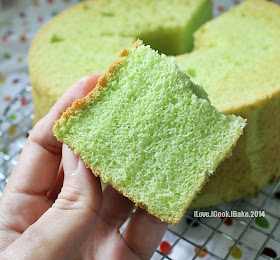
It has the softness and fluffiness of chiffon cake, but at the same time moist (this is important as I dislike dry cake) and oh so flavourful! The sweetness is just nice to my liking and I love the color, too. Love love this! :)

One thing I regret is, I forgot to tap the pan before putting it in the oven. You can see some holes here and there :(


Soft like pillow :)


I still can't unmould chiffon cake properly. It lacks of the brown 'skin' all around...


Other than that, this cake is a winner. A keeper recipe I must say!

Here's the recipe using 21cm chiffon pan
(original recipe is for 15cm pan => HERE)

What you need:

75g butter
70g plain flour with a pinch of salt, sifted
70g coconut milk
7 pandan leaves (wash and cut) + 1/4 tsp pandan paste
5 egg yolks
5 egg whites
90g caster sugar

Method:
  1. Melt butter in a pot over medium low heat. Remove from heat. Add in sifted flour & salt mixture, mix till smooth. Return pot to the heat and cook til slightly bubbles. Off the heat and leave to cool completely
  2. Using blender, process cut pandan leaves with pandan paste and coconut milk
  3. Squeeze out the pandan juice over a strainer to make a total volume of 70ml
  4. Add in pandan mixture and egg yolk to the cooled butter mixture, mix well
  5. Beat egg whites til foamy, add in sugar gradually and keep beating til stiff peak
  6. Add in 1/3 of the egg white batter into the egg yolk mixture, mix well
  7. Fold in the remaining egg white batter til just incorporated, do not overmix
  8. Pour batter into ungreased 21cm chiffon pan and tap the pan to release big air bubbles
  9. Bake in preheated oven of 160degC for 50minutes until cooked
  10. Invert to cool down completely before unmoulding


This post is for Bake Along, an event organised by Joyce from Kitchen FlavoursLena from Frozen Wings and Zoe from Bake For Happy Kids where the theme this time is Chiffon Cake


You have to see those fab bakers with their wonderful chiffon cakes. My chiffon cake to do list is getting longer after seeing them :)
 

Thursday, July 17, 2014

Potato Cheese Meatless Bitterballen

I always buy potatoes in supermarket where it always comes in big bags
As a result, I always have leftover
This is one snack you should try if you feel like indulging in something savoury
This Dutch inspired snack is pretty addictive. This is a modified version by using potato. I made before using bread as one of the ingredient and it's real good. The original version only uses plain flour - I shall try also :)


What you need:
(recipe source: Sajian Sedap)
 
2 tbsp butter
50g plain flour
250ml fresh milk
300g potatoes - steamed, peeled and mashed (weight after mashed)
50g finely grated cheddar cheese
3/4 tsp salt
1/2 tsp pepper
1/2 tsp nutmeg powder, a little sugar
For coating: egg white , breadcrumbs
 
Method:
  1. Heat butter and add in flour. Mix til lumpy
  2. Gradually add in milk, stir continuously til smooth. Remove from heat
  3. Add in potato salt, pepper, nutmeg, cheese
  4. Shape into balls - size according to preference, mine was about 3cm diameter
  5. Roll balls into breadcrumbs, dip into beaten egg, and roll again into breadcrumbs til well coated
  6. Deep fry in a wok with hot oil til evenly golden brown
  7. Drain and after about 10 minutes, transfer to a plate lined with kitchen towel
  8. Serve hot. Best eaten with bottled chilli sauce

This post is linked to the event Little Thumbs Up (July 2014 Event: Potato) - organised by Zoe (Bake for Happy Kids) and Mui Mui (My Little Favourite DIY) and hosted by Jasline (Foodie Baker)
 

Sunday, July 13, 2014

THB #33 Holiday Cranberry Nut Rum Cake

One more late post for The Home Bakers (THB)
It's bake no.33 chosen by Diana from Domestic Goddess Wannabe


She mentioned this cake as 'to die for'
To me, this cake resembles Christmas fruit cake which I am not a fan of
What's good is, this is the better version! I, the 'not into fruit cake in Christmas' person, did enjoy eating this cake! :)


I didn't have bourbon or whisky in stock, so I just used dark rum. And I used toasted walnuts instead of pecan. I mixed golden raisins and chopped dates, soaked them in rum before use. And for cranberries, I used frozen
 
For full original recipe, please view HERE


My bake for The Home Bakers hosted by Joyce from Kitchen Flavours - bake no. 33


Thursday, July 10, 2014

THB #32 Raspberry Almond Coffee Cake

Many thanks to Joyce from Kitchen Flavour, the host of The Home Baker
She gave me permission to link my super late bakes
It's supposed to be done in March and I did this cake somewhere early June and I just posted today! I must fight this "blogging blue" that has been dragging too long! :)


This cake was chosen by Angela from the Charmed Cupcake
Simple to make, yet so yummy. My kind of cake :)
Soft, moist, sweetness mixed with the tang from the raspberry and the bonus crunch from the almond. So perfect with a cuppa!


I baked half recipe with 10x20cm rectangle pan. Didn't do any change to the measurement of the ingredients this time. Just perfect :)
Please view HERE for the full recipe

My bake for The Home Bakers - bake no. 32