Pages

Thursday, January 31, 2013

Chocolate Cheese Lapis Legit Rolled Cake

I made lapis roll before, at that time I just did the original kind. You may view it HERE
This time I did it a little differently, a twist I made from this well known Indonesian kue lapis (we Indonesians call it "lapis legit")


These ugly looking rolled cake slices  can't be judged by their look
The chocolate taste and the crunch from the grated cheese are so perfectly blended together
It has a really soft, moist and really rich texture, just like how normally kue lapis is
As you know, kue lapis is notorious for the amount of egg yolks used, just like the lapis surabaya cake I made the other day


Recipe is from Rima's site
She made pandan and prune version while I did chocolate and cheese :)

What you need:

150g cold good quality butter
1 tbsp sweet condensed milk
12 egg yolks
100g caster sugar
10g hongkong flour
1 tbsp milk powder
1/2 tbsp spekoek powder (I used cocoa powder)
1 tsp pandan paste (I used 2 tsp chocolate paste)
enough finely grated cheddar cheese
enough chocolate rice

Method:
  1. Preheat oven to 170degC
  2. Grease a 20cm square pan and line with baking paper
  3. Beat butter til smooth and white, add in condensed milk and beat well. Set aside
  4. In another bowl, beat egg yolks and sugar til white and fluffy
  5. In low speed, add in sieved hongkong flour and milk powder, also cocoa powder
  6. Lastly, add in chocolate paste
  7. Fold in butter mixture into the egg mixture
  8. Divide batter into 5 parts
  9. Pour the first batter and bake for 7 mins using top and bottom heat
  10. Take out from oven, change the oven heat to top heat only
  11. Sprinkle chocolate rice and grated cheese
  12. Pour the second batter and bake (top heat only) til browned (around 3-5 minutes depending on the oven)
  13. Do the same for the remaining layers
  14. Before baking the last layer, switch back the oven to top and bottom heat
  15. Sprinkle only cheese on top of the last layer and bake top and bottom heat for 7 minutes or til cooked
  16. Take out from the oven and let cool in the pan for 5 minutes
  17. Take out the cake from the pan (with the baking paper) and transfer to another baking paper
  18. Let cool slightly and spread a thin layer of butter, and then roll like how you do when rolling a swissroll
  19. Keep it tightly wrapped in the baking paper for around 30 minutes before cutting it

Another delicious alternative to make this cake for Chinese New Year, especially for those don't really fancy spekoek taste

I'm submitting this post to:

* Aspiring Bakers #27: Through Thick and Thin – Kue Lapis Classics hosted by Sam of Sweet Samsations
* Chinese New year Delights 2013 hosted by Sonia aka Nasi Lemak Lover

Monday, January 28, 2013

Orange Lapis Surabaya Cake (Spiku)

Coming to Chinese New Year, the type of cake usually comes into the mind of those celebrating is the Indonesian thousand layers cake (Kue Lapis Legit)
In Singapore, Kue Lapis Legit is so easily spotted in many bakeries during Lunar New Year time
But do you know that there's another type of Indonesian layered cake? It's as famous and in fact is a must too in every household of Indonesian Chinese families during the fifteen days of celebration. It's readily available in most bakeries, too

It's called Lapis Surabaya (Spiku)
Unlike the uncountable thin layers Kue Lapis Legit, Lapis Surabaya has only three layers typically
Those who dislike the fragrant and/or taste of spekkoek which is very distinct in Kue Lapis Legit, Lapis Surabaya would be the better choice
I personally prefer the latter, if I can choose, even though basically I love both :P
Firstly, the procedure to make Lapis Surabaya isn't as tedious. Secondly, I LOVE the taste and texture!

Both cakes are so notorious in the amount of egg yolks used
The good quality of this cake needs great quality of butter, too
Those two ingredients explain how many slices you can take in a day, to maintain your waistline, and most importantly, your cholesterol level!
I restrict myself in making and eating these cakes only during this time of the year, Chinese New Year time :)
Strangely, as much as I love them, the craving hits me only when the time comes, thank God :)

Oh well, it's the time to make one now. The craving is here and it's even more after I saw Nina made one and posted in her blog
I knew I must try it!
So, here it is....


Such a fine cake, I must say
The texture is unbelievably soft and moist. It tasted so delicious, with a hint of orange and chocolate and additional touch of berries jam melted together in every bite. Heaven!


A closer look on the fabulous texture of this cake
It's not the same as those soft cottonny chiffon cakes, it's different, a good different :)

You can see the glossy strawberries jam I used to glue each layer. I used my homemade strawberries jam (recipe is the same as my homemade plum jam, just replace plum with strawberries and adjust the sugar used accordingly)


I don't really favor lapis Surabaya with buttercream filling, hence the choice of this sweet tangy jam
The original recipe used marmalade, but I didn't use that sice I didn't want to make the orange flavour in this cake to be too overpowering

 
A slice of pure bliss! :)


What you need:
(below is half recipe I made with a slight modification)

Orange layers (makes two):
10 egg yolks (I used medium size)
70g caster sugar
35g plain flour
8g corn flour
8g full cream milk powder
125g butter
1 tbsp freshly squeezed orange juice
1/2 tsp orange zest
1 tbsp sweet condensed milk
1/2 tsp orange essence (optional)

Chocolate layer (makes one):
5 egg yolks
50g caster sugar
15g plain flour
10g cocoa powder
65g butter
1/2 tbsp sweet condensed milk
1 tsp chocolate paste

Filling:
strawberries jam

Method:

Grease pan (10x20cm pan for chocolate layer, and 20x20cm pan for orange layer) , line and grease again. Set aside

To make the orange layers:
  1. Beat butter til smooth. Add in orange juice and sweet condensed milk, beat well. Add in orange zest, mix well
  2. Beat egg yolks and caster sugar til tibbon stage
  3. Fold in sieved plain flour, milk powder and corn flour
  4. Pour egg yolk mixture into the butter mixture, gently mix with spatula til well incorporated
  5. Pour into 20x20cm pan, and bake in preheated oven of 180degC for 18 minutes til cooked (when the skewer comes out clean)
Do the same for the chocolate layer using 10x20cm pan

To assembly:

When the cakes are cooled, slice orange cake into half, place one orange layer and spread the top with jam, top with chocolate layer
Spread the top of chocolate layer with jam, top with the other orange layer
Cut and serve


 So irresistable!


I'm submitting this post to:

* Aspiring Bakers #27: Through Thick and Thin – Kue Lapis Classics hosted by Sam of Sweet Samsations
* Chinese New year Delights 2013 hosted by Sonia aka Nasi Lemak Lover

Saturday, January 26, 2013

Negeri Sembilan MFF - Fried Fish With Chillies


This dish was gone in minutes during dinner time :)
The fish was so delicious and with the chillies, it's just perfect
But the star was the chillies! It's so tasty and after some adjustment, the spiciness was just nice for me to endure enjoy :)


Recipe is from Wendy's site

What you need:

1 medium tilapia (I used black tilapia), cleaned and scored
1 tsp turmeric powder
1/2 tsp salt

1pc asam gelugor
1/2 cup oil (I used less than 1/4 cup)
salt

Blend together:
1 red onion
3 red chillies (I used 5 large red chillies)
10 bird's eye chillies (I used 7 red bird's eye chillies)
1 inch ginger
4 garlic

Method:
  1. Marinate fish with turmeric powder and salt for about an hour
  2. Heat oil and fry fish on both sides til golden and crisp
  3. Remove fish from pan
  4. Sautee the chilli paste with the remaining oil and asam til fragrant and glossy. Season with salt
  5. Smear the paste on both sides of the fish. Serve immediately

The next time I cook this dish again I will double the chilli paste
It's so good I can eat it just with plain rice! :)

I'm submitting this post to Malaysia Food Fest, Negeri Sembilan month hosted by Hody of Cook 4 you & me

Thursday, January 24, 2013

Famous Amos Double Chocolate Chips Cookies Copycat

It's time of the year when my mind is filled with cookies. What about you?
Let me start with what I have been craving the most (among many more LOL) - chocolate chips cookies

I am a chewy cookies follower, but strangely I've been having a craving for crunchy chocolate chips cookies
What could be better than a recipe which can give result close to the famous cookies by Mr Amos? :)

So, I searched for the recipe, found and bookmarked some
The first recipe I decided to try was from Cooking Crave
And yes, it didn't disappoint me at all
Tasty and crunchy. I kept them in an airtight container and they were still crunchy a few days later til the last piece was taken :)

These cookies of mine were fat cookies
I used 1 tbsp for each drop cookie, I guess 1 heaped tsp would be the best size :)


What you need:
 
150g butter
100g sugar
30g brown sugar
1 egg
220g plain flour
50g corn flour
1 tsp vanilla essence
1 tsp baking soda
1/2 tsp salt
100g walnut (I didn't use)
50g chocolate chips (I used 150g since I omitted the walnut)
30g cocoa powder
 
Method:
  1. Sieve flour, corn flour, cocoa powder and baking soda together, set aside
  2. Cream butter with sugar and brown sugar til creamy
  3. Add in egg and mix well
  4. Add in salt and vanilla essence
  5. Fold in the sieved flour til it forms dough and mix in the walnut (if used) and chocolate chips
  6. Spoon and drop the dough (1 heaped tsp will be the best size for me) onto a lined baking pan
  7. Bake in preheat oven at 180degC for 20 minutes


Tuesday, January 22, 2013

Seremban Hakka Mee

Such a simple dish to prepare yet so yummy
My family loved this dish to the bit!


Recipe source: Kelly Siew Cooks
 
What you need:
 
2 pcs Cintan brand flat noodles (so happy to be able to find this noodles in NTUC, it's really good!)
3 pcs shitake mushroom, sliced
100g minced pork
3 garlic, minced
1 tbsp cooking oil
1 tbsp fish sauce
1 tsp light soya sauce
1/2 tsp chicken stock
approximately 150 ml water
a few drops of sesame oil
2 spring onion, chopped
pickled green chillis (I used store bought)
 
Method:
  1. Boil a pot of water, add a few drops of sesame oil, cook noodles for 3 minutes or til al dente. Drain on a colander and pour cold water over it
  2. Heat oil (both types), fry garlic til fragrant
  3. Add in minced pork, stir til changed color and then add in mushrooms
  4. Add in water, fish sauce, chicken stock, soya sauce and simmer for 10 minutes
  5. (add water if necessary)
  6. Top noodles with minced pork and gravy and spring onion
  7. Eat with pickled green chillis
 
I'm submitting this post to Malaysia Food Fest, Negeri Sembilan month hosted by Hody of Cook 4 you & me

Friday, January 18, 2013

Bake Along #38 - Cold Oven Cream Cheese & Chocolate Pound Cake

After missing out three bakes in a row for Bake Along, finally I managed to find time to bake these little cutie pies
Thanks to the hosts of Bake Along, the time for submission now is 10 days, that means a lot to me! :)

This little cakes were very well received by my family, including the kids
It's indeed really good, I like the taste, very fine texture and moist too
I added chocolate to attract my kids and it worked :)
I wanted to make marble effect but since I used mini moulds it's not so easy to do so
I did have a little extra batter, so I did three cupcakes with marbled effect and baked using Happy Call pan :)

The mini donuts...


The mini cupcakes...


And the standard size cupcakes, the remaining batter baked using Happy Call pan...
Tasted the same, but the texture was slightly different, a little chewy and the texture was not as fine as those baked using oven


Recipe is  from the book Cake Keeper Cakes by Lauren Chattman
I made half recipe, modified as follows...

What you need:

1 1/2 cup cake flour (minus 1 1/2 tbsp)
1 1/2 tbsp cocoa powder
3 /4 tsp baking powder
1/2 tsp salt
114g unsalted butter, softened
114g cream cheese, softened
3/4 (slightly heaped) cup caster sugar (original half recipe uses 1 1/4 cup which I think is too much)
3 large eggs
1/2 tbsp vanilla extract
Original half recipe uses 3/4 tbsp grated fresh ginger and 1/2 tbsp grated lemon zest but I skipped them

Method:
  1. Grease and flour 1 mini donut pan and 1 mini cupcakes pan
  2. Combine flour, baking powder and salt in a medium bowl
  3. Combine butter, cream cheese and sugar in a large bowl and beat til fluffy about 3 minutes
  4. Lower the speed to medium, add in eggs one at a time
  5. Add in vanilla, ginger and lemon zest (if used - I didn't use ginger and lemon zest, only vanilla)
  6. Reduce speed to low and add in the flour mixture, 1/2 cup each time
  7. Mix for 30 seconds on medium speed and off the mixer
  8. Take 1/3 of the batter and fold in cocoa powder
  9. Put batter (both plain and chocolate) in separate piping bag, snip the tip
  10. Pipe the plain batter into the pan and top with the chocolate batter
  11. Place the pans in the cold oven. Turn the oven to 150degC fan forced and bake without opening the door til cake is cooked when skewer comes out clean (mine is about 25 minutes)
  12. Cool the cake in the pan for 15 minutes then invert onto a rack
  13. Store in an airtight container


This is the bake for Bake Along event hosted by Zoe from Bake For Happy Kids, Joyce  from Kitchen Flavours and Lena, from Frozen wings

Please check out below others baked the same cake with their own brilliant modifications

Thursday, January 17, 2013

Quiche Lorraine

I always love quiche
Last time before I started being active in the kitchen, I always bought quiche in Delifrance
Very yummy savoury snack but I always found it too pricey
So happy I can make one myself now and it's really surprisingly easy! :)


This recipe received many great reviews and it's in the 5 star category
Now I know why, it's fabulous!

What you need:

For the filling:
170g thick cut bacon, cut into narrow strips
2 large eggs
2 large egg yolks
300ml half and half
1/4 tsp salt
1/4 tsp ground white pepper
a pinch of grated nutmeg
1 cup grated gruyere

For the flaky butter crust:
140g plain flour
1/4 tsp salt
100g unsalted butter, chilled and cut into pieces
2 tbsp ice water

Method:

To make the dough:
Combine flour, salt and butter in a medium bowl, and mix with pastry blender on your fingertips til the mixture  resembles coarse crumbs. Add water 1 tbsp at a time and mix til the dough comes together and no longer dry, do not overmix. Form into a disk, wrap in platic wrap and refrigerate for at least an hour
  1. Roll out the dough on a lightly floured surface to 28cm circle, fit into pan (22cm pie pan with removeable bottom), trim the edges and allow to rest again in the refrigerator for at least 30 minutes
  2. Preheat the oven to 190degC
  3. Line the pastry with parchment paper and fill with pie weights or dried beans. Bake til the crust is set, 15 minutes. Remove the paper and beans and bake til golden brown, 10 minutes. Remove from the oven and cool on a wire rack. Leave the oven on
  4. In a medium skillet, cook the bacon til crisp and the fat is rendered, about 5 minutes. Remove with a slotted spoon and drain on paper towels. Discard the fat or reserve for another use
  5. Arrange the bacon evenly over the bottom of the baked crust
  6. In a large bowl, beat the eggs, yolks, and half and half. Add the remaining ingredients and whisk to combine. Pour into the prepared crust and bake until the custard is golden, puffed and set yet still slightly wiggly in the center, 35 minutes
  7. Remove from the oven and let cool on a wire rack for 15 minutes before serving

Yum yum yum....
I will definitely make this addictive savoury snack again..and again :)


Sunday, January 13, 2013

THB #13 - Dark Chocolate Almond Cake (Happy Call)

Two years is fast! LBT turned two on Friday, hence the challenge for this month, any bake for celebration :)
So I chose to bake this yummy chocolate cake, decorated with sugar cookies which happened to be requested by Ian :)

I baked this yummy chocolaty cake in conjunction with the 13th bake for The Home Bakers, a recipe chosen by Jocelyn from Riceball Eats, from the book  "Coffee Cakes" by Lou Seibert Pappas
This time I baked using Happy Call pan and I was satisfied with the outcome
Soft and chocolaty, tasty too. A bit crumbly, perhaps cos I overbaked it a little
Very similar to brownies, but not the fudgy type
Very well received by my family, including the kids :)

I had only chopped almonds which I blended briefly, so I still could taste a little crunch from the almond bits :)
I used bittersweet chocolate and strong brewed coffee. I guess the coffee was a bit too strong I felt the cake was not sweet enough. Since I love the slight coffee taste in the cake, I would still use the same kind of brewed coffee and used semi sweet chocolate instead to get the right sweetness to my liking

Here for presentation I sliced the cake to bite size small squares
It's surprisingly pleasant to munch the cake together with the cookie :)


Please view Jocelyn's site to view the full recipe for the chocolate cake
As for the sugar cookies, I used the same recipe I made before from Rima


So glad I finally managed to find time to participate in The Home Bakers event this time, after I missed out the previous bake :)
This event is hosted by Joyce of Kitchen Flavours
Please visit HERE if you're interested in joining the fun :)

And to LBT, happy 2nd birthday! So glad to be able to share baking experiences together with the ever growing number of members, many turn to best friends :)
Many more years to come. Cheers!

Wednesday, January 9, 2013

Apple Stuffed French Toast (Martha Stewart)

My weekdays breakfast can be very boring. Due to the morning rush to prepare the kids to go to school, I don't have the luxury of time for breakfast preparation
Everytime is just the simple same kind, very limited variety
Moreover, my weekdays breakfast is very lonely, only me myself, since the kids and DH always leave house very early
So to me, weekends breakfast has to be more special. It's the only time we can have it together

I have a long list of breakfast ideas, but many times lazing around on bed a little longer than usual on weekends attracts me more LOL
Our special breakfast ends up is just pancakes from premix or simple french toast hehehe...
Perhaps I should make this as one of my New Year's resolution to make our weekends breakfast even more special than our special last year :P

I kickstarted my this resolution with this sweet baby...


I drooled the first time I saw Martha demonstrated how to make this delicious breakfast together with her mum
Finally I made it, and my, this really made my tongue danced in joy!
 
Look at how moist it is!


The day before, I baked my favorite brioche recipe and used it the next morning for this french toast

Recipe is from Martha Stewart's video HERE and HERE
Original recipe used pear, I used US fuji apples instead

What you need:

brioche, sliced ( my brioche was so soft it's quite difficult to get thin slices, hence my thick french toast LOL)

any apple of your choice (I used 4 of the sweet US fuji apples)
2 tbsp unsalted butter
1 tbsp sugar

6 eggs
zest of a lemon and an orange
juice from half an orange
juice from 1/4 lemon
about more than 1 cup of fresh milk
a big pinch of salt
2 tbsp sugar
1/4 cup pear brandy (I used 1/8 cup dark rhum)

enough butter for frying

Method:
  1. Heat pan and add in butter, let it melt
  2. Add in apple and sugar and let simmer while stirring occasionally til apples turn soft and juicy. Set aside
  3. In a large wide bowl, mix eggs and milk, whisk with fork til well mixed
  4. Add in zests, juices, salt and sugar, mix well
  5. Add in rhum, whisk til well incorporated
  6. Dip brioche and quickly lay it on a wide plate
  7. Arrange apples on top, dip another brioche and put it on top of the apples
  8. Put it on a buttered pan over medium low fire and let the bottom browned
  9. Flip to the other side and let it browned too
  10. Serve warm with icing sugar and maple syrup

Oh, don't forget a cup of hot coffee, a big cup :)


Friday, January 4, 2013

Happy New Year - Another Feast, A Boozy Night

After the big spread we had on Xmas Day, we indulged another round for New year :)

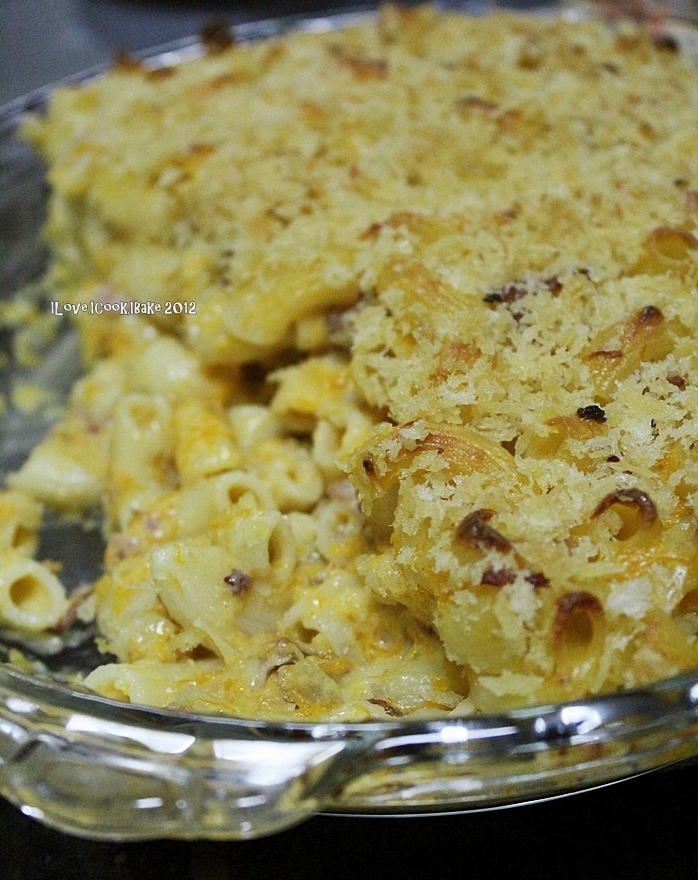
Pumpkin bacon macaroni cheese
Incredibly tasty, cheesy and creamy, yum!


Recipe is from Brown Eyed Baker
 
What you need:
 
12 slices thick-cut peppered bacon, cut into ½-inch pieces (I used 10 slices back bacon)
½ butternut squash, finely diced (I used 1/4 japanese pumpkin)
½ yellow onion, finely diced
salt and pepper, to taste
8 tablespoons unsalted butter, divided
4 tablespoons all-purpose flour
3 cups whole milk
2 cups gruyere cheese, shredded, divided
2 cups sharp cheddar cheese, shredded, divided
16 ounces cavatappi pasta (I used 400g elbow)
1 cup plain breadcrumbs (I used panko breadcrumbs)
 
Method:
  1. Preheat oven to 200degC
  2. Butter casserole dish of your choice
  3. Heat a large pot of water over high heat for the pasta, cover
  4. In a pan, fry bacon with a little oil til crisp. Remove from heat to a towel lined plate to drain
  5. Set aside 2 tbsps of bacon grease in the pan
  6. Adjust heat to medium low, add in pumpkin and onion to the bacon grease
  7. Cook, stir occasionally til pumpkin and onion are browned and soft
  8. With a wooden spoon, mash up the mixture. It doesn't have to be completely smooth, leave some chunks in for texture
  9. Add pasta to the boiling water and cook according to the box instruction - cook al dente
  10. When cooked, drain it in a colander
  11. For the sauce: In a large pan, melt 4 tbsps of the butter over medium heat. Whisk in flour and cook for about 1 minute, until the flour start to brown a bit and smells nutty, whisk constantly. Slowly, add in the milk. Allow the sauce to come to a simmer, stir occasionally
  12. Stir in both cheeses, adding a handful at a time and stir til completely melt each time - it's about 1 1/2 cup each in all
  13. Season with salt and pepper, off heat
  14. Add the cooked pasta, bacon and pumpkin mixture to the sauce. Stir til it's completely combined. Pour the mixture into the prepared casserole dish
  15. Melt the remaining 4 tbsps of butter and mix with the breadcrumbs
  16. Sprinkle the macaroni cheese with the remaining 1/2 cup gruyere and 1/2 cup cheddar cheese. Sprinkle the breadcrumbs mixture on top of the cheese
  17. Bake until browned and bubbly, about 20 minutes
 
 A hearty red meatballs carrot soup prepared by my mum
This is cooked by many Indonesians, a dish easily found in wedding dinners and Chinese food restaurants in the country


Recipe is from my mum
 
What you need:
 
1 chicken bone
a pot of water
200g minced chicken
half a can of luncheon meat, diced and put into food processor til smooth
1 tbsp fried onion, finely crushed
4 large tomatoes, cut into chunks
1 onion, diced
4 carrots, diced
5 frozen chicken sausages, sliced
a little butter, salt, pepper, sugar, nutmeg, tomato ketchup
corn flour diluted in water (2:1)
 
Method:
  1. Bring a pot of water with chicken bone to a boil, discard the residue
  2. In a small pot, bring to a boil tomatoes with a little of the chicken stock til tomatoes turn really soft. Transfer to another pot with a strainer and add into the chicken stock, let it simmer
  3. In a pan, heat butter and sautee onion til soft, transfer to the chicken stock
  4. In a large bowl, combine chicken, luncheon meat, a little salt and pepper, fried onion
  5. Shape into balls (my mum prefers to shape into oval shape) and put into the chicken stock
  6. The balls are cooked when they float
  7. Add in carrots, stir well
  8. When the carrots are half cooked, add in sausages, stir well
  9. Add in seasonings to the soup - salt, pepper, nutmeg, tomato ketchup, sugar
  10. Adjust the taste, bring to a boil
  11. Add in diluted corn flour and stir til the desired thickness achieved
  12. Bring to a boil one more time and turn off heat
 
Now is dessert time! What better dessert can be made so boozy other than tiramisu LOL
A super boozy kind we made this time, it's extremely yummy and addictive. The only thing forced us to stop eating this was when we felt our cheeks getting warmer LOL
A big NO for those kids keen to try :)


Recipe is from Annielicious
 
What you need:
 
8 tsp instant coffee powder (I used Nescafe Gold)
8 tsp caster sugar
10 tbsp kahlua
500g mascarpone cheese
200 ml chilled whipping cream
2 large eggs
2 packs of sponge fingers (Annie has emphasized in the importance of using a good quality sponge fingers but I was too lazy to find the brand she used, I just grabbed any brand I could find in supermarket hehe... I will find the particular brand Annie mentioned, Cantreau brand Savoiardi - to experience the difference)
cocoa powder (to sieve on top before serving)
 
Method:
  1. In a bowl can fit the length of sponge finger, mix instant coffee powder and caster sugar in a bowl. Add 8 tbsps kahlua into the coffee mixture. Stir til all completely melted. Set aside
  2. Beat cold whipping cream til stiff. Once done, put the cream back to the fridge
  3. Separate egg whites and yolks. Beat egg yolk til pale
  4. In another clean and dry bowl, beat egg whites til stiff peak
  5. Add mascarpone into a mixing bowl and add in egg yolk, mix well
  6. Add in whipping cream, egg whites and 2 tbsps kahlua into the mascarpone mixture. Mix til everything incorporated. Put the whole bowl back to the fridge
  7. Prepare a removable base cake tin, line the sides with baking paper. No need to line the base. Using mousse cake ring is the best way to make great looking tiramisu. But if appearance doesn't matter, you may use any kind of dish with approximately 5 cm height at the sides. I used 22 square pan, perfect for me
 
To assembly:
 
1st layer:
Dip sponge fingers (sugary sides  down) into the coffee mixture, dip half part of the sponge fingers. The next time I make this again, I'll dip the whole thing to get the maximum moistness of the whole tiramisu. Dipping half part gave me still dry parts of the sponge fingers here and there which I don't prefer
Cut sponge fingers to fit the pan if neccessary (I didn't need to do that)
 
2nd layer:
Spread half the cream mixture on top of the sponge fingers. Sift some cocoa powder (I didn't add cocoa powder for this 2nd layer - which I regretted. I'll add for the next try )
 
3rd layer:
Repeat the step for 1st layer. Dip the sponge fingers into the coffee mixture (this time sugary sides up) and put another layer of the sponge fingers on top of the cream
 
4th layer:
Cover with the remaining cream on top
 
Keep the tiramisu covered in clingwrap overnight
Sift cocoa powder just before serving
If mousse ring or removable pan is used, use a sharp knife to run around the base of the cake, carefully transfer the cake to a plate or serving dish
You may cut the sponge fingers into half and arrange them all around the side of the cake and tie with ribbon for a pretty finishing touch
 
Why my version was real boozy?
After left overnight in the fridge, I tried my first bite and found that some of the sponge fingers were quite dry, so I literally poured the remaining coffee mixture added with some kahlua at one side of the cake, tilting the pan so the liquid run through all over the bottom part of the cake, let the sponge fingers absorbed all of it
It's an idea based on logic to wet the dry spinge fingers. It worked,  but boy, what a strong kahlua based dessert we had! LOL
 
We still had a few dry parts at the centre of the cake from the sponge fingers at the 3rd layer, though but we enjoyed it to the max
it's super yummy!
 
The making process - especially to make the cream was a little troublesome, since I only have one stand mixer, so a few times of washing required
But believe me, it's really really worth it! :)
Tiramisu lover, this is a must try!
 
Besides dessert, as if it's not boozy enough, my sis made one of any girl's favorite drink, frozen margaritha


And DH bought this, first time we tried and fell in love with it at the very first sip! Nice, light, so fruity, refreshing!


Oh and DH managed to find a bottle of Erdinger beer in the fridge, out favorite beer besides Paulaner :)
 
To go along with the drinks, my sis also stocked up on many savoury munches - chips, nuts, cheese balls. Perfect!
 
 
So, do you think it's a feast? LOL
It was to our family. We are still stuffed everytime thinking of what we had for the just over Xmas and New Year :)
Well, we definitely had so much fun, that what's matter the most :)
 
HAPPY NEW YEAR EVERYBODY!

LinkWithin

Related Posts Plugin for WordPress, Blogger...